Pages

Sunday, February 23, 2014

A First Time For Everything...

{Scrapbook Layout}
 
 
Congrats to our Featured Entry and Winning Commenter of last week's linky party!
 
 
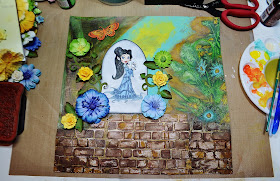
It's time for a new linky party to open at Make It Monday and our sponsor this week is the talented  Kenny K. So what is the first for me? A scrapped digital image layout. I really had no idea where I was going with this image until I used SB's Arched Window One die to frame her. A light bulb went off and I set out to create a view from her window. My LO definitely evolved over the three days I worked on it. Last week was a bit rough and this project helped provide some creative therapy for me.
 
So who's the pretty lady in the frame? She's Kenny K's Elf Queen digital image and I absolutely love her! I colored her with Copic markers and added some detail to her hair with Faber-Castell Pitt Pens.  
 
  
Here are a few ;) photos of the process and it does include another first for me...
 
I altered a MME glittered paper by sanding the
dp. It removed the glitter and left a faint
shimmer. I'm kind of liking this idea. :) 
 

Then I used a silver Adirondack dabber to cover
the brown bg and polka dots. A water bottle was used
to soften some of the areas.

To build my castle wall I used a stencil - MPD
Brick Wall and modeling paste. Here's how I did
it-lay your stencil down and use an old
credit/gift card to apply the paste over the stencil.
I kept moving my stencil and repeating until I
was happy with my wall. Sorry the photo is so
dark, hopefully you can see the dimension
that modeling paste adds. Using a blow dryer
set to low I dried it then sprayed with various
ink sprays. For detail and shading I used
FC Pitt Pens in brown, dark
sepia and black shades.

 
To tone the silver down on the top part
of my LO I used a thin coat of white gesso
and brushed it on. I started applying
acrylic paint to create my background
and a script roller stamp came in handy
to add some detail. 
Note: I used the metallic silver to create
depth under my brick wall and add a bit of shine.
The flowers on the right side were brought to life
with FC Pitt Pens. I kept adding layers
of color until I was happy with the look.

 
At this point my brick wall and background are
finished and I can move on to the embellishments.
Oops, almost forgot to show you how I made
the window frame.
 
 
I used my SB die as a template and drew around
the outer edge and roughly sketched the inside, fussy cut
it out and using my brick wall stencil again I sprayed
over it with Cappuccino Perfect Pearls on white cs.
I cut the bricks out individually and placed them
at interval spaces on my frame. The mortar
(modeling paste) was applied with a brush and 
colored with FC Pitt Pens.
 
 
I used another SB die-On the Vine
Borderabilities (for my flowers to grow on)
which I sprayed with water to manipulate
the leaves. It was distressed with Vintage
Photo Distress Ink and a Unity stamp.
When looking to add texture with a stamp
choose one with no particular pattern
so you can use it all over. I randomly stamped
the paper flowers, background, brick wall,
and butterflies with it. 
 
 
The next step was to use various sprays-shown are
Dylusions Cut Grass, Melted Chocolate and Perfect
Pearls Cappuccino-to give my vine an aged look. If the
color is too dark use water to dilute it in a mister.
Note: I always spray first on a scrap piece of paper to check
the true color of the ink before spraying it on my project.
 

The pretty Dusty Attic chipboard butterfly was
altered with Twinkling H20's as well as the wood
flourishes and leaves. I gave each a thin coat of gesso
first so they'd absorb the color better. Love the sparkle
of H2O's! 
 

A pretty gemstone butterfly by Recollections.
 
 
I altered the lace with gesso and
Adirondack Butterscotch ink spray
then added a row of pearl trim.
The miniature roses were in my stash already
and to get that beautiful blue shade I used H2O's
again. The remaining paper flowers are
by Recollections.
 
 
I plan to frame this and keep it in my craft room. These are my happy colors-blue, yellow, green-and it will provide a bright spot for me and a reminder that beauty is every where.
 
 
Joining along with the following challenges:
(used a chipboard butterfly, lower right) 
(I distressed my image, On the Vine die, flowers, washi tape, brick wall/window, etc.)
(used elf digital image)
(see photos above for detail on how I created my own background)
 
 
Edited: I do not have a POTW this week, my MIL passed away on Friday and my teamies were gracious to help me out with my commenting. I'll be back in a few days and will catch up with everyone then.  


SPONSOR


Thank you Kenny K for supplying digi's for the DT to create with!
For prize info please check the challenge blog HERE.


For more inspiration drop by my teamie's blogs and check out their amazing creations.
(Their links are on my right sidebar)
 
 
Hugs,
Lisa


Saturday, February 22, 2014

From Me to You


**Something Spooled**
 
We have a brand new challenge for you at The Squirrel and The Fox and it seems to be a popular choice among paper crafters.
 
Here's what we are looking for...
 
Ribbon
Twine
Lace/Trim
Stitching-with thread
Washi Tape
Embroidery Floss
etc.
 
Basically if it is on a spool you are good to go. :) Make It Crafty is our sponsor and the DT had fun playing with Zoe's amazing images. I used Sassy Violet for my hubby's upcoming birthday. She definitely has some attitude (just like me lol) and I think he'll like her. Since he's a mechanical engineer I couldn't resist using a Gears Stencils by MPD for the background and I added dimension by applying modeling paste directly over the stencil then carefully lifting it. I colored the panel with a red Faber-Castell Gelato and highlighted areas with a Caran d'Ache black watercolor crayon. I tore bits of washi tape and used it in various places to mimic electrical tape. Tim Holtz metal embellies, a bottle cap, wood gears (that were altered with a coat of gesso and painted with a silver Adirondack dabber) and some gauze sprayed with ink spray complete my card. Oh, and most importantly ;) is the ribbon and metallic twine which add a bit of sparkle.
 
 
SPONSOR
 
Make it Crafty
 
Make it Crafty will supply two prizes for this challenge:
One for the winner and there will be a separate draw for those using a MIC image.

Both prizes are a AU$10 voucher to spend in the online store.
 
A big thank you to MIC for supplying the DT with images to create with!!!


Okay, it's your turn to share "Something Spooled" at The Squirrel and The Fox. Good luck to each of you and congratulations to the winner of the Love challenge and Top 3!
 
 
Edited: On a personal note, my MIL passed away yesterday so I may be scarce in blog land for a few days. I'll be by to visit when things calm a bit and would greatly appreciate it if you'd keep my DH and his brother in your thoughts and prayers.
 
Hugs,
Lisa


Tuesday, February 18, 2014

Puppy Love


**Stitching**
 
That's our new challenge at Top Tip Tuesday and you're free to choose which type of stitching you prefer-needle stitching, hand stitching or faux stitching. Deneen has some fabulous tips for all three types on the challenge blog which you might find helpful. I always default to faux stitching because I guess I have a phobia of sewing machines lol. Maybe it's my bad sewing experience in high school Home Economics (don't know if they call it that anymore, it's been a while) but a ruler and marker/pen work just fine for me. Which leads me to my Top Tip- I used a ruler (as a guide) to free hand my faux stitches and a fine point marker.
 
My choice of image to create with - Patches the Dachshund Dog - is by our sponsor 2 Cute Ink. They supplied the DT with three images so check out what my teamies created with the other two. The embellishments were kept to a minimum because this one is going in the mail soon.
 
 
SPONSOR


Prize is winner's choice of 2 free digital stamps.


That's all for me today, hope you'll join us for our stitching challenge! 
 
Crafty Hugs,
Lisa xx  

Sunday, February 16, 2014

Live Laugh Love

 {art journal page using sponsor's image}
 
It's time to kick off a new linky party at Make It Monday where your new or old paper creations are always welcome. We're sponsored this week by the popular Bugaboo Stamps and I adore their images. I used Live-Laugh-Love-Flower Fairies to create this mixed media page in my art journal. I'll share a few pic's to show you how in just a minute but first I want to congratulate our Winning Commenter and Featured Entry from last week. I also want to encourage you to visit my teamies to check out their inspiration using the images that Bugaboo provided the DT with. Thank You Bugaboo Stamps!
 
To create my page I printed my image on white cardstock, trimmed and set aside.
Chose four Gelatos to color with and black to do shading.
I grabbed my water brush and my water bottle. The picture below is just to show the colors I used, we'll get to that stamped image in a minute. It was a mid project decision to share my process so bear with me. ;) 
 
 
I filled the water brush to wet the tip and activated the Gelatos by spritzing them with water. To create my background I dabbed my brush in the color I wanted to use and began adding it to the page. Gelatos are very forgiving and you can move the color around easily which is why I love them. :) You can brush it on or swirl it around, whatever works for you.
 
Next I grabbed my Faber Castell Pitt Pens (look in upper left corner of photo above) and colored my image. I shaded with a black Gelato (again mixing with water) and used the side of my brush to add a fine line to detail the images on my digital stamp. I highlighted with a white Sakura Gelly pen and EK Success metallic silver writer pen. 
 
After I finished my digi I let it dry and stamped a leaf pattern (Dylusions) on each side of my art journal page with Staz On black ink. To create more color I stamped again on a separate sheet of cs (see photo above) and colored the leaves with Gelatos.


At this point you can add more depth to the leaves, mix lighter and darker shades together or combine all four colors. Just play and have fun! I fussy cut the leaves, outlined with a black Faber Castell Pitt Pen and added white dots along the edges (like Dyan does). I glued the extra leaves where I wanted which does two things-gives a 3D effect and highlighted color. A black Sakura Gelly pen was used to add dots along the vine and branches.
 
 
I adhered my digital image with gel medium and used Pitt Pens to outline the edges, added some cut out flowers from my stamped image to the bottom, and added a circular stamped image (Inkadinkadoo) around the edges. Oh, and a few tear drop dew drops (that's a mouth full lol) in coordinating colors to my image.
 
It was a lot of fun to create and I hope you'll give Gelatos a try if you haven't already. :)
 
 
SPONSOR


Prize is winner's choice of 7 single digi's!


My  first Pick of the Week is...
#181 Lola


This floral wreath is gorgeous! I love the spring colors Lola chose and the stitching is an extra bonus. Be sure to click her link for a better view of this beautiful card.
Thanks for sharing your talent with us at Make It Monday!


and my second Pick of the Week is...
#191 Jen Leeflang

 
I love this image and Jen's coloring brings this beautiful girl to life. Her card is called Butterfly Kisses and I hope you'll pop over and take a closer look at it.
Thanks for sharing your talent with us at Make It Monday! 


I'm entering my art journal page in the All Crafts Challenge - February/March.
 
 
 Have a fabulous week!
 
Hugs,
Lisa xx

Friday, February 14, 2014

love

{Mixed Media Canvas}
 
 
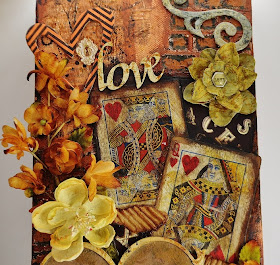
Here is the US the month of February is synonymous with hearts and love because we celebrate Valentine's Day. So how do playing cards fit into this equation? They're a requirement for the current Eclectic Paperie challenge-use altered playing cards on your project. Since my mixed media canvas has a love theme I decided to use the king and queen of hearts. I'm also going to play along with a few other challenges since "love" and "hearts" are wildly popular right now. :)


Taking a note from Broni at EP I sanded my playing cards to roughen them up a bit, then used distress inks around the edges and a Faber Castell Sepia Pitt pen to create more of a distressed tone on the face of the cards. I didn't want to cover up the fact that they were playing cards but to simply tone them down a bit so they'd blend with the canvas. I created my background by applying Golden's Fiber Paste over a MPD Brick Wall stencil in random places and letting it dry. I love the look of text in mixed media so I grabbed my Tim Holtz tissue paper and started tearing pieces to fill my empty spaces. After adhering it to my canvas I mixed my background color and used a water bottle to lighten the color in some areas for a more transparent look. Tim Holtz stamps were randomly stamped with black Staz On ink for texture. I don't have a picture of the sides but they received the same treatment. 


This gorgeous heart is from Dusty Attic and the background is actually the negative. I couldn't throw it away so I added some texture to it with acrylic paint, ink sprays and distress ink. The other chipboard pieces (love, scroll, key) were altered in the same way. (I did add a coat of Golden's Glass Beads to the scroll and key before I altered them).  
 
 
I have to confess that this canvas took a dramatic turn from my original vision but I'm happy with the out come. That's the great thing about creativity-you never know where it will take you.
 
 
I'm playing along with the following challenges:
 
Edited: Yay! I won the EP Altered Playing Cards challenge, what an honor. Thank You!!


Thanks for dropping by and I hope you like my mixed media canvas. For everyone celebrating Valentine's Day I wish you a very **sweet** day that's filled with love.
 
Hugs,
Lisa xx
 

Monday, February 10, 2014

Let's Hear It for Girly


***Girly***
 
Here I am nearly a week late with my DT post for Top Tip Tuesday {hanging head in shame} but hopefully late is better than never. I've been playing catch up this year (all month and a half of it lol) and I think I'm back on track now, hope so. Samantha is terrific for graciously giving me the time I needed to pull this card together. :)   
 
I could not pass up the opportunity to create with our current sponsor's images. I'm a big fan of - Heather Ellis - the talent behind the adorable little girl in the Pure Innocence line of stamps. I have several of her cling stamps which I regularly find at My Favorite Things online shop but Heather also sells a variety of digi's from her Etsy store. I'm using Pure Innocence 015 on my Valentine card for my sweet daughter because she loved taking bubble baths when she was little, still does. I think she'll get a kick out of the image and enjoy the spa package she's getting for Valentine's Day. She deserves it because she has worked diligently in her college studies and has made all A's since starting her freshman semester last fall. I think a little pampering is in order but don't tell her okay. ;)


I rummaged in my stash and found some extra's to add to my card like Pink Paislee's Luxe hearts, Prima's Junkyard Findings lightbulb trinket, Glitz What Nots-Love You Madly cut outs (heart in upper left corner w/numbers on it), bling, paper blossoms, crystal heart charm, clear dew drops, heart stick pins, etc... Pretty much grabbed anything I could find and you can't tell (because I covered it with all the goodies) but there's a die cut house by MFT which I used to frame her. It's actually solid so I had to use a SB circle die to cut a frame out. The scalloped roof trim is part of the MFT die and so is the little flower box (bottom left and right) with the trio of flowers. This is a fab die to have and I love mine! I'm kind of into ripping paper these days and two MME dp's were used to give depth and texture to my card. Both had a pattern so all that was needed was to squirt the edges with my water bottle, let it set a minute and then distress with edges with distress ink. I used Vintage Photo on the graph dp and Worn Lipstick on the pink dp. Afterwards I crinkled, tore and smudged the edges and rotated the panels to give it an 'off the page' look. While I was in that mode I decided to hang the ribbon off the edge too, why not. I really had a great time building this card and I hope my DD will like it. :)
 
 
SPONSOR


Prize is the winner's choice of 3 free images!


Entering this card in the following challenges:
 (I have two twine bows on my card-button and crystal heart)
(used a Glitz What Not cut out heart, crystal heart, 2 heart stick pins, 3 wood hearts)
(the word love is printed on the Prima Junkyard Findings lightbulb trinket)
(I used several hearts-crystal, wood, paper)
(Heather's PI line of digi's and acrylic stamps are a fave with me because they're so cute!)


Thanks for the visit today and I hope you've seen the awesome tutorial Deneen has on the challenge blog. She offers several ideas for making and creating with crepe paper flowers. Be sure to check it out especially that adorable pom pom flower. I'll be back next week, on time, with my next DT post for Top Tip Tuesday. Until then, have a terrific week and for those celebrating Valentine's I hope your day is filled with love and sweet memories.
 
Hugs,
Lisa xoxo


Sunday, February 9, 2014

Shades of Teal


It's time for a new linky party to open at Make It Monday!
We're excited to have Scrapper's Delight back as our sponsor this week.  
They offer a nice selection of digital images and I'm using Winter Elf on my card.  

 
I colored her in shades of teal with Copic markers and fussy cut her then set her aside.
To create my card I used a teal cs base, added a text dp by Tim Holtz, and cut two diagonal pieces from a Kaisercraft dp. I distressed all of the edges with Vintage Photo Distress Ink and used water to soften some of the edges so I could tear the paper and give it a torn, distressed look. Next I stamped the lamp post and scroll (upper right corner) with Vintage Photo then distressed the blossoms and image. Some vintage trim was added to soften the divide of the diagonal papers and two wood butterflies were distressed, glued together and topped with a resin rose. Turquoise gemstones were added to the scroll and Lagoon Stickles add a touch of bling to the diamond on the elf's hat and dress. I wanted to create some depth on the cream diagonal panel and did so by using a cosmic scroll stencil and vintage photo. I wrapped my card by using rub-on's (leaves, postage stamp and doilies) to give it a vintage feel. I'm not normally a teal kind of gal but I think I've changed my mind about this color. :)
 
 
SPONSOR
 
Prize is winner's choice of 3 free images!
 
 
For more inspiration please visit the blogs of my teamies and check out their creations.
 
 
My PICK OF THE WEEK is...
 
 
This is the cover of Linda's beautiful mini-album and it's filled with stunning pages that's a must see. Click her link to view it for yourself.
Thanks Linda for sharing your talent with us at Make It Monday!


That's all for me today, hope each of you have a wonderful week and for those celebrating a very Happy Valentine's Day!
 
Hugs,
Lisa xx

Saturday, February 8, 2014

Love


** LOVE **
 
 
That is our new challenge at The Squirrel and The Fox and it's just in time for Valentine's Day.
 
So what does my card have to do with LOVE? I made this card to give my hubby when I want to ask him for a lunch date. Spring is on its way (one can only hope) and when the weather turns warm we enjoy picnics by the lake. Nothings says love to my hubby like a meal prepared by me for him. It seems my mother was right when she told me that the way to a man's heart is through his stomach. LOL It's so true! Guess it's a good thing I like to cook. :)


I used a pre-colored image by our sponsor - Doodle Pantry - called Picnic Ants. It is so much fun to create with and it also comes with coordinating digital papers, a variety of sentiments and a non-colored image. I used "Let's have lunch" and added "hunny" with Tim's Label Letters. I don't know if you can see the embossed clouds on the blue (sky) paper, they sort of faded into the background unfortunately. A grass border was punched with a MS punch on the green (grassy) paper. Then I reached way back in my stash...way, way back...and found stickers and cut outs that would work with my picnic theme card. I grabbed some rub-ons and added some doodles and flowers. The bee in the left corner is actually two stickers with one popped up on a foam dot to give it a 3D effect and a buzzing trail was made by using Kaisercraft black pearls. 
 
Thank you Doodle Pantry for supplying the DT with images to create with!
Be sure to click their link to see all of the fab digi's (and more) they offer in their online store.
 
 
SPONSOR
 
Prize is a $10.00 gift certificate to their online store.
 
 
Congrats to our Winner and Top 3 of Challenge #62!
For more inspiration using these fab images please pay my teamies a visit.
 
Hugs,
Lisa xx
 

Sunday, February 2, 2014

XOXO


Hi all, welcome to the new linky party at Make It Monday! We have a fantastic sponsor this week - Milk Coffee - and I'm using Michelle and Her Typewriter on my card. It has a retro feel to it (which I love) and I kept the design clean and simple.
 
SPONSOR


Prize is winner's choice of 3 digi's!
 
A big thank you to Milk Coffee for supplying the DT with images to create with!


My PICK OF THE WEEK is...


Here's a sneak peek at Lynda's project. You really need to see this one for yourself, it's so pretty!
Thanks for sharing your talent with us at Make It Monday.


That's a wrap for me today, I've been under the weather with a nasty cold but hopefully I'm on the mend now. Hope all of you are well and staying warm wherever you are. :) Too bad Phil (the groundhog) saw his shadow, I'm ready for spring to arrive!!!
 
Crafty Hugs,
Lisa