Pages

Wednesday, September 30, 2015

Outgoing and Incoming Pocket Letters

Sweet Treats Group swap Pocket Letter


Hello and Welcome!

I promised to share a mixed media angel today but since this is the last day of September I'm going to to share my last outgoing PL and my incoming PL's from my pals.

This pocket letter was created for the Sweet Treats Group swap and it went out to my pal, Meghan, in New York. We both love cupcakes so I included several in the design and it's chock full of goodies. Everybody loves goodies, right!

First I'll let you in on a little secret....I discovered the Dutch magazine Flow in my fave bookstore a few months ago and it's a papercrafter's dream. They pack every issue with fun stuff which you can use in your crafting and sometimes even the articles come in handy. ;)

Check out the photo below...
{had to photograph it sideways due to glare}

One of the articles in the August issue provided the perfect confectionery background for my Sweet Treats swap. Some Flow issues are smaller in size and this one happened to be so I made up the difference with pink cardstock pockets trimmed with cupcake washi tape. :)

The Italian "La Dolce Vita" phrase was a must for this pocket letter. It means "The Sweet Life" and I hope Meghan always has a sweet life. In the far left pocket is my letter to her and the pocket on the right holds some sweet treats for her.

Row two holds my tea packet, note about me and my 3?'s for my pal.

This row is where the main goodies are-stickers, washi tape samples with coordinating baker's twine, and some fun ephemera. The green cupcake on the far right pocket is a page magnetic bookmark and it's scented. I love it and I hope she does too!

Quickly, here's a snap of the back of her pocket letter.


Now, as much fun as it is to create pocket letters for my pals, it's totally awesome to receive letters as well.  So far I have received four but since one is Halloween themed I'm going to save it for next week. Here are the other 3 letters in the order I received them.

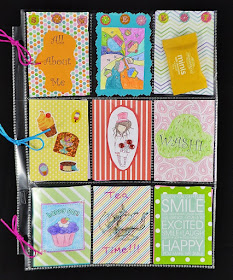
First PL from my pal Renee in New Jersey.
I love it and she created the paper using mixed media techniques. The brooch on the top row-middle can be worn or used in a crafty project.  The girl with the umbrella is so sweet and I love the digi she used for her tea pocket. Awesome pocket letter, thanks Renee!!! 


Second PL from my pal Meghan in New York.
Love the bright, fun colors of this PL and the pockets were full of goodies and sweet treats. Yay! It's always nice to meet another cupcake aficionado. Honestly, who never met a cupcake they didn't like. :) Thanks so much Meghan!!!


and last but not least is the PL I received yesterday from my Canadian pal, Tiana. 
A girl after my own heart!!! 
We decided to swap PL's with a Cats and Cute Animals theme and I am thrilled with my PL. All of the whimsical animals are hand drawn by her which just makes this over the top awesome for me. I absolutely adore this PL Tiana!!! Uh, did I mention she's 15? Yep, what a talent she is!! 

I had to include some close ups of her adorable animals. 

She created mixed media backgrounds for each and I love all of the detail.

I have such an affinity for rabbits and this sweet rabbit stole my heart.

As a bonus she included her drawings in the pockets so I can use them in future projects. Needless to say it will be for a journal or keepsake that will remain with me. :)
Thank you Tiana!!!

Okay, thanks for sticking in there with this long post today. I'll have the mixed media angel up on my blog by Friday Monday and next week I'll be sharing some fall projects featuring The Cutting Cafe's templates, printable stamps and cutting files. I'm sure a PL will be up as well lol.

Take care, wherever you are!
Lisa xx


Monday, September 28, 2015

Cats and Cute Animals

Cute Animals Pocket Letter


I shared my first pocket letter last week and today I'm back with my second one. The Pocket Letter Pals website is a great place to network with people from all over the world and every age. In fact this PL is for my teenage pen pal, Tiana. I asked what her fave colors are and she replied purple and green so that's the color scheme I went with. We mutually agreed on a cat and cute animals theme for our swap since we both love animals. :)

Here are a few close ups.

With every pocket letter you should include a greeting and a hello note. The dp worked well with the hello bubble printed on it and I spelled out friend with Glitz alpha stickers. A cute whale button was attached because all teenagers like buttons. :)  

For my "mail tag" pocket I asked her a few ?'s which she can message the answers to me. I'm pretty certain we'll exchange letters again and I'd like to get to know her a little better. The owl is a magnetic page bookmark so she can use it when studying or reading her fave book.

Also with every pocket letter you should share some facts about yourself with your pal. I altered a 7 Gypsies mini folder with washi tape and alpha stickers and included a letter with a few facts about me. There's a map on the back which shows where I live and a few quick facts about the lake I live on. This black cat sticker reminds me of my grandcat, Felix. Do you see the little mouse trying to hide?

 
I love this sweet llama and I decided to cut the sticker in two and continue it on the lower pocket. As you can see I decorated the spine of the pocket with washi tape, paper flowers and brads. The washi will remain but she can use the brads and flowers on a future project or decorate a journal, etc. for herself.

I adore foxes and we actually have a red fox that visits us regularly. It's always a treat when I see it trotting down the street or making its way to the lake to get some water. When we decided on the cute animals theme I knew I wanted a pocket with a fox and who doesn't remember this song lol. It was everywhere!


I filled the pack pockets with all sorts of goodies like brads, a key ring, stickers, vintage buttons, bling, baker's twine, washi tape samples and ephemera plus a cute paper clip. I couldn't resist sending a fox magnetic page bookmark as well. 


I really hope my pen pal, Tiana, likes her pocket letter because it was a joy to create!

I'll be back mid week with a mixed media angel that was inspired by Tamara LaPorte's Art, Heart and Healing e-course.

See you then,
Lisa xx


Friday, September 25, 2015

Pocket Letter Pals


PLP's!
That's my newest adventure on this paper journey. :)
  
Recently I discovered Janette Lane's Pocket Letters and I was intrigued. She inspired this style of pen pal writing in late January of this year and in March she launched the Pocket Letter Pals website. Under the umbrella of the PLP's you can join groups based on your interest and exchange a pocket letter with pen pals here in the US or around the globe. She designed a format for pocket letters with a few basic suggestions when sending one out to a pal and you can check out more info on Janette's blog. This is my first pocket letter and it went to my pal, Renee, in New Jersey. :)

A few photos and an explanation of the different pockets.

The left pocket expresses a greeting to my pal with a letter tucked in the back. 
In this particular group swap-Anything and Everything-we were asked to create a pocket letter with different colors and themes. My letter for Renee reflects her favorite things-flowers, lace, washi tape, brads and includes the items which are also to be included such as a packet of tea, letter to your pal, an about me pocket, quote, and a mail tag with questions for my pal so we can get to know each other better. 

My story is included in a note about me which I tucked inside the altered 7 Gypsies small file folder. The quote by Richard Dumb is from a stamp set by My Favorite Things and the pocket on the right has the mail tag with 5 ?'s on the back with I spelled out "choose 3" with alpha stickers. 

The third row of pockets holds a pack of brads, a tea bag (on the back) and a stamped inspiration with a butterfly theme. 


Janette encourages sending goodies that range from stickers, ephemera, die cuts, washi tape, tea, etc.....so the back of my pockets are chock full and you can see that I included a few items on the front as well. After all, Renee is my first pocket letter pal and that makes her special. :)


I included flowers (which she can color to match any project), vintage buttons, wood flowers and butterflies, lace samples, a small bag of micro beads, canvas butterflies and all of the other goodies that were suggested. You'll see on the 2nd row far right pocket that I attached a map of my location with a few quick facts about the lake I live on. For me, one of the best things about a pen pal is getting to know where they're from and what it's like where they live. 

Each pocket is ATC size which is 2.5" x 3.5" and baseball trading card protector pages are used to house your letter. After it's finished place it in a #10 (legal) size envelope and if your letters are like mine (chunky) you may want to buy a pack of plain manila envelopes to mail it in. I buy all of these supplies at Wal-Mart in the office supply section.

Using a template by Mirkwood Designs, I created this vellum envelope and it's perfect for my sweet gift of Ghirardelli chocolate. Hope she enjoys it!


I've made my 2nd pocket letter already and it was for my teenage pen pal, Tiana. I love the way it turned out and can't wait to share it next week.  

Have a wonderful weekend everyone, wherever you are!
Lisa xx


Wednesday, September 23, 2015

In Black and White

{loved drawing pigtails on this girl}


Hello and Welcome!


I'm back to share some of the girls I sketched from Tamara LaPorte's Art, Heart and Healing E-Course last spring. I'm a newbie when it comes to drawing and recently shared my first mixed media girl, in color, from Tam's course. You can see Lucy here in case you missed the post. 

I love how Tam uses color in her mixed media and her whimsical creatures are fantastic. It's a free e-course for those who sign up to her newsletter and you'll find that there's a lot of drawing content in this course. If you don't need the healing part then follow Tam's recommendation and skip it. 

I took the course because it was 
1. Free 
2. I love her art 
3.She's an awesome teacher 
4. I wanted to learn how to draw whimsical creatures

You can visit her blog and click on the banner at the top right to join if you're interested.   
I highly recommend this free e-course!


I made notes on my page while Tam was instructing and refer to them when needed.  


I found it beneficial that she also teaches you how to draw different articles of clothing, shoes, styles of feet and hair. I'm telling you, there's a lot of art content in each video and it's all for FREE. 


In the 4th video Tam taught us how to draw an angel and I can't wait to share her with you next week. I have a sketch of the initial angel I drew plus another angel which I colored with some of Tam's favorite watercolor mixed media products. 


In the meantime, I hope you'll visit me on Friday when I introduce another "new to me" adventure right here on my blog. 

See ya then!
Lisa xx

Monday, September 21, 2015

File Folder Box Holder Template and Cutting File


The design team at The Cutting Cafe is playing with a versatile set that has so many uses. It's the 


and I love it. I have several friends who love the idea of giving a handmade card yet they aren't crafty. That gave me the inspiration to create card kits for them and the File Folder Box Holder Template and Cutting File is the perfect packaging. 


I added strips of a coordinating dp and embellished it with 3 paper flowers.


There are various styles of labels in the cutting file to use. Since this is a Parisian themed thank you card set I spelled out "merci" using Authentique alpha stickers. 


The opposite side.


These are so much fun to create and they're going to make great Christmas gifts this year. :)


I'll be back next week with another File Folder Box Holder Template and Cutting File project plus a Snapguide tutorial for you. Last week was crazy busy!!! We traveled to visit our son and DIL and have a double birthday celebration party with them. Hers is tomorrow and his is on Wednesday, now how neat is that! Also I missed posting my second mixed media girl and I'll have a make up post on Wednesday. With getting ready for the trip, buying birthday gifts, making party food and a sick puppy for three days during the week all prior blog posting plans went out the window lol. 

If you'd like to win 3 FREE Sets from The Cutting Cafe visit the blog, leave a comment on the design team post and you'll be automatically entered into the drawing. Regina will announce the winner on the 7th of October. 

See you on Wednesday!
Lisa xx

Thursday, September 10, 2015

Fall Mixed Media Canvas


Fall is nearly here and personally I couldn't be happier! I decided to celebrate by creating a mixed media fall canvas that features the 3-D Pumpkin Template...Cutting File by The Cutting Cafe. While this template creates the cutest 3-D pumpkin for holiday decorating, I used it as a template for my fall canvas. It's a huge time saver and frankly I don't have much experience drawing pumpkins lol. 

I have a complete step by step Snapguide tutorial to share with you below. The steps can be used to create any themed canvas you like. I hope you enjoy it. 


To view all of the wonderful templates and cutting files visit The Cutting Cafe. It's not necessary to own an electronic cutting machine as Regina offers each cutting file in a PDF as well. 

I'm off to fix a quick pasta dinner for one. My hubby is fishing with a friend and it's just me and my fur baby here tonight. Think I'll watch my favorite chick flick - Under the Tuscan Sun.

Ciao!
Lisa xx

Tuesday, September 8, 2015

Say Hello to Lucy


Hello and Welcome!

Hope everyone here in the US had a wonderful Labor Day holiday. Ours was busy but we had a great time visiting with our kids and furry grand babies. :)

As I mentioned in my previous blog post I'm sharing something new here on my blog. I discovered Tamara LaPorte's blog - www.willowing.org  - earlier in the spring and fell in love with her whimsical mixed media art. After watching her FREE 4 Week E-Course titled Art, Heart and Healing I was inspired to do something I haven't done in a long time...draw. This is one of Tam's mixed media girls from the class and I named her Lucy. It's a little intimidating sharing your art with others and for the past several months I've kept it a secret. Today I'm choosing to step out and share the girls I've been creating in my art journals. Over the months I branched out and you'll be able to see that progression weekly here on my blog. 


"Inspiration does exist, but it must find you working."
                                                     -Picasso


Lucy is an independent spirit whose destined to blaze her own trail. 
Hence the quote below by Dr. Seuss.

I typed up the quote using Adler font, cut the word strips out and used a black gel pen to scribble a border around each one. Liquitex Gloss Gel was lightly brushed on the back and they were glued in place.

Whimsical people/creatures share three traits-

big heads
small bodies
overly emphasized features

and I just love them!


I'll be back later in the week with a Snapguide tutorial featuring a fall cutting file from The Cutting Cafe. Thanks for looking today!

Lisa xx


Friday, September 4, 2015

Sweet Gifts


Happy Friday everyone! 
As promised I'm back with my design team project for The Cutting Cafe. Regina asked us to showcase her adorable milk carton templates...cutting files and I was happy to. We have several birthday's coming up in our family and these make great packaging for gift giving. They also make great party favors and they're super fun to decorate. Can't you see one all dressed up for Halloween or Christmas and filled with candy! Click here to see the pumpkin milk carton I created last fall.

As I mentioned in my previous blog post I am introducing something new here at Adventures in Paperland. I am now offering Snapguide tutorials for my design team projects as well as other creations I want to share. You'll be able to see how easy it is to create with Regina's templates and cutting files. It also gives me an opportunity to share some tips and tricks along the way. 


The Cutting Cafe


Here's a second milk carton I put together using the same steps in the tutorial. The only changes were the Pumice Stone Distress Ink I used to distress the paper edges and I chose two different designer papers from the same collection. 


Before I go, I want to wish my fellow Americans a happy and safe Labor Day weekend. We're off to visit our kids and enjoy some time with them. It's cool having grown up children and totally okay to be an empty nester. Course, I wouldn't have said that two years ago. ;)

I'll be back on Tuesday with another "new" for me. In the meantime you can click on any of my social media pins to connect with me.

Take care,
Lisa xx