Showing posts with label Halloween. Show all posts

Sunday, December 31, 2017

Before 2018 Rolls in....

Christmas Countdown Pocket Letter for Katrin 


Before 2017 closes I  thought I'd share a few projects that never made it to my blog. Some I made and some were incoming happy mail from friends around the world. This hasn't been the best year for me as a blogger and hopefully I can make a better show of it in 2018. 

Second page of my Christmas Countdown PL

It has been a bittersweet year as I had to say goodbye to my mom in February after her long battle with Alzheimer's. She was the last of mine and my husband's parents to pass away and it's just profoundly sad. I miss both of my parents as well as my in-laws every day. It's good to know that they are in a better place and that we'll see them again one day. That is what keeps me going! 

Last Page of my Christmas Countdown PL

On a lighter note, in May our daughter graduated college and we treated her to a 3 week graduation trip to California. We made so many memories and it was a wonderful adventure. The remainder of the year has been insanely crazy but the best part is that I've been reunited with so many personal friends this year. I love that!!! Some of us just drifted apart as life literally took us in different directions but the mark of a true friend is that you can pick up where you left off. 

2017 is a year that gave me clarity, closure, peace, happiness and laughter. I certainly hope it was a good one for all of you and that 2018 will be awesome! 

Now for those projects beginning with one I should have shared back in May :(

My daughter's college grad card which was inspired by a card I saw on Pinterest. I made the grad hat by die cutting and embossing a square die by Spellbinders and making the tassle using embroidery floss. The mini diploma is rolled paper tied with ribbon and it was a fun card to make. I stamped a quote by Eleanor Roosevelt on the inside left side and another grad sentiment on the right. Easy peasy!

Front side of a loaded envelope I made for a swap with my friend, Aparna, in India.

Back side has her name and more pockets filled with crafty goodies. 


There were so many new babies in our church this year and this was the first arrival, Mia Jane. Love G45's Little Darling's collection for creating quick and easy baby cards. 

When it was time to welcome John Charles into the world I turned to the same collection as before. This card was one of my #bestnineof2017 cards on Instagram. I had to temporarily set my account to public to do this but glad I did. Unfortunately due to spam and all the unwanted followers requests by strange men I had to set my account to private. So sick of these trolls on Facebook and Instagram. Get a life!

My friend from Germany, Katrin, loves Halloween and every year we swap a themed project. This year I decided to alter a paper mache house I purchased from Hobby Lobby. Here is it wrapped up with ribbon ready to be shipped.

Back side of house and roof.

I filled the inside with crafty goodies. :)

Katrin snapped this photo for me and once it arrived she placed battery operated candles in the house and used it as a night light. So happy she loved her Halloween house!

This is a collage I shared on Instagram showing the card I made for her using a cool stamp from Northwoods Rubber Stamps. 

Now for the project she made me....a special request.

She made a fabulous shadowbox in 2016 so I requested another one and this one is lighted. I just love it and her attention to detail is fantastic. Super fun swap!!!


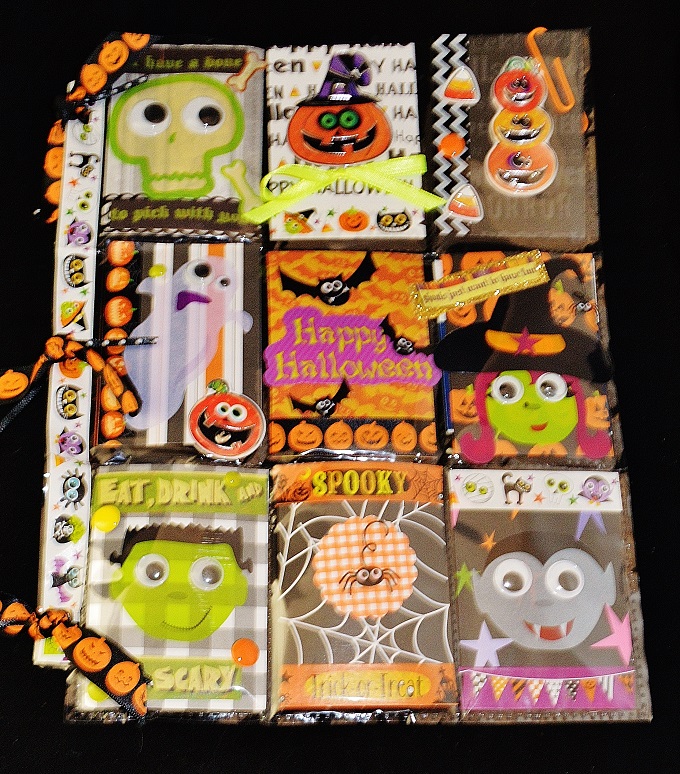
Next up is a pocket letter that I made for a new pal, Christina Betts, in Canada.

She has a black cat named Indy so the pocket at the top far right is dedicated to her feline buddy. I did a lot of layering and this is really a terrible photo but in person it was colorful and full of little details to ponder over. She loved it and that made me so happy as she makes beautiful creations. She filmed a You Tube video when she unboxed my package if you want to check that out here


Okay that's all for Halloween now on to a flip book I made for a brand new pal in Spain. 

Front Cover using a dp by Paige Taylor Evans for Pink Paislee.

Love using puffy stickers and adding crepe paper to the bottom of the tag on the right.

On the left here and below I used paint chips from the hardware store to create pockets and I love to do that. This little book has it all - wood veneer, puffy stickers, washi tape, labels and fun ephemera.


The cards on the right are a printable that I found on Pinterest. I used a corner chopper to round the edges and I had to use Tim's "remember to play" chit chat sticker. ;)
A cute book with more pages that can be view on my Instagram page at lisa_snowdy.

Last but not least I received this vintage Christmas book paper flip book from my pal, Aparna. 
This is the outer cover and I love the large doily she used. Also love the way she decorated the envelope she mailed it in as well. You can see more of the incredible book papers she used on my Instagram page.


Well the ball has dropped in the eastern time zone here in the U. S. and it will be our turn in 40 minutes or so here in central time zone so I'm going to wrap this post and wish all of you, everywhere, a very Happy New Year!!! 

I'll see all of you on Wednesday, the 3rd, for my ABC design team post. 
Crafty Hugs,
Lisa 


Friday, October 27, 2017

Happy Mail from Christina Betts

Halloween Card designed by Christina Betts


Hello and Welcome!
I have some happy mail to share today that came from my new pal, Christina Betts, in Canada. I reached out to her after I watched several of her You Tube videos and Instagram posts to see if she'd like to swap. She's a real talent and I'm tickled to have one of her pocket letters and a beautiful card. Thanks for the amazing swap Christina! 


Her pocket letter is a Fall / Halloween themed pocket letter and I love it! 

Christina's pocket letter :)

Love the currently card and we want the same thing Christina. I think every mom does!

I pulled the shaker pocket out so you could see it better.

Love the spooky bats on this fab house. 

I'm a sucker for fall leaves. 

Christina used an image from Andrea Gomoll for the swap tag. 
It's colored beautifully and I love it!

The back of her pocket letter is full of goodies.

Love the washi tape and so excited to have a Starbucks card which I'll be sure to put to use soon.
Thank you Christina!

Christina colored another image by Andrea Gomoll and scanned it then printed out extra copies. She used one, which you'll see below, to decorate the envelope with my letter.

I love customized ribbon!

Here's the image again and love the vintage typewriter. 

Her pocket letter was in the envelope (in back) and she included two adorable bookmarks, some fab trim, a flair and a packet of buttons and charms.

She gifted me 6 x 6 paper collection by Kaisercraft, some gorgeous trim and this stamp set which will work perfectly with a cookbook project I'm currently working on. Yay!

More goodies, can you believe it?!?  I love the stickers, vintage cooking magazine and the Wild Cards she included. You may notice the tissue underneath which was used for packaging, it is so pretty and can't wait to use it on future mixed media projects. I love all my crafty goodies and thank you again Christina for everything.  

Be sure to check out Christina's You Tube channel  

also on Instagram


Have a great weekend everyone, wherever you are. 

Crafty Hugs,
Lisa xxx 

Wednesday, November 16, 2016

Halloween Shadowbox


Hello and Welcome!

Today I'd like to share the Halloween shadowbox I created for my dear friend, Katrin. She lives in Germany and they do not celebrate Halloween. Really, say what??? She shared that she loves this holiday so along with our Halloween themed pocket letters we exchanged shadowboxes as well. My schedule was crazy in October but thankfully she was in no hurry and hey since they don't celebrate it no pressure! :) It mailed out 3 days after Halloween and arrived late last week which was super fast. I'm waiting to share the Halloween pocket letters because my overseas incoming pl's haven't arrived yet. Soon hopefully!   

My favorite item has to be the candy corn tree. I've always wanted to make one of these and it was super easy. Masking tape protected the areas where I didn't want color (top of tree) or needed to change colors. Dylusions ink sprays were applied directly over the exposed area and I used a manila tag to mop up the excess. A little trick I learned from Tim Holtz. :) After it dried I painted the wood base with black acrylic paint and added a "31" adhesive sticker. I have a thing for bats so I added 3 glitter sticker bats to the tree and I love the way it turned out. I see many more of these in my future! I added some small pumpkins and JoLee's Boutique stickers to the background. 

Another favorite of mine is the word "BOO" spelled out with Tim's wood letterpress letters. Each base was painted black then I went over the letters with orange acrylic paint. The candied apple (to the left) is a dimensional sticker by JoLee's boutique. You can see one of Tim's wishbones on the left which are so cute. In the bottom left box I used a dimensional sticker by Recollections and I added a paper extension to it so it would stand out from the back. You can't see it but I placed some tiny pumpkins to the right of the spooky house as well. 

I knew I wanted a skeleton for one of the vignette scenes and these were really hard to find this year. I searched Hobby Lobby, JoAnn's as well as Michael's with no luck, in the end I found a four pack at the Dollar Store. I bought the last two in stock and now I'll have some for next year and I sent my friend some as well. Honestly next year I think I'll just start there for Halloween crafty stuff. The small pumpkins were purchased last year at a gift shop in Franklin, Tennessee. They were part of a potpourri pack and I just love them. I coated each one with a thin layer of Deco Art's matte gel medium to add a protective coating. I also used this product to adhere the patterned paper to the back of each small box within the shadowbox. It's a great product with many uses! 

You can see two of Tim's rub-ons in this photo-one on the glass bottle and the other on the background paper. There's also a snip of his laboratory washi tape on there as well. The large bottle holds tiny bones which are cake decorations by Wilton. In the smaller bottle I decided to crush some of the candy bones and the rub on was perfect. I dismembered the skeleton and his legs were placed in this vignette while his head and body are in a box to the left. Sound gruesome, doesn't it?!? I promise he didn't feel a thing lol.  

This close up shows what the top boxes look like. I added a dimensional pumpkin with a glitter moon and star stickers in the background on the left and the right box simply has a trio of bats with clear gemstone eyes and a small pumpkin. You can also see the Halloween puffy sticker I placed on the top left of the shadowbox. The big glitter spider has been in my stash for a while and I added some white paint to highlight his/her eyes. 


The shadowbox was covered with Hazel and Ruby's wide spider web washi tape. For the inside boxes I painted each one with black acrylic paint by Ranger and added touches of gold/silver paint. I added Tim's metal feet to each corner to elevate it and to hold each one in place I used a hot glue gun. Most of the items were added with hot glue with a few exceptions where I used Art Basic's matte gel (by Finnabair for Prima Marketing). 

Thanks for your visit today, have a great day!
Hugs,
Lisa 

Saturday, October 31, 2015

Final 2015 Halloween Pocket Letter plus Incoming PL's!


Happy Halloween!


I'm sharing my {actual} final Halloween PL today plus those I received from my pals. At the end of the post I'll also share a pl from my pal in Memphis so I'll be caught up with October. The pocket letter above went to my pal in New York. She asked if I'd like to swap and of course I said yes. :) 

There are many photos to share with you so you might want to grab a cuppa or a quick snack. 
Let's get started.


Above is the front of my pals pocket and below are a few close ups. 

I added Tim's tissue tape to the spine and two number brads (a 3 and 1), then I attached a metal button to the striped ribbon bow. A quick tag was created from ephemera from Tim's holiday stash paper pad and I stamped Hi Pal.

The rosette is a dimensional sticker by K and Co., I stamped images (far right pocket) then colored with Copic markers and fussy cut them. Glittered alpha's spell out franks lab and I popped a Frankenstein sticker on the outer pocket. Silver liquid pearls were added to outer pockets as well as Tim's laboratory tissue tape . On the far left I added a bottle cap image and stamped Hey Ghoulfriend and a another spiders web at the top (hard to see I know).

 
A metal Idea-ology crown was added to the skull and Tim's Gothic stencil was stamped around it in Dusty Concord distress ink. For the outer pockets I stamped images (Waltzingmouse and Taylored Expressions) and punched a MS border fence on far right pocket.

The middle pocket holds die cut Halloween charms by TE and the far left pocket dies are also by TE. The remaining goodies were tucked in the back pockets which you can see below.

I included washi tape, a tag and stickers, note from me, bottle cap images, ephemera, stamped images, tea, metal Idea-ology skulls and spider medallions.


Okay now for the Halloween incoming pocket letters plus a private vintage swap I did with my pal in Memphis, Tennessee.

{in order I rec'd them}

From my pal in Connecticut
Front

Back

 From my pal in Indiana
Front

Back

 From my pal in New York
Front

Back


From my pal in Canada
{this is our second swap) 
Front

Back


Also including a vintage pocket letter from my pal in Memphis, Tennessee. 
Front

Back


I love each one and want to thank each pal who took the time to create one for me. Can't wait to use the goodies on next year's pocket letters. :) 

Have a safe and fun Halloween everyone, wherever you are!

Lisa xx
Related Posts Plugin for WordPress, Blogger...