Showing posts with label Mixed Media Canvas. Show all posts

Thursday, September 10, 2015

Fall Mixed Media Canvas


Fall is nearly here and personally I couldn't be happier! I decided to celebrate by creating a mixed media fall canvas that features the 3-D Pumpkin Template...Cutting File by The Cutting Cafe. While this template creates the cutest 3-D pumpkin for holiday decorating, I used it as a template for my fall canvas. It's a huge time saver and frankly I don't have much experience drawing pumpkins lol. 

I have a complete step by step Snapguide tutorial to share with you below. The steps can be used to create any themed canvas you like. I hope you enjoy it. 


To view all of the wonderful templates and cutting files visit The Cutting Cafe. It's not necessary to own an electronic cutting machine as Regina offers each cutting file in a PDF as well. 

I'm off to fix a quick pasta dinner for one. My hubby is fishing with a friend and it's just me and my fur baby here tonight. Think I'll watch my favorite chick flick - Under the Tuscan Sun.

Ciao!
Lisa xx

Monday, August 10, 2015

More Fun with Finnabair


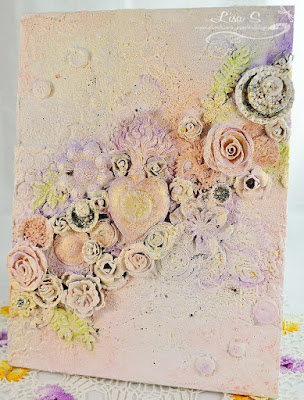
Finnabair's Time Capsule class project


I said a few weeks ago that I'd share the second class project that I made from my two day class with Finnabair but never did. It honestly slipped my mind with the craziness that has been my life this summer. I took the opportunity to get some home improvement projects done with my daughter home from college and as usual one project turned into another... :)

I'm back now to share my mixed media canvas from Finn's Time Capsule class. In the class we made three canvases however I'm only sharing my middle canvas for now. I have plans to personalize the side panels with photos of my mom and my late MIL. The trio will hang in my guest bedroom that honors the two of them. Hopefully I can get that done soon. 


The Flaming Hearts Ex Votos II relic by Sandra Evertson was part of our kit and it was altered with Finn's mixed media products

Various shades of mica powder bring this canvas to life. 

Prima blooms + Mechanicals make a beautiful bouquet.

Can you tell what my favorite product on this canvas is?

Before I tell you what it is let me say how much I love Finn's stencils. They are sturdy and super easy to work with, I used the Honeycomb stencil on my background with White Sand-Texture Paste.  

Ok, my favorite product is her Gold Mica Powder! 
When I mixed it with water and sprayed a coat over my canvas...pure magic happened!!

Finn's Bottle Cap Mechanicals were layered then filled with Crystal Glass Beads and Platinum Glass Glitter.  


I love the softness of this canvas. 


I highly recommend that you take one of her classes if you get the opportunity. You'll see for yourself what an awesome teacher she is and I loved getting feedback from her. She certainly inspired me to create something every day. I have a ton of stuff coming up in the next few months here on my blog and I can't wait to share it with all of you.  


This is our selfie which I am so proud of. It was two busy but totally fantastic days of creative fun!!! I don't know how she keeps the hectic schedule she's on with her North American tour but I'm so grateful she came so I could take her classes. Thanks Finn!!!

Thanks for looking, have a wonderful week.
Lisa xx


Tuesday, July 28, 2015

My First Class with Finnabair


The Artifact Class with Finnabair


It's always exciting when you meet someone you admire for the first time. Well let me say that if you ever have the opportunity to take one of Finnabair's classes do it. She's an amazing teacher and inspires your personal style to shine!

Anna Dabrowska (aka Finnabair)

I attended The Artifact and Time Capsule classes at Donna Downey's Studio in Huntersville, North Carolina. So I not only met Anna but Donna and her husband Bill as well. The energy in that studio was phenomenal and I ended up signing up for two more events next year. ;) Guess I'm into live classes now!

So on to the first class which was The Artifact.
If you click the link you can see Finnabair's original on her blog.

Our classroom with all of us busy creating our collages. 


We created three 9x12 canvases using various products from Finn's mixed media line.


My finished project. :)

Mechanicals on display.


The texture is 3D and so it's fun to touch.

Prima Junkyard Findings were embedded into my favorite product of this class - 
this stuff is grand and the texture is amazing.

 
Mica flakes, micro beads and glass beads from Finn's Art Ingredients line.
Love these!!!

The lace peeking out makes me a happy girl. 

Who knew inexpensive brushes could look so good.

Left Canvas

Middle Canvas

 Right Canvas

 I used Finn's 12x12 Harlequin stencil and Modeling Paste on my background. 
Other elements were used as well to build up texture but I'm not giving any secrets away out of respect for her.  


After a day of creating masterpieces Finn gathered us for a group photo.
The Artifact Class with Finnabair
Saturday, July 18, 2015


Be back soon with my second project from the Time Capsule class.
Thanks for the visit!
 Lisa xx


Tuesday, April 15, 2014

timeless couture

{mixed media canvas}

***Warning, Photo Heavy Post***

Hello and Welcome Back!!
I created this 'timeless couture' mixed media canvas for my daughter because she loves fashion and is an admirer of the late Coco Chanel. It's also my DT offering for Top Tip Tuesday's new challenge - Paper Piecing - which we hope you'll play along with. My paper pieced element is the Alterations Sewing Room dress form die by Tim Holtz which I first die cut with chipboard then made a second die cut with a text dp by Fancy Pants. I paper pieced the dp over the chipboard, inked the edges with Distress Ink-Black Soot and added Kaisercraft pearls to create a faux pearl necklace. 

Our sponsor for this challenge is Stamp and Create and they are offering the winner a $20.00 gift certificate.


Thank you for your support of TTT!


My canvas was also influenced by a new challenge that I'm enjoying playing along with - A Vintage Journey - and the hostess, Astrid, asked us to create something that's "A Little Bit French." This was right up my alley and being able to combine my DD's love of fashion with the iconic French couturier, Coco Chanel, to create a piece of art she'll enjoy is perfection for me. :)

On a personal note, I used some sentimental scraps of trim {from my mom's sewing stash} and a Vogue sewing pattern {from my MIL's sewing stash} which are vintage in themselves. These items are precious to both of us since my MIL passed in February of this year {after a long battle with Alzheimer's} and my mother is still fighting her own personal battle with this dreaded disease. Both were excellent seamstresses in their day and my daughter has an affinity for sewing which she must have gotten from them because sewing is like a foreign language to me. Both of her grandmothers would be very proud of her textile projects for her TXMD college courses!

Here are a few close ups and I'll explain my French influences on this canvas as I go.

I covered the 11x14 canvas with my MIL's Vogue sewing pattern
and applied white gesso randomly over it. To begin 
building my background I used various stamps to the pattern
and here's a tip when stamping directly onto canvas. 
TIP: Place a book/object under the open part of the canvas so you
will have a firm foundation to stamp on. 

At this point I started gathering my items and when I was sure 
of the placement I started adhering them to my canvas.  
I used Tim's Weathered Clock die to create a frame for Coco's
picture {courtesy of Google}. A piece of  recycled cereal board
was used for my die cut, then I gave it a coat of black gesso, let it dry and 
applied Ranger's Perfect Medium to a text stamp and stamped over the clock
die cut. Ranger's Perfect Pearls-Heirloom Gold, Pewter, Perfect Pearl and 
Bronze was then applied over the medium with a brush. I set the colors with 
a light coat of hair spray and this technique is an easy way to achieve a metallic
look. To add texture to my clock frame I dabbed it with Adirondack Acrylic 
Paints in -Silver, Gold and Snow Cap. 

The sewing machine image is from Tim's Blueprint Assortment stamp set
and it was stamped onto a piece of parchment paper, I cut around the image and 
distressed the edges with Black Soot ink. 
The NOTED wood embellishment is from Prima's 
Stationer's Desk wood embellishment collection and it's 
altered with a light coat of black gesso and a dab of Snow 
Cap acrylic paint. You can see another stamp I used of the 
Eiffel Tower to the left of the frame and one of Tim's fractured dolls
to the right. The doll reminds me of the statues on display in the various 
French museums and also of a mannequin. 

I love that you can see the Vogue name on the sewing pattern. :) 
Did you know that Coco made her debut in Vogue on February 1,
1916. Her brand is still going strong today {43 years after her passing}
and she once said "I freed the body" which clothing wise, 
she did. Her use of jersey fabric allowed women the freedom 
to move about while working or traveling without constraint. 
Now that's a good thing!

This laser cut chandelier is from Michael's
and I altered it with acrylic paints, layer by layer.

After it dried I added silver and gold acrylic paints. 
Then I gave it some texture with this stamp. 

Love the detail the stamp adds.

The large Eiffel Tower was stamped onto parchment paper 
and fussy cut. The flower nearest the fractured doll is 
faux leather and it adds another textile layer to my canvas.

The fancy trim at the top was in my mom's stash and 
I love it, it reminds me of chainmail for some reason.
That's Tim's composer tissue tape under it and a Prima
pebble to the left which reflects all of the musicals/plays
that were made of Coco's life. Tim's ball chain was 
altered with silver acrylic paint and finishes off my
chandelier. 

Timeless and Couture chipboard pieces are also from Dusty 
Attic and each was given a light coat of black gesso. The ivory
flower is linen and fits in well with my theme besides
being pretty. The black lace bling is by Prima as well 
as the scissors which are a wood embellishment from the 
Stationer's Desk collection that I altered 
with gesso and silver acrylic paint. I used Tim's Latticework
layering stencil {you can see it above the dress form} in
several places to add depth and visual interest. I love this
stencil and find myself using it a lot.

This little vignette is a peek into Coco's private world. ;)
I love the vintage telephone {Dusty Attic} setting on the 
laser cut wood table {Soiree-Pink Paislee} on the black 
and white checkered floor {a dp} with the French antique
wood laser cut chair {Michael's}. The gold braid trim is from
my stash and the pen nibs {Tim for Idea-ology} represent the 
articles, books, etc. written about Coco's life.
{the red dp they are on is Glitz's Distressed Couture dp}

Before the frame and doll were added I used my fave stencil,
Latticework by Tim to add color and depth. Ranger's Tree Branch
ink is dabbed over the stencil and then I lifted it to reveal the 
stenciled image. 

French influences are Coco-a Parisian, the Eiffel Tower, french 
fashion and antiques (wood furniture/chandelier)

See the Paris stamp above the nibs, it's from Tim's French Connection
stamp set and the pen nibs are from his Idea-ology line. So many
books/plays have been written about Coco Chanel and I wanted to
reflect that. The pretty dp is from Glitz's Distressed Couture collection 
and I love it. I shaded it with a black Faber-Castell Pitt Pen and you can 
also see a flourish stamp by Tim in the background. I stamped it on
my background randomly when I was building my layers and it adds
a special touch. 

I spelled out Chanel with a Recollections alpha set and the No. 5 is 
from a 7 Gypsies set. The flower center is from Prima's Say It With
Studs and the layered paper flowers are also Prima.

A G45 {postcard stamp} records correspondence 
and the edges were distressed with Black Soot. 
A Prima Princess paper clip adds a vintage touch, the
gold flower is also by Prima and I added a touch of Vintage
Photo Distress ink to it. You can see Tim's Fabulous Flourish 
stamp in the background. :)

I distressed {at the top} the vintage trim with Vintage 
Photo Distress Stain because it was stained in places 
and now it blends in. The trim on the left is a fancy 
trim that was in her sewing box as well. The Prima tile was
framed with a wood embellishment from the same collection
I've used throughout by Prima and the dp underneath it is 
by Glitz and another one in their Distressed Couture collection.

The large spool was given a coat of black gesso and I wrapped 
some ivory twine around it then threaded a needle from my 
mom's sewing stash through. The small wood spool was wrapped
with gold cord and I added a large black pearl to the center of the 
black button by Pink Paislee. 


Playing along with these challenges too:
{I used a dp on the dress form, the red dp under pen nibs is by Glitz and the third is under the Prima tile-upper left corner-and it's also by Glitz}

Whew!!! If you've come this far thanks for hanging in there. Hope you enjoyed my mixed media canvas and I'll be back tomorrow with my third Guest Designer project for eclectic Paperie.

Also, a big thank you to A Vintage Journey for the Pinworthy Mention for this project HERE


Hugs,
Lisa


Friday, February 14, 2014

love

{Mixed Media Canvas}
 
 
Here is the US the month of February is synonymous with hearts and love because we celebrate Valentine's Day. So how do playing cards fit into this equation? They're a requirement for the current Eclectic Paperie challenge-use altered playing cards on your project. Since my mixed media canvas has a love theme I decided to use the king and queen of hearts. I'm also going to play along with a few other challenges since "love" and "hearts" are wildly popular right now. :)


Taking a note from Broni at EP I sanded my playing cards to roughen them up a bit, then used distress inks around the edges and a Faber Castell Sepia Pitt pen to create more of a distressed tone on the face of the cards. I didn't want to cover up the fact that they were playing cards but to simply tone them down a bit so they'd blend with the canvas. I created my background by applying Golden's Fiber Paste over a MPD Brick Wall stencil in random places and letting it dry. I love the look of text in mixed media so I grabbed my Tim Holtz tissue paper and started tearing pieces to fill my empty spaces. After adhering it to my canvas I mixed my background color and used a water bottle to lighten the color in some areas for a more transparent look. Tim Holtz stamps were randomly stamped with black Staz On ink for texture. I don't have a picture of the sides but they received the same treatment. 


This gorgeous heart is from Dusty Attic and the background is actually the negative. I couldn't throw it away so I added some texture to it with acrylic paint, ink sprays and distress ink. The other chipboard pieces (love, scroll, key) were altered in the same way. (I did add a coat of Golden's Glass Beads to the scroll and key before I altered them).  
 
 
I have to confess that this canvas took a dramatic turn from my original vision but I'm happy with the out come. That's the great thing about creativity-you never know where it will take you.
 
 
I'm playing along with the following challenges:
 
Edited: Yay! I won the EP Altered Playing Cards challenge, what an honor. Thank You!!


Thanks for dropping by and I hope you like my mixed media canvas. For everyone celebrating Valentine's Day I wish you a very **sweet** day that's filled with love.
 
Hugs,
Lisa xx
 
Related Posts Plugin for WordPress, Blogger...