Showing posts with label Valentine's Day. Show all posts

Thursday, February 7, 2019

Celebrating LOVE at The Cutting Cafe


Hello and Welcome!

I'm still a bit scarce here on my blog as I am trying to get back into a crafty routine. Today's share is a design team card for The Cutting Cafe. With Valentine's Day just around the corner you may be looking for inspiration in making cards, decorative boxes etc.. Well we have you covered over on TCC's blog so be sure to check this post out later today when it goes live. 


On this card I used two printable sets which makes it easy to mass produce. I'm also sharing below a photo of the files so you can see what is in each set. Both files come with PDF and JPEG format. 


I love you

this is the one I used but there is another version below

I love you1

In the first photo you can see the 3 fonts that are available in this set for $1.99 and it is an instant download after payment. 

The Cutting Cafe

The next set I used is the Keep Calm and Say I Love You Printable Set and it features colored and plain images. 

KEEP CLAM

and the plain

KEEP CLAM 1

This set is $1.75 and is an instant download after payment. 


I hope you enjoyed this card and to see a variety of projects featuring the Valentine's Day and LOVE printable sets and SVG files visit The Cutting Cafe's blog, link above, and if you leave a comment you'll be automatically entered into a drawing to win 3 FREE SETS of your choice. Regina will announce the winner on the next DT post the 21st of this month. Good Luck!


Crafty Hugs,
Lisa


Monday, February 5, 2018

XOXO Word Shaped Card


Hello and Welcome!
I'm here to share a card I designed for The Cutting Cafe using the XOXO Word Shaped Card. I love how it turned out and I hope the recipient will as well. :) With Valentine's Day approaching soon you'll want to check out the DT post featuring word shaped cards on the 7th for more inspiration.


 The Cutting Cafe


Here's another example by Regina Easter of how she used this cutting file to create a shaker card.

Xoxo

  It's so cute!!!
The file includes sentiments and all of the hearts and arrow you see on both cards. It's such a versatile set and to see more Valentine themed word shaped cards visit here


The design team blog post will go live on Wednesday so be sure to visit. If you leave a comment you'll be automatically entered in a drawing to win 3 FREE SETS of your choice. Regina will announce the winner on the 21st of February. Best of luck!

I'll be back Wednesday with a Christmas themed design team post for ABC Christmas Challenge. 
See you then,
Lisa xx

Friday, February 17, 2017

Valentine Pocket Letters - Outgoing


I have a sweet post, pardon the pun, to share with you today. I wanted to wait until my Pocket Letter Pal's received their pl's and they have. Unfortunately because I'm still out of town I won't be able to share the letters they made me today but I will before the end of the month. The first one which you see above was created for a group swap at PLP's and went to my friend Joan in New York. 


The 3D rosettes are stickers and I added a die cut glitter heart to the bottom one. The scroll (top left pocket) is a Tim Holtz mover 'n shaker die and I cut it from white foam craft. More foam hearts, by Tim, were also cut from colored foam craft. The arrows are dies by Spellbinders and I used glitter and metallic papers to cut those. The pretty metal angels are by Jo-lee Boutique.


The next pocket letter went to my pal in Germany, Katrin. We swapped a coloring page pl and gifted each other some colored pencils. I added some 3D embellishments to the front which she can leave on it or use in future projects. 


The little toadstools and ladybugs came from Michael's. The die cut clouds are a Taylored Expressions die and I added a doily at the top that was gifted to me by a previous pal. The die cut hearts are the same as above, Tim's Mover & Shakers dies. I used 1/8" red glitter foam and they add some sparkle. :) 


Before I close I want to wish my mom a very Happy 81st Birthday!!!

Hope each of you had a wonderful Valentine's Day if you celebrated the holiday. 
Have a great weekend, wherever you are.

Lisa xx


Wednesday, February 15, 2017

Valentine Loaded Envelope

Front

Yesterday here in the U. S. we celebrated Valentine's Day and I want to share my first take on the loaded envelope concept. I discovered them on You Tube and I knew I wanted to make one with a Valentine theme. It is chock full and as you'll see the goodies and handmade embellishments spilled over. ;) This is a photo heavy post so let's get started. You can see the front of my loaded envelope above and here is what the back looks like below.

Back
{more on it later}

The base of my loaded envelope is a kraft clasp 6 x 9 envelope. I removed the silver clasp and decorated the front and back with Echo Park's Yours Truly paper collection. I bought the set that came with matching cardstock stickers and I love it. Some of my favorite Valentine themed paper ever! I created 3 pockets on the front using various designer papers and embellishing each layer with washi tape, stickers from the YT collection, punched elements-cupid and hearts, die cuts and round cardstock stickers by MAMBI.

The pockets were loaded with ephemera from the YT collection, die cut hearts by Verve, and vellum gift packs with assorted punched and die cut images. I tucked in a flair flower button and heart paper clips as well. A silver Heidi Swapp glitter bow sticker makes an appearance on the second pocket and I cut a black doily border for the top 2 pockets with MS's doily border punch.

You can see (lower left) a handmade bookmark which I tucked into the middle pocket. I also included die cuts by Echo Park, Tim Holtz and Verve Stamps for her to use as well. The small vellum packets were made by using scrap pieces, folding them in half and adding washi tape to seal the edges. 

I used a paint chip sample to make the bookmark, cut it to size and added some die cut embellishments and gifted her a vintage resin pink button which she can use for future projects. 
She's an avid reader so I think she'll like her bookmark. :)

As a fan of Hello Kitty I thought she'd like this button and I added a charm by The Girl's Paperie (no longer open for biz) which I have hoarded saved forever for the right person. :)

I tucked my handmade paper wand into the top opening pocket and I'll share below how I made the rosette. I layered a cupcake liner, crepe paper rosette, die cut doily and 3D rosette sticker on the front. A paper straw was used for the wand and I added pretty ribbon and trim to finish it. 

I wanted a large rosette for the base of my wand so I used my score board and trimmed a dp to 3" wide by 12" long. I scored every 1/4" and then punched one edge with a MS border punch. You can do this step in either order. I used two 3" x 12" strips to create this rosette. A 2" punched circle holds the front of the rosette together and a 3.5" punched circle gives the back some stability and provides a base to add a punched or die cut decorative base for the back. I highly recommend using glue to adhere the two strips together as well as the punched bases. It's stronger and will hold up better over time, just a tip. ;)

I made a stack of rosettes using paper, cupcake liners and crepe paper. For the crepe paper rosettes I added a border of silver Stickles to one side, let it dry thoroughly then folded in accordion style and fanned it into a circle shape. I punched two circles and added one to each side for stability. Super easy to create and very therapeutic as well. They were made while binge watching Midsomer Murders on Netflix. :)

I gifted my friend a paper rosette and added a die cut doily for her to use on future projects. The tag on the front is from the Yours Truly collection and I trimmed a dp from the collection to use in my packaging. It serves a dual purpose making the package pretty and she can use it for a future project.   

In the back of the package I included various die cut doilies and hearts cut from papers in my stash. 

The cupcake liners were placed in recycled packaging and I added a band of washi tape to the top along with more dp's from the paper collection. It was as much fun dressing up the gift packs as it was decorating the loaded envelope!  

The candy brad on the sequin packet is from Doodlebug and I included some paper napkins for her since she likes those too. The sequins are a mix from Verve Stamps and the colors are perfect for Valentine themed projects. Using a dp from the collection and a doily border punch by MS I created pretty packaging for the sequin mix. 

I also included some paper cut to 6 x 6 size for her to use, stuffed some candy conversation hearts into a heart clam shell package which I ordered a while back from Taylored Expressions. A Valentine ziploc bag holds all of her chocolate treats and it wouldn't be Valentine's Day without a little chocolate. Would it? I think not! 


Hope you enjoyed my share today, if you did or have questions please leave me a comment below. I'm afraid I've been a bit of an absentee blogger this year, it has already seen its share of sickness with colds and now the darling daughter has the flu. First time for her and unfortunately she has a really bad case of it. I'm here with her now to help her out and ensure my furry grandbaby is taken care of as well. Praying I can stay strong and not succumb to it, seems everyone around here is down with the flu. :(  

Hugs,
Lisa


Thursday, March 10, 2016

Incoming Valentine Pocket Letters for February


I'm a bit late today but I'm gonna go with better late than never. In fact I should have shared these last month but February wasn't the best month for me personally. Real life took it's toll and I totally spaced on sharing the Valentine pocket letters that my pals from Pocket Letter Pals sent me. So today is the day and as you can see I have some really awesome pals. There's no favorite because I absolutely love the creativity behind each and every one. The pocket letter above is from my pal, Natasha, from England and I love her style. It was filled with goodies and she also gave me a beautiful floral hair pin plus a wire rose she made by hand. It's a lovely pocket letter and I can't thank you enough Tasha (her name at PLP's in case you want to swap with her as well). 

The next pocket letter is from my pal, Glenda, in Florida. We've swapped several times and I love the detail she added to each pocket. 
The adorable ladybug banner is so cute. Thanks Glenda!

This pocket letter is from my new pal, Nori, and it included fabric and mixed media. Am I a lucky girl or what to receive this awesome pocket letter. I'm excited that we arranged another swap for Easter! Thanks Nori!

This pocket letter is from my pal, Mary, in Florida and it's our 3rd swap. Not only did she send me this fabulous pl she also made a handmade book for recording my personal and group pl swaps. She always adds a little something extra and although she doesn't have to do that I appreciate her kindness. Mary is a sweetheart and I adore this pl! Thanks Mare :)

Last but certainly not least is a pl from my new pal, Cherise, in Michigan. I love the fun papers she used and the sweet little banner she added. She also included a metal heart ornament as a keepsake. I love this pl Cherise, thank you so much!


That updates my Valentine incoming pocket letters from my pals at Pocket Letter Pals. Tomorrow I'll be sharing more incoming pl's from January and February. 

Hugs,
Lisa


Thursday, February 11, 2016

Outgoing Valentine Pocket Letters


Hello everyone, hope all of you are doing well! I've taken a bit of a break from crafting and blogging lately to catch up on several things including some much needed rest. Most of the pocket letters I'm sharing today were arranged for swaps back in December. I'm not one to renege on a promise so I created a flurry of these last month for mail out at the end of the month. There's a total of 5 with four going to US pals and one going to my new pal in the United Kingdom. In fact the one above went to Natasha and she hails from Royal Windsor in merry 'ole England. Her pl features one of my favorite paper collections - Be Mine - by Echo Park. It's been in my stash awhile and that's because I tend to use it sparingly. The papers are so pretty and I love the color scheme of pinks, grays, black, cream and white.


A closer look...
She goes by Tasha at PLP's so I spelled it out on her greeting pocket. A mixture of Verve stamps and die cuts were used on each pocket.  

The cupid (left pocket) is a punch and the row of small hearts on the far right pocket is a die border by Taylored Expressions.

I also used a Fiskar's heart punch, heart shaped gemstones and liquid pearls to dress up my pockets. So happy Natasha likes her pl and that we've agreed to swap letters again!


The next pocket letter is different in style and it went to my new US pal, Cherise, in Michigan.

I used 4 different papers on this pl-metallic hearts, diamonds, roses, and black foil. It was hard to photograph but in person you can really see the detail of the foil paper. A few years ago I picked up a box of chip and glitter elements and I used several, including the tag on the spine, on this pl.

White glitter thicker alpha's spell her name and I used two chip hearts on her greeting card. Another chip can be seen on the 3rd pocket and I added a band of pretty trim. For the middle pocket I spelled out "be" using the pretty glitter alpha's from a Twilight chipboard collection. Not a big fan of the movies / books but it included some great pieces I knew would come in use someday. 
PS, no offense to Twilight fans...just not my cup of tea. :) 

The roses on the outer pockets are chip pieces as well as the "sparkle" tag. I added pretty bling scrolls and punched two small hearts under both roses with a $1 punch from Michael's.

The double hearts were a gift from another pocket pal and the little red cupid (middle pocket) was punched from red glitter paper. More glitter thicker alpha's spell out "xo" and the final touch was to spell out "mine" with the red glitter alpha's. 


For the next letter I continued with a black, red and white theme. It went to my pal Glenda in Florida and we're regular swap partners. 

I'm fond of diamonds (as you can tell) and enjoyed using this dp to contrast with the red flocked paper. Ribbons, trim, doilies, stamping and die cuts brought this pocket letter together.

I used glitter thicker alpha's to spell her name and cut a heart doily and attached it to her greeting pocket. The middle and far right pocket both have stamped images from Graphic 45 and I added ribbon to both outer pockets.

More stamped images (click to enlarge), a chipboard piece from the collection I used on the prior pl, another heart doily and more ribbon / trim.

The pretty heart on the left is a stamped image by G45 and I stamped "valentine" by Verve Stamps on it. The middle pocket has two die cut hearts by Verve and a flair button by Prima. The other pocket has a heart doily with ribbon and "xo" glitter thicker alpha's. So happy Glenda likes her pl!


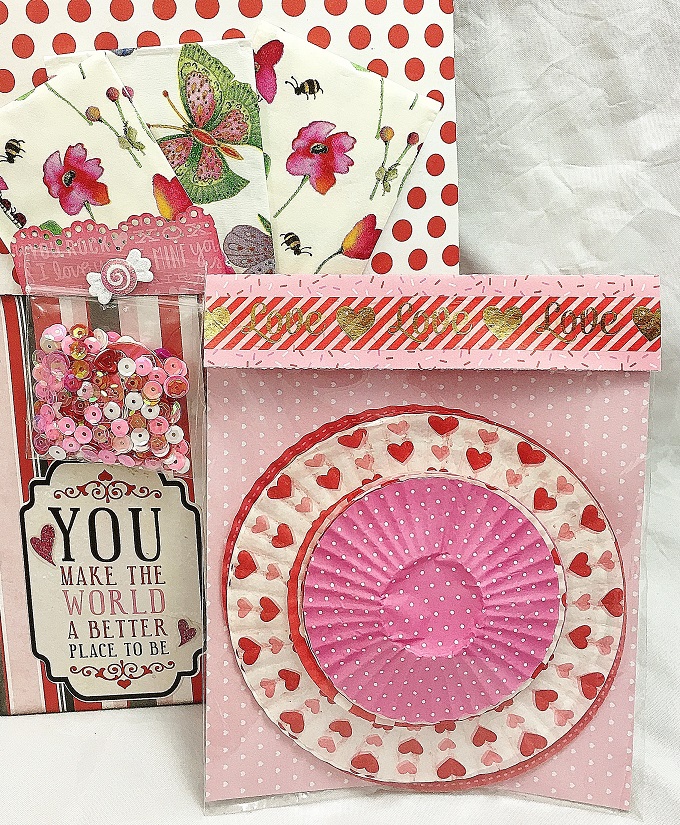
The next pocket letter continues the same color scheme and it was for a group swap at PLP's. Happy to have a new pal, Nori, in Massachusetts. We had to include fabric (which could include paper / trim / ribbon) and mixed media on our Valentine-Fabric w/Mixed Media pocket letters. 

For the fabric I used a flocked paper (red) and a canvas print. I brought the mixed media in with embossing paste, micro beads, a fun technique by Tim Holtz, liquid acrylic paints and drywall tape.

I used Tim's foil tape embossing technique on the far left heart. A band of drywall tape was added to the bottom with black lace and I spelled out her greeting with Authentique alpha's. The middle pocket is canvas print and it has text on it so I didn't want to cover that up therefore a simple bling treatment was all it needed. The far right pocket has a die cut heart which received a layer of silver embossing paste and then a coat of micro beads for more texture. I die cut Tim's lattice corner and "love" and added to my pocket. The black trim finishes it off.
Note: You can purchase drywall tape at any Lowe's / Home Depot or hardware store. 

(sorry for the glare, you can click to enlarge and hopefully see it better.)
I die cut corrugated black hearts for the outer pockets and added drywall tape for some texture. The Prima bling continues on the middle canvas pocket. I spelled out "Happy" and "Valentine" with the same alpha's by Authentique.

I did the same thing in reverse for the two other pockets as I did on the first row. The middle pocket has two die cut hearts, one from black corrugated paper and the other is from a resist paper pack by Heidi Swapp. A pretty band of black trim with gems add sparkle and I finished my Valentine greeting on the the small heart. So happy Nori likes her pl and that we're going to swap again!


My final Valentine pocket letter is for my pal Mary in Florida. We are regular swap partners and for this one I went with a clean and simple look. 

The glare made this one difficult to photograph but hopefully you can click on each image to see the pockets better. The red dp is actually a metallic paper with heart images and love the way it shimmers. 

More glitter thicker alpha's to spell her name, pretty white lace trim and a swirl bling on the left outer pocket. For the middle pocket I stamped images by Verve Stamps. The far right pocket includes a punched cupid image, pink ribbon and a heart charm by Tim Holtz.

I tucked an acrylic stamp set for her in the middle pocket and stamped sentiments by Verve Stamps on the outer pockets.

A key charm by Tim was added to the left pocket, more stamped images from Verve's Twitterpated Stamp Set and a mirror image of the greeting pocket on the far right pocket. 


This wraps my Valentine pocket letters for 2016. If you're interested in learning more about pocket letters and how to sign up to become a Pocket Letter Pal visit the founder's blog - Janette Lane. She began pl's in January of 2015 and launched the PLP's website two months later. It grew exponentially last year and it's such a fun way to meet new people around the globe. I'll be sharing all of my incoming pocket letters at the end of the month. Have I said how much fun it is to receive happy mail? It's awesome, thanks pals!!!


Wishing you a very Happy Valentine's Day, wherever you are. 
Lisa
xoxo


Related Posts Plugin for WordPress, Blogger...