Showing posts with label Tim Holtz. Show all posts

Wednesday, July 4, 2018

N for Name, O for 'On Skates etc' at ABC Christmas Challenge

Ice Skate Card

Christmas in July is what I was thinking when I created this design team card for the ABC Christmas Challenge. With the record hot temps here in the U.S. I'm definitely dreaming of a white Christmas. :) I'll stop and confess right now that I'm no ice skater but I wish I was. Ice skating is a beautiful sport and I love to watch it!

I used a SVG file by Daniela Moscone available at Silhouette Design Store called Ice Skate Card


The inside sentiment and image are by Verve Stamps which sadly closed their doors the end of June. I used stickers by Simple Stories on the opposite page.


For the front of my card I used a merry mix of embellishments and ephemera. The seasons greetings stamp is from G45's Night Before Christmas 3 stamp set and I backed it with a 1" punched circle from black cardstock. Years ago Pink Paislee offered a collection called  City Sidewalks and I still have some of the papers and ephemera in my stash. The bell ephemera is from that collection as are the fishtail banners. I ran some red/white twine through the tag and secured it with Tim's tiny attacher. The rosette is a dimensional sticker from Recollections and the glitter red heart was punched using a Fiskar's heart punch. I also used a circle sticker from G45's A Place in Time sticker sheet on the right side of the cluster and foam tape to give some of the elements dimension.


White and black gel pens add highlights and faux stitching. I added a chipboard 'Believe' by Echo Park to the blade, tinsel by Tim Holtz to the base of the ice skate and flat back pearls where the laces pull through and that completes this card.

I used the fold card and layering pieces from the SVG file to create my card. My Silhouette Cameo made this an easy task to do. Check out the Silhouette Design Store to see what is currently on sale and if memory serves me correctly I believe they have a big Christmas sale during July. If I learn when I'll pop in and edit this post and add a direct link. ;) You can also visit my dear friend's online store, The Cutting Cafe, as Regina offers several Christmas themed files and each one comes with various electronic cutter SVG files as well as a PDF version in case you don't own an electronic cutter.   

Sponsor

Prize is a $25 gift certificate to our lucky winner.

also

Helen is our hostess this month and she is offering this stamp set from Lily of the Valley as a prize. 


You have from today, July 4th, until the end of the month to play along and as long as your project is Christmas themed you can enter as often as you like. The DT will be by to visit your inspiring creations soon and we all wish you the best of luck.


Crafty Hugs,
Lisa xx 

Wednesday, August 24, 2016

August Outgoing and Incoming Pocket Letters

For Tasha


Good Morning!
It's time to share the pocket letters that I made for my pals at Pocket Letter Pals during the month of August. I'm also going to share the pl's my pals made for me as well so let's get started. The pocket letter above was created for my pal, Tasha, in England. It's actually the second one I made for her as the first pl was damaged in transit. Fortunately the postal system mailed it back to me just before I left for my anniversary trip in June. I contacted her and she was so gracious and understanding. Thanks Tasha!!! As soon as I returned home I made a replacement pl then promptly mailed it. It arrived in England within a week and that has to be a record!!!  


I used a paper collection that has been in my stash for a while (maybe because I am hoarding it) to create it. Pink Paislee's London Market 12 x 12 paper and the alpha paper is from Prima's Romance Novel. I fussy cut stamps as well as ephemera - banners, tickets and a floral pocket to hold treasure (aka metal charms) from both paper collections. I also decided to add a die cut Sizzix Eiffel Tower, on the front of my letter and outlined it with Platinum Liquid Pearls by Ranger. Finishing touches on the pockets include fancy trim, stickers, chipboard cog wheel, a button, Prima bling, washi tape, ribbons, rub ons, metal charm tag on the spine, stamping and Ranger's Liquid Pearls. I'm happy to say she loves it!  I shared her pl previously on my blog but here it is again below.


I love all the girly aspects of her letter and the color combo too!
Thanks again Tasha!


Next up is the letter I sent to my pal and friend, Katrin, in Germany. It always amazes me how much we think alike but somehow we managed to surprise each other with travel pocket letters. :)
Here's the one I made for her.


It was hard to photograph because it was bulky and the glare was impossible. Basically each pocket holds an accordion style booklet which is a mini photo album of the places we visited. Here's a photo which shows how dimensional this pl is.

They were wedged in the protective pocket covers and I worried a few wouldn't fit. ;)

This is what the back looks like.

Maybe some close ups will help with the glare...
Top Row-Photos along the drive, Canyon De Chelley National Monument in Arizona, Zion National Park in Utah

Middle Row-Kolob Canyons, Salt Lake City and Ogden, Utah, Bryce Canyon National Park

Bottom Row-Arches Nat'l Park in Utah, Ouray, Colorado and Santa Fe, New Mexico

Along the way I sent Katrin messages via Instagram and I used those photos as well. Hopefully it brings back wonderful memories of the places she visited with her husband in Utah and inspires them to come back for another visit to the beautiful southwest. I'll share quickly how I put the mini albums together as someone asked that question on Pocket Letter Pal's. 

I used an acrylic accordion style album that I purchased several years ago from Taylored Expressions. I added designer paper to the front of each section with double stick tape but first I chomped the corners with the 1/2" corner rounder by We R Memory Keepers. 

I added photos to the front and back writing notes on the actual photos and sometimes spelling a message out with tiny alphas.  

To maximize my album I tucked photos behind and on top of (flip style) other photos. 

You can see here how I added a photo on top of the bottom photo and another one on the inside of my flipped up photo. 

I'm not sure if these acrylic accordion style mini albums are available anymore (each panel was ATC size - 2.5" x 3.5") but you can make your own using a piece of cardstock and a score board. Your panel needs to be 3.5" tall and for a 5 photo spread like mine it needs to be 12.5" wide. You'll score at 2.5", 5", 7.5", 10" and 12.5" then fold on each score line. You can round the corners or not, whatever you like. Truthfully it would probably work better with cardstock as the acrylic accordion albums were rather bulky once I added the photos. 

Okay, now let me share the pocket letter Katrin made for me (well my hubby too).

I love it!!! The glare again is making it a bit difficult to see but you can click on any photo to enlarge. There's a lot of detail on each pocket and I love how she layers her elements. :) 

The top right pocket is still hard to see. I love the paper she used which looks like a map of a national park and the buffalo embellishment and small map folded and tucked in the bottom left corner are fabulous touches. I'll have to share my up close and personal experience with buffalo in the Wind Cave National Park with you someday. ;) The two love birds on the branch (bottom left pocket) is another fave and she put our initials inside the heart. How sweet! I love the starry background and her message spelled out - Under the Stars. 

On the spine she included this fun tag with the retro image of a car and vintage style camper complete with the towering red rocks of the southwest in the background. I love the metal charms and sweet little banner too. Thanks Katrin!!! I'm going to place some of our fave photos in the back of the pockets and store it with our vacation albums so we'll see it every time we look back and remember this amazing trip. :)


Next up is the most recent pl I created and it was for a butterfly group swap at PLP's. It went to my pal, Glenda, in Florida and I'm tickled that she loves it and considers it a work of art. That just made my day!

I used mixed media techniques to add several layers to each pocket. Each one started out with a resist paper from Hot Off the Press that had a butterfly motif pattern on it. When I rubbed my distress inks-old paper, tattered rose, gathered twigs, black soot-over the top the butterflies popped up. I love resist paper and it's always an easy way to make a statement. I added a variety of mediums like texture paste, stenciling, Tim's Tissue Paper-Melange-rub ons and inks. The tissue paper offered a large butterfly (bottom row, left pocket) which I love and this paper has a waxy feel to it. However it's translucent which is great for shading/adding color with my Faber-Castell Pitt Brush Pens or Tim's Distress Markers.

Since we were challenged to make some of our butterflies pop off the page I went for a 3 dimensional look. First butterfly was stamped in permanent black ink on the resist paper, then I stamped it twice on a dp from Prima's Almanac paper collection in Versamark Ink and heat embossed each one with black embossing powder by Ranger. Foam dots were added under the wings of the first embossed butterfly and I placed it directly over the stamped butterfly. I placed the other embossed butterfly on the outside of the pocket, matching it up with the other two, and this time foam tape was used on the body of the butterfly so I could bring the wings up as if he/she were in flight. This pocket was embellished with a quote, a Prima flower and rub ons. 

I fussy cut several butterflies from the Almanac collection and layered them on top of each other adding dimension with foam dots/tape. You can see in the background a Pink Paislee rub on that I placed over the resist paper and also some rub on stitches (upper right) by Christy Tomlinson. I love Finnabair's mixed media products (available through Prima Marketing) and one of my fave things to do is add her micro beads to anything. For this pocket letter I added a Prima paper rose to each pocket and adorned each one with bronze micro beads by Finn. Simply mix a small amount with her soft gloss gel (or other medium like matte gel) and add with a fine tip brush where you want to place the beads. The gel medium will dry clear as you can see leaving only the beads to shine. I spelled out "with brave wings she flies" with Tim Holtz's chitchat stickers.

Since Glenda is always so gracious to include handmade beaded items I wanted to include beading on my letter to her. While I'm simply not patient enough to create beaded tassles or pretty stick pins I did pay homage by stringing these seed beads onto a strand of hemp cording and I added micro beads to each and every Prima rose. You can also see on this pocket that I used a smaller butterfly cut from the Almanac collection and laser cut wood butterflies that were altered with acrylic paint, ink and bronze Liquid Pearls. You can also see the 3 layers of resist paper, Tim's tissue paper and his lattice stencil in the background. I love the depth the layering adds as well as rub ons. 

The piano keyboard is ephemera from the Almanac collection as well as the mini stamps on the different pocket letters. Prima bling was added to 3 of the pockets and I used rub ons from Kaisercraft, Pink Paislee, Christy Tomlinson and Tim Holtz on the various pockets. Butterflies mean "new beginnings" so I had to stamp this Taylored Expressions sentiment on a hand cut banner. For my inks I used Tim's Distress Inks in the above mentioned colors. The music notes are actually from Tim's Melange Tissue Paper and I adhered it with matte gel medium by Liquitex.

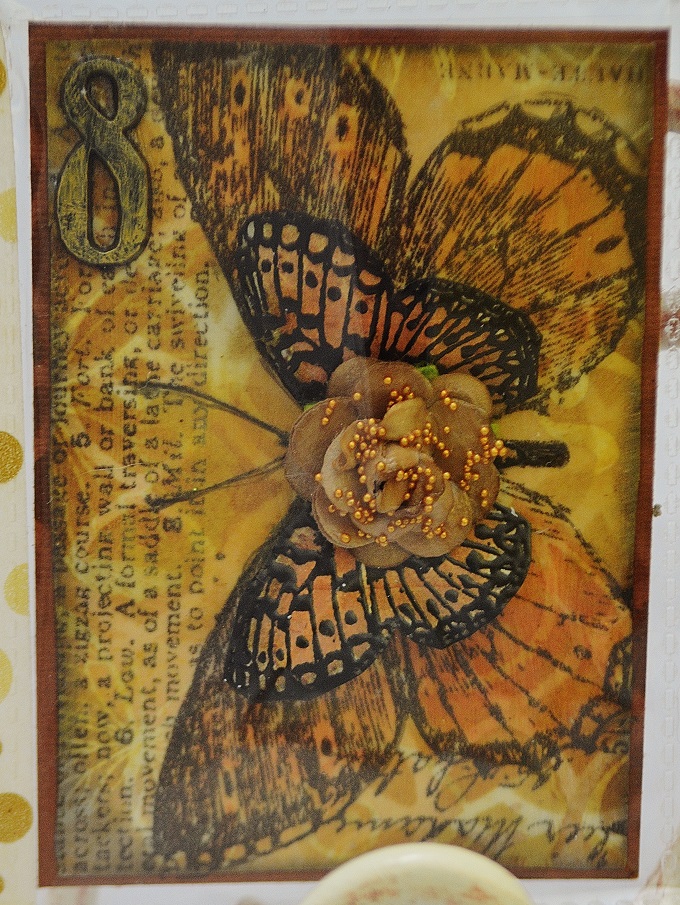
The number 8 means "new beginnings" so I wanted to include it on my letter for Glenda. You can see (white lines) the lattice stencil by Tim Holtz peeking through the background. I placed this large butterfly from the tissue paper on my resist paper vertically so I could capture most of it. It's colored with Distress Markers and I stamped a butterfly image with Versamark ink onto a dp from the Almanac collection then heat embossed it. It was popped up on foam dots for dimension and placed on top of the tissue butterfly and I added a Prima rose in the center. I love that the tissue paper dries translucent so you can see the design beneath it as well as the text, script writing and butterfly on this sheet. Tim Holtz is a creative genius indeed!


Here's is Glenda's butterfly pocket letter to me and being someone who loves color......well I simply love it. The butterflies are gorgeous and I love the banner she made along the spine. 

I'm not sure where she got all of her images from but they are so pretty in person. The blue is vibrant and jumps off the page and I love the beaded tassle as well as the handmade stick pins (not shown) she always includes. I admitted to her that I am hoarding them. :) Sorry folks but no way am I passing those treasures on. I'm planning to use them on future mini albums I want to create if things ever calm down a bit. I also got a chuckle out of her saying I looked too young to become a grandma soon in my note I included for her. It might be time for me to update my profile photo lol because this time next month my grandson should be here. I'm just a wee bit excited to become a "Mimi" and even more excited to hold that precious bundle in my arms for the first time. :)))))

Sorry, I got off track...here's a mini collage of this pretty pocket letter before I close today.

She's added sunflowers (which I love) crochet lace, sequin trim, my initial, and a yellow and white fancy trim....just so many details that are hard to miss if you don't take a closer look. The image of the cluster of butterflies (middle pocket, bottom row) is stunning in person. I love winged things and I'm currently working on another pl with this theme. Upon receiving this one from Glenda last week I decided to go with vibrant colors as well. After all, summer is nearly over and the butterflies will be leaving soon then everything will turn golden.


A big thank you to all of my pals for the wonderful goodies they included with my pocket letters and for those special handmade gifts that will be cherished always. ;)

Thanks for the visit today!
Hugs,
Lisa 


Thursday, August 13, 2015

The Final Challenge at CC3C


The final challenge, Layering Stencil: Monoprint, bring us to the last technique in Tim Holtz's Compendium of Curiosities 3 book. It makes me sad to say goodbye to the challenges but I know that I'll keep up with the Curiosity  Crew through their blogs and on FB. They have provided amazing inspiration each challenge and I just want to say a big thank you.  Also to Linda Ledbetter for hosting all 34 challenges, now that's commitment!

34.header

It's not too late to get your autographed copy of Tim's Compendium of Curiosities 3 book on his blog. 


For my last project I decided on a tag because Tim seems kinda fond of 'em. ;)

A little close up of the Layering Stencil: Monoprint technique using Tim's Honeycomb stencil. In the upper left corner I stamped a quote, from the Classics #16 set, which fits perfectly with my final entry. 

 I had to use this gorgeous butterfly from the Limitations set. It was water colored with Distress Markers-seedless preserves, mowed lawn, squeezed lemonade, mustard see, broken china, spiced marmalade- and received a dusting of Clear Rock Candy Distress Glitter for some texture.

(Voyage stamp is from the Classics #1 set)
I have enjoyed every minute of my artful voyage with the Curiosity Crew.
Thanks Ladies!!!


Wonder when book #4 will be published? Can't wait!!


The final challenge is sponsored by The Funkie Junkie Boutique and Linda is generously offering a $25 gift certificate to the lucky CC3C winner. Thanks Linda!

The Funkie Junkie Boutique


That's all for me today, take care everyone.
Lisa xx

Friday, July 31, 2015

CC3C - Altered Surfaces


I know it's a wee bit early possibly for a Halloween project. Perhaps it was a subliminal thing, it has been "hotter than blue blazes" and maybe I was wishing of cooler temps or perhaps I was thinking of Tim. He loves Halloween and consequently he designed a lot of fun stuff for us to play with. Who knows??? Sometimes you just gotta go with it.

I've been out of the CC3C loop for the past 5 challenges. Now sure how that happened (yes I do, real life stuff) but I'm back to play along with the final two. This one is all about altered surfaces and the technique can be found on pg. 45 of Tim's Compendium of Curiosities III book.

33.header


I chose to alter two numbers from Tim's Idea-ology Alpha Parts, Numeric Words and Numbers, using the technique in the book. Micro beads were added because I like them. :)
See that bat? Well he started all of this, I found him on my craft room floor (don't ask) and before I knew it, I had bats everywhere lol.

You can see Tim's Shattered stencil on display in this photo.
I blended Archival Jet Black ink through the Shattered stencil over my canvas to build the the base layer. After it dried I came back with Distress Inks-Black Soot, Seedless Preserves, Spiced Marmalade, Mustard Seed, Squeezed Lemonade-and blended the colors randomly over the stenciled area. 

I'm totally into texture these days and the more the better. With that in mind I die cut my branch tree with black corrugated paper and gave each one several coats of gesso and distress paints. Bent branches add more dimension and hide various spooky creatures.

Like the owl hiding behind the branches. He's from Tim's Mini Halloween stamp set and because we have an owl living on the lot next to ours I wanted to include him. It's a bit spooky at night to take the dog out and hear him hooting. She's snack size for him and I don't want to wrestle an owl over my dog, but I will!

The moon and stars were die cut from Tim's Crescent Moon and Stars die with iridescent paper. Distress inks were rubbed over the surface so the texture of the paper would pop out. I did add some shading with a black Faber-Castell Pitt Pen.

The trick or treaters (aren't they fun!) are also from Tim's Mini Halloween set and were stamped in Archival Jet Black Ink because it's permanent ink. I outlined each one with a Uniball Signo white gel pen for some definition. The Skull and Cross Bones metal elements were altered with gesso and Black Soot Distress Ink. They're from Tim's Idea-ology line as well as the Wishbone in the lower left corner. The white marbles are from my stash and I added micro beads to the top of each. If you enlarge the photo you'll be able to see the micro beads I added to the base of my trees. I'm kinda hung up on these things right now. ;)

Tim's Clipboard Clip will serve as the hanger for my canvas and it was altered with Brushed Pewter and Black Soot Distress Paints. I used strong adhesive glue and two long fasteners to anchor it in place. A Halloween token was altered with the same paint and glued in place with Glossy Accents. To finish I blended Spiced Marmalade Distress Ink over a 2015 Small Talk Stickers word strip by Tim, placed it on the clip and added a purple ribbon from my stash.

I love the lettering of Tim's Ransom alpha's and to highlight the letters I added a touch of Brushed Pewter Distress paint. Seasonal Chit Chat stickers, trick or treat, were altered with Seedless Preserves Distress Ink and a black Uniball gel pen. You can see the spiders I stamped, also from the Mini Halloween set, and the black glass bats from my stash. After they were glued with 3D Matte Gel I added a touch of the Brushed Pewter DP to the end of each one to highlight. 


This was such a fun project to create and even though I truly had no intention of making a Halloween canvas, I'm glad I did. My daughter loves it and has already claimed it for her holiday decorating this fall. 


The Inspiration Emporium sponsored this challenge. Thanks I. E.!

iegc50


I hope to be back later today with my second project from my class with Finnabair (still editing photos). It may have to wait until Monday because my hubby wants to travel to visit our friend who was in an auto accident earlier this week. He was airlifted to Memphis on Monday morning and was cleared for visitors this morning. It'll be a short and sweet visit I'm sure but I think he wants to see for himself that his friend is going to be okay. A big thank you to all of you who've said a prayer for him and his family! One thing is for certain, you never know what each day will bring in this life so let's make them count.

Have a great weekend everyone, wherever you are. :)
Lisa xx


Friday, May 1, 2015

Read the Directions


It has been a long time coming but I am actually linking up my project during the first week of the challenge. Might not seem like a lot but it sure makes me happy! Another thing that makes me happy is this gorgeous butterfly by Tim that is part of the Limitations stamp and die set. I love it!!!

This particular challenge focuses on Embossing Diffusers, another cool tool by Tim, and once again I waited until a challenge forced me to use it. Why??? I think I have to change my ways and venture out a little bit lol. At this point here's where the blog title comes in-

~ Read the Directions ~

I read the instructions in the book (well actually I looked at the pictures) and started the process. Boom, I thought I'd broken my die cutting machine. Not good! Tried it again and was unsuccessful. Hmmm....time to get the book and read the text...AH BACH! Third time was definitely the charm and it was so easy that I felt foolish. Good thing I was the only one home to witness this episode. ;)


27.Header

Order your autographed copy right here from Tim!


You already know by now that participants can't share the technique but I have a few close ups and can share how I put my card together.


I used Distress Markers to color the butterfly then blended Scattered Straw Distress Ink over it. Using the die included in the set I die cut my butterfly and set it aside. Next I altered an Idea-ology metal flower but left the leaves in their natural state. Tim's French Script embossing folder and the circle from the Embossing Diffusers 1 set were used to complete the technique for the challenge. Gathered Twigs Distress Ink was lightly rubbed over the raised text to make it stand out. 


Lace trim was wrapped around the layered panels and I added a sentiment from Tim's Hashtags stamp set, yes the hashtag is missing but I was afraid it wouldn't fit to I masked it. I'll go back and add it. I used two of Tim's paper collections - Shabby Vintage and French Industrial - for the dp's and textured cardstock for the base. Should also note that I used the Figure stamp from the Limitations set and the Zig Zag border stamp (on the green panel) is from his Spring Sprung set. Jet Black Archival ink was used to stamp the sentiment and butterfly and Gathered Twigs Distress Ink for the Figure stamp and distressed edges. Kaisercraft brown pearls finished my card.


The Inspiration Emporium is sponsoring this challenge and offering one lucky CC3C'er a $50 gift certificate.  

iegc50


Edited: I haven't joined other challenges (minus the CC3C) in over a year now but I couldn't pass up the opportunity to join along with another fun Tim influenced challenge. So I am also linking my card up with A Vintage Journey and the challenge for May is Spring Colors. My colors are pink, green, and shades of brown. Pink for the geraniums I just planted, green for the leaves that are on all the trees now, and brown for dirt which is a necessary component to any growing plant/tree unless you're into hydroponics which I'm not lol. The products I used by Tim are mentioned above.


Have a great weekend everyone!
Lisa xx


Related Posts Plugin for WordPress, Blogger...