Thursday, May 21, 2015

Piggy Treat Cup


It's all about Treat Cup Cards at The Cutting Cafe!!!


I used the Pig Treat Cup to create my card but there are 6 fabulous designs to choose from as well.


The Cutting Cafe


The set includes the following TREAT CUP CARDS:
FLOWER TREAT CUP CARD
LADYBUG TREAT CUP CARD
PIG TREAT CUP CARD
HOT AIR BALLOON TREAT CUP CARD
GUMBALL MACHINE TREAT CUP CAR
RATTLE TREAT CUP CARD
CANDY TREAT CUP CARD

Sentiments are also included for every set.

If you are a visual learner, like me, you'll enjoy Regina's 
Watch Me Work Wednesday-Episode 25 
which shows you how to put these fun treats together in a snap. 
(click the link to watch now)

To see more inspiration featuring all of these designs visit TCC's blog to check out the DT's creations. My teamies really knocked it out of the park!

Also, Regina is holding a DESIGN TEAM CALL so if you'd be interested in joining this wonderful team click here for more information. Good Luck!

Design team badge


Thanks for the visit!
Lisa xx


Tuesday, May 12, 2015

All About Animals


This challenge is for animal lovers and Brenda is hosting this one. All you need to do is choose an animal(s) and include it on your project. You'll be in the running for our fabulous sponsor's prize and if you're interested in being a guest designer at TTT leave a tip in your blog post and put TIP behind your name when you link up. 


Crafty Sentiments Designs


Prize is winner's choice of 3 free digi's.


I used Suzi Blu's Loved Pets: Bubble Biscuit on this fun birthday card and colored it with Prismacolor pencils. You can see in this close up how I mixed several geometric designs together which leads me to my TIP: Mix geometric patterns using different elements like paper, dry embossing and ribbon. I love the visual interest it adds. The balloons are part of Hero Arts-Be Happy Today stamp set and I fussy cut them. The word Celebrate is part of a subway art stamp - Graphic Greetings Birthday - and I masked it with scotch tape so only this word would appear. Festive Berries Distress Ink adds a touch of color to my sentiment. The chevron dp is by The Paper Studio and the multi-star dp is from Echo Park's Little Boy collection. Kaisercraft red pearls and Ocean Blue liquid pearls by Ranger add the finishing touches. 


I rarely show the inside of my cards but I love this birthday sentiment, and the candles, which are also from the Be Happy Today set. That's a Labels 10 Spellbinders die and should note that I used  Classic Circles and Classic Scalloped Circles dies by Spellbinders on the front of my card. 


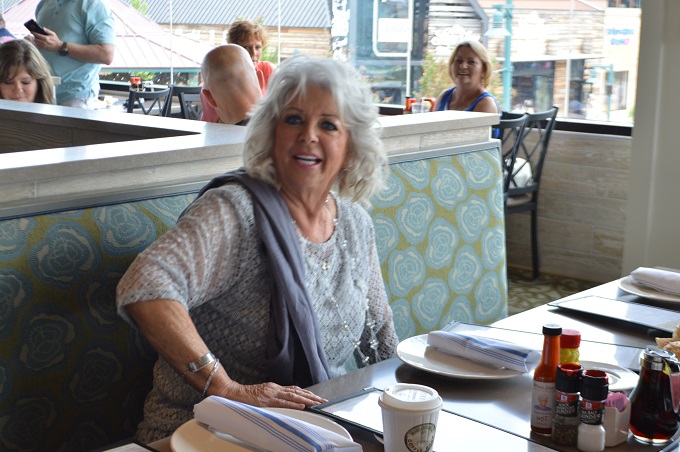
Before I go I have to share who I met yesterday in Pigeon Forge, Tennessee. 
She needs no introduction-


We were eating lunch (at her restaurant located at The Island-a resort, shopping, and dining complex) when all of a sudden everyone started clapping. We couldn't see what was going on and then there she was. She sat down across from where we were sitting and her husband, Michael, joined her a few minutes later. She was so gracious to let everyone take pictures and after she ate lunch she surprised shoppers in the gift shop by appearing in the kitchen area to snap photographs with everyone. She is one of the most down-to-earth people I've ever met. 

Here she is signing some tea towels my hubby bought for me. :) 


A rare photo for me as I hate having my picture taken but I had to make an exception this time. ;)

By the way, I highly recommend her new restaurant Paula Deen's Family Kitchen in Pigeon Forge. 
Good food and plenty of it!!!


Thanks for the visit today, we are headed home and I have thoroughly enjoyed my Mother's Day get-a-way with the hubster and my Bub. I'll be by soon to catch up with all the crafty goodness that I missed while away. :)

Have a wonderful week,
Lisa xx


Wednesday, May 6, 2015

Furry Babies Mini Album


I'm sharing a fun project for The Cutting Cafe that features the Photo Background Printable Stamp. In addition I used the Camera Photo Shaped Holder Template...Cutting File which coordinates with the printable stamp. 

I created this mini for my furry grand babies, Rosie and Felix, and for the new addition we're expecting. My hubby has finally relented and we are getting a beautiful little girl next month. Her name is Sophie and she's a Cavalier King Charles Spaniel just like my furry granddaughter, Rosie. I can't wait! So actually this mini is more like a brag book. :)


The Cutting Cafe


PHOTOS

2010-11-29_194529


A few close ups of the cover of my mini. 


I trimmed a 12x12 dp from Graphic 45's Communique collection to 8.5x11 and printed the Photo Background printable stamp on it. Then I imported the Camera Photo Shaped Holder cutting file into my Silhouette Cameo library by 

1. Open Silhouette
2. Click on File > Import > Import to Library 

at this point a window opens for you to select the file - it's important that you've extracted the file before you do this and second that you select SVG (*svg) as the file type, not the automatic Silhouette file. You have to make this change before you can see all of the files in the folder.

3. Select the SVG (*svg) as file type
4. Choose your cutting file
5. Click OPEN and import

My Cutting Cafe files go directly to the My Own Designs folder in the Silhouette Library. To keep my non Silhouette files straight I create a separate folder so I can click on the file image and drag it to the correct folder. It helps me stay organized and I hope this info will help some of you just starting out with your Silhouette Cameo. 


To create this mini I went rummaging in my alterables stash and found a 7 Gypsies Book Cover I purchased on clearance, ages ago. I decorated the front but left the back cover alone. The other pages are chipboard which I cut to size and each one is covered with Graphic 45's - Raining Cats and Dogs collection. The alpha's, flowers and cardstock stickers are also from the same collection.

I'll share the inside pages after we get our little girl next month. 
I won't forget, I promise.


Be sure to visit The Cutting Cafe's blog on the 7th to see all of the inspiration by the design team. If you leave a comment for the DT then you'll be in the running to win 3 FREE sets from Regina. Good Luck!

Have a great week everyone!
Lisa xx


Friday, May 1, 2015

Read the Directions


It has been a long time coming but I am actually linking up my project during the first week of the challenge. Might not seem like a lot but it sure makes me happy! Another thing that makes me happy is this gorgeous butterfly by Tim that is part of the Limitations stamp and die set. I love it!!!

This particular challenge focuses on Embossing Diffusers, another cool tool by Tim, and once again I waited until a challenge forced me to use it. Why??? I think I have to change my ways and venture out a little bit lol. At this point here's where the blog title comes in-

~ Read the Directions ~

I read the instructions in the book (well actually I looked at the pictures) and started the process. Boom, I thought I'd broken my die cutting machine. Not good! Tried it again and was unsuccessful. Hmmm....time to get the book and read the text...AH BACH! Third time was definitely the charm and it was so easy that I felt foolish. Good thing I was the only one home to witness this episode. ;)


27.Header

Order your autographed copy right here from Tim!


You already know by now that participants can't share the technique but I have a few close ups and can share how I put my card together.


I used Distress Markers to color the butterfly then blended Scattered Straw Distress Ink over it. Using the die included in the set I die cut my butterfly and set it aside. Next I altered an Idea-ology metal flower but left the leaves in their natural state. Tim's French Script embossing folder and the circle from the Embossing Diffusers 1 set were used to complete the technique for the challenge. Gathered Twigs Distress Ink was lightly rubbed over the raised text to make it stand out. 


Lace trim was wrapped around the layered panels and I added a sentiment from Tim's Hashtags stamp set, yes the hashtag is missing but I was afraid it wouldn't fit to I masked it. I'll go back and add it. I used two of Tim's paper collections - Shabby Vintage and French Industrial - for the dp's and textured cardstock for the base. Should also note that I used the Figure stamp from the Limitations set and the Zig Zag border stamp (on the green panel) is from his Spring Sprung set. Jet Black Archival ink was used to stamp the sentiment and butterfly and Gathered Twigs Distress Ink for the Figure stamp and distressed edges. Kaisercraft brown pearls finished my card.


The Inspiration Emporium is sponsoring this challenge and offering one lucky CC3C'er a $50 gift certificate.  

iegc50


Edited: I haven't joined other challenges (minus the CC3C) in over a year now but I couldn't pass up the opportunity to join along with another fun Tim influenced challenge. So I am also linking my card up with A Vintage Journey and the challenge for May is Spring Colors. My colors are pink, green, and shades of brown. Pink for the geraniums I just planted, green for the leaves that are on all the trees now, and brown for dirt which is a necessary component to any growing plant/tree unless you're into hydroponics which I'm not lol. The products I used by Tim are mentioned above.


Have a great weekend everyone!
Lisa xx


Related Posts Plugin for WordPress, Blogger...