***Photo Heavy Post***
Good Morning...or afternoon...or evening wherever you are! I shared some sneak peeks of this album on Instagram and now the full reveal is here on my blog. Recently I traveled to California for a long vacation and found coming home to so many photos overwhelming. I wished that I would have made an album so I could just print photos, do some journaling and record our keepsakes from the trip and file everything away neatly and without it taking me a year. ;) That's when it hit me! I could make one for my dear friend, Katrin, who was set to travel to the United Kingdom in July with her husband. I could begin working on it before the trip and finish it shortly after they left, mail it and presto she'd have an album to come home to where she could do exactly what I should have done.
I'm happy to say they had a wonderful UK adventure and we "virtually" opened it together when she returned. It touched me how much it meant to her. Every now and then we come across special people who bless our life and become our friends and she is one of those people for me. I am blessed by her friendship beyond measure!
So let's go right into the album, shall we. I'll start with the charms I added to the spine and go in order from there.
I added some of Tim's travel charms, a cross (because they always visit churches), a key with a heart, compass and a small bottlecap with a crown. The trim which holds the 2-ring metal binder is also by Tim.
This is the inside front cover and I die cut bunting with a Spellbinders pennant die, added some alpha's and teeny brads. The Union Jack washi has been in my stash forever and I was so happy to be able to use it. I sent some to Katrin before they left so she could also use it in her traveler's notebook. The chipboard piece at the bottom is a leftover from a sticker pack that I think (?) is by K and Co. and the metal arrow is by Tim Holtz as well as the star paper (Correspondence collection).
I used stickers from the travel themed collection that I purchased at Michael's, a Pink Paislee cork heart, MAMBI chalkboard sticker, wood veneer plane and alpha's by Dear Lizzy for American Crafts.
The back of the divider page is a perfect spot for adding a waterfall style album for larger photos or items they want to record from their trip. I added some of the cities and places visited with Tim's chit chat sticker alpha's and if I missed any I know she has some in her crafty stash. :)
I found this small calendar and recorded the dates they were traveling on it. On the pocket above I created Scotland's flag - the Cross of St. Andrew - and embossed the upper right pocket.
I stamped on both left pockets, tucked in some labels and used a journal card from the collection.
I stamped #selfie on the upper right pocket and tucked in a chipboard word - Holiday - which I painted yellow. That pocket (if you look closely) has been embossed.
A journal card and another for use as a photo mat which came from the travel collection.
Washi tape and a wood veneer frame tucked into the upper right pocket are the simple embellishments on this page. Visiting Scotland was a first for them so I know they'll want to record a lot of pictures. They traveled with their sweet bear, Bo, on this trip and as it turns out he loves cherries so had to include a paper with cherries on it for him. ;)
*traveling with a bear, yeah I know how that sounds, to learn more about Bo and his great big adventures check him out on Instagram at bocrewwanders*
Love the paper by Glitz on the upper left pocket, it has hexagons on it which Katrin loves. The butterfly on the upper right pocket was stamped on there and I added some washi to it.
This page is really about sharing photos, the washi holds in some treats for her you'll see below. On the blue striped paper I stamped flowers from one of Tim's stamps in weathered wood (I believe) distress ink.
I love the flowers on the top left pocket because I know they'll remind Katrin of the beautiful wildflowers in Scotland. I tucked in some cork and wood veneer embellishments in the lower right pocket for her to use where she wants to.
This concludes the first part and now onto to the second stop of their UK adventure, Ireland.
The second part of their journey began in Ireland and when I think of Ireland 2 colors come to mind - green and yellow. I always see fields of green grass with yellow flowers so those colors are heavily featured in this section. This deep pocket will be great for storing large photos or whatever happies they want to keep in it. I shared 3 green doilies with her which she can use or save for another project.
This is a G45 paper and I loved the colors in it, a side pocket was added and fun ephemera from a 6x6 paper collection that I can't recall right now. I'll look it up and edit it this post some time today.
The upper two are really photo mats and the lower left is a great place to journal. To the pocket on the lower right I added some of Tim's washi and one of his flashcards.
Katrin loves animals and especially little deer so this Maggie Holmes image had to grace her album. The upper right pocket already had the text on it and I added some stamped butterflies and a label. The other two (upper left and lower right) are front loading pockets to store photos. Since it was their first time there I knew she was likely to take a lot of pictures. ;)
I stamped soft images on the two left pockets - flowers and a compass - added some washi and chit chat stickers and did a bit of doodling with a gel pen.
Sometimes it is good to record those special meals in special places so your memories can instantly bring you back to that place and time again.
Another place to record larger photos, I made it a half-sheet and she can add a photo mat or journaling to the back of it (see below).
I love Heidi Swapp's photo protectors and for this album I turned them on their side and placed in a waterfall style. The cardstock label above each photo can record the when and where it was taken. This washi had to make an appearance as I love it and the colors are perfect. :)
The upper left pocket can be used to slip a photo underneath or a piece of ephemera from their trip while the lower right pocket will hold tickets or more photos. The label can record what she decides to store in it.
I put a belly band on the upper left pocket and spelled out "dublin" on the lower pocket. On the upper right pocket I used a SMASH journal sheet so she can record some of their favorite things.
The papers on the right are busy but they go with the theme so maybe she can use them as photo mats or create a pocket with a calmer paper. ;) The journal card (upper left) will let her record special memories from their time in Ireland.
That concludes the second part of their journey, next they traveled to merry 'ole England.
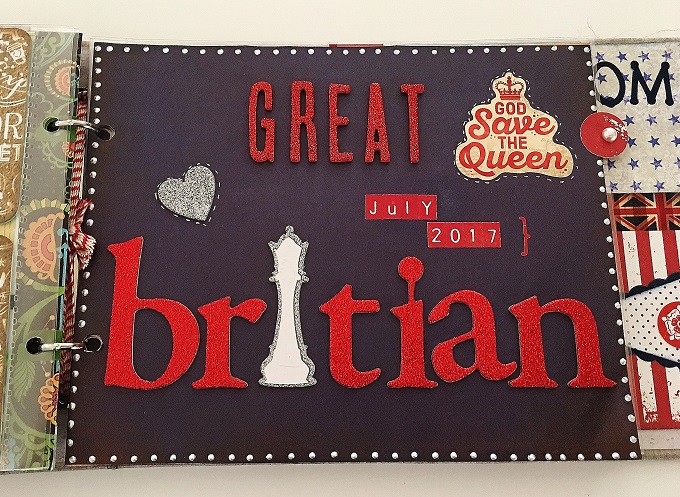
The divider for the last leg of their journey, Britian. I greatly admire Queen Elizabeth so I was tickled to use this sticker from the collection. Honestly I can't imagine the world without her in it, she has served with immense grace throughout her life.
The back of the Britian divider has more photo pockets by Heidi Swapp.
Stonehenge was on the travel agenda and fortunately for me there was a paper in the travel collection with photos on it. I also found a ticket that had London Country Buses on it (upper left) which was perfect.
Sorry for the glare in this photo but I used a journal card (bottom left) and stamped an image of the British flag (bottom right) and simply added a sticker from the collection.
The London Calling was a journal card from the travel paper pack and I cut the other 3 from papers in Tim's Correspondence collection. I stamped images on each of those and the washi was added to secure what I tucked in the pocket below.
A wood veneer crown was tucked in the bottom left pocket and secured with washi so it wouldn't fall out during transit. A belly band was added to the bottom right pocket and more of my Union Jack washi tape makes an appearance. A die cut image with a tea pot was added and I slipped in some labels for her to use. In the upper right pocket you can see where I stenciled stars in chipped sapphire distress ink with Tim's stars stencil.
I tucked a wood veneer arrow in the bottom left pocket and stenciled some clock cogs with Tim's stencil on the bottom right card. Above it you see more of my Union Jack washi tape.
Maps of London and stickers from the travel themed paper pack can be seen here and below.
On the bottom right card I stamped a crown in faded jeans distress ink. The phone booth (upper right) is a sticker.
Love the journal card (bottom right) from the travel paper pack. :)
Inside Back Cover
It has a deep pocket where maps, brochures, large photos, etc. can be stored. Another British doily makes an appearance and I incorporated stickers from the travel themed paper pack I used throughout the album.
Thanks for visiting today and I hope this may provide someone with inspiration. Please overlook any grammar or spelling errors as I am flying today and wanted to get this up before noon. ;) I will be back soon with a belated design team project for ABC Christmas Challenge.
Have an awesome day,
Lisa xx