Saturday, October 31, 2015

Final 2015 Halloween Pocket Letter plus Incoming PL's!


Happy Halloween!


I'm sharing my {actual} final Halloween PL today plus those I received from my pals. At the end of the post I'll also share a pl from my pal in Memphis so I'll be caught up with October. The pocket letter above went to my pal in New York. She asked if I'd like to swap and of course I said yes. :) 

There are many photos to share with you so you might want to grab a cuppa or a quick snack. 
Let's get started.


Above is the front of my pals pocket and below are a few close ups. 

I added Tim's tissue tape to the spine and two number brads (a 3 and 1), then I attached a metal button to the striped ribbon bow. A quick tag was created from ephemera from Tim's holiday stash paper pad and I stamped Hi Pal.

The rosette is a dimensional sticker by K and Co., I stamped images (far right pocket) then colored with Copic markers and fussy cut them. Glittered alpha's spell out franks lab and I popped a Frankenstein sticker on the outer pocket. Silver liquid pearls were added to outer pockets as well as Tim's laboratory tissue tape . On the far left I added a bottle cap image and stamped Hey Ghoulfriend and a another spiders web at the top (hard to see I know).

 
A metal Idea-ology crown was added to the skull and Tim's Gothic stencil was stamped around it in Dusty Concord distress ink. For the outer pockets I stamped images (Waltzingmouse and Taylored Expressions) and punched a MS border fence on far right pocket.

The middle pocket holds die cut Halloween charms by TE and the far left pocket dies are also by TE. The remaining goodies were tucked in the back pockets which you can see below.

I included washi tape, a tag and stickers, note from me, bottle cap images, ephemera, stamped images, tea, metal Idea-ology skulls and spider medallions.


Okay now for the Halloween incoming pocket letters plus a private vintage swap I did with my pal in Memphis, Tennessee.

{in order I rec'd them}

From my pal in Connecticut
Front

Back

 From my pal in Indiana
Front

Back

 From my pal in New York
Front

Back


From my pal in Canada
{this is our second swap) 
Front

Back


Also including a vintage pocket letter from my pal in Memphis, Tennessee. 
Front

Back


I love each one and want to thank each pal who took the time to create one for me. Can't wait to use the goodies on next year's pocket letters. :) 

Have a safe and fun Halloween everyone, wherever you are!

Lisa xx

Wednesday, October 28, 2015

A New Adventure


Good news to share!
I am the newest design team member at ABC Christmas Challenge and I'm super excited to be a part of this team. I love Christmas and it's going to be a lot of fun creating projects all year long. A big thank you to Samantha for the invitation and to Helen and the team for the warm welcome. 
Thanks ladies! 

Every other Wednesday a new challenge begins and this challenge is

 ~   V - Very Cute    ~

As always you can make any item you like as long as it meets the current challenge theme and it's a new project. If you enjoy making Christmas items then check out the rules here  and join us.   

Our sponsor - Zlatoena's Designs - offers cute digital images and graciously supplied the DT with images to use. I used Bunny Christmas Lights on my card and I adore him. It's really hard to believe though, in a few weeks, I'll be putting up our Christmas tree. This year has literally flown by! 

Prize: 2 Free Digi's for our lucky winner.

To create my A2 size card I used dp's from the MME Merry Christmas 6x6 paper pad, a tree die by Verve Stamps, Kaisercraft hot pink bling, a pink button, twine and ribbon. The sentiment is by Hot Off The Press and I used an EK Success border punch to create a fancy border which I outlined with a black Spica glitter pen. The cute image was colored with Wink of Stella glitter pens (light bulbs) and Copic markers for a bit of shading on the rabbit.


I'm entering this card in the following challenges:
Christmas Card Challenge - Anything Goes
We'd love to have you join us for this challenge! 
For more inspiration drop by the ABC Challenge blog to see the other DT creations and our guest designer's, Sarah Wills, super cute card. 
Also, there's a DT CALL going on until the end of November and you can learn more about it by clicking the link to the blog. 

Thanks for the visit, have a wonderful day.
Lisa xx


Wednesday, October 21, 2015

Outgoing Halloween Pocket Letters


It's hump day which means the weekend is only two days away. We've been enjoying the beautiful fall weather here in west Tennessee with walks, picnics and taking our annual fall cruises on the lake to watch the changing of the leaves. I try to soak up this time of the year as much as possible because I know what follows. I hate winter and the cold that comes with it. :( For me after celebrating the holiday season it's all down hill until spring. 

I should warn you that I'm sharing several projects w/photos so if you want to grab a quick cuppa or snack now is a good time. :)

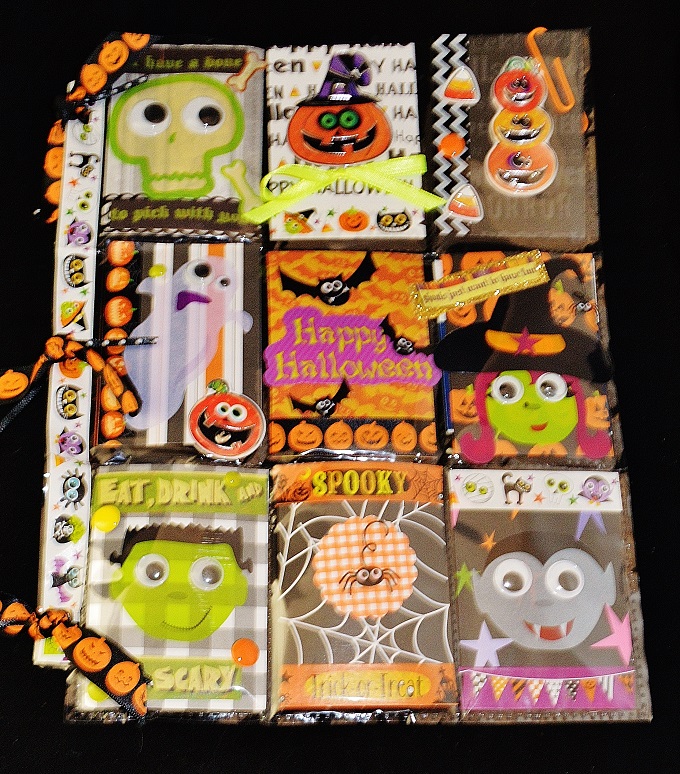
Today I have three Halloween tricked out pocket letters to share with you. I'm posting them in the order I created them and the first one (above) was for my pal in Connecticut. We were swap partners in the Cute or Spooky Halloween Monster swap at Pocket Letter Pals and it's clear that we both chose cute. I love all the fun aspects of Halloween-trick or treating, dressing up, parties and candy-but not the dark side. Since my kids are grown it's fun to have a creative way to "dress up" ATC size cards with stickers, stamps, dies cuts and punches and create pocket letters. Of course you have to include a sweet treat as well and I always try to "treat" my pal and not "trick" them. ;)

Here's the back of the pocket letter where I stashed all of her treats. 
Stickers, tags, ephemera, ribbon, bottle caps, labels and some relaxing tea after a hectic day.

One of the things she mentioned that she liked about her pocket letter were the fences which I embellished with purple liquid pearls. The border punch is by Martha Stewart and you'll see it also on my last pl in this post. I kinda like it too!

Top row-there were goodies on the the front side as well as the back side. Here you can see one of the assembled bottle caps and there are two buttons as well. Sorry for the glare, it's really hard to get good clean shots because of the reflection from the protective sheet cover. 
Note: You can click on any picture to enlarge. 
  
Middle row-No goodies on these but I did share some of the labels I used in the back pockets. 

Bottom row-You can see the fence punch again and I had fun creating the little scenes. Even though the black cat scared the skeleton have to death (far right) they later became friends and went trick or treating together, or so I was told by the skull. ;)

--------
Note: if you are Tiana or Patti you want to stop reading now if you're pl's haven't arrived yet. I post at PLP's once they show delivered but usually do not wait to post to my blog. Just sayin'! 
--------

Okay my second pocket letter went to my Canadian pal. This is actually our second swap and again it's not for a group swap but simply because we wanted to. I adored the first one she sent so I'm looking forward to receiving hers next week.
{I'll share all of my incoming pl's at the end of the month so you can see what I received.} 

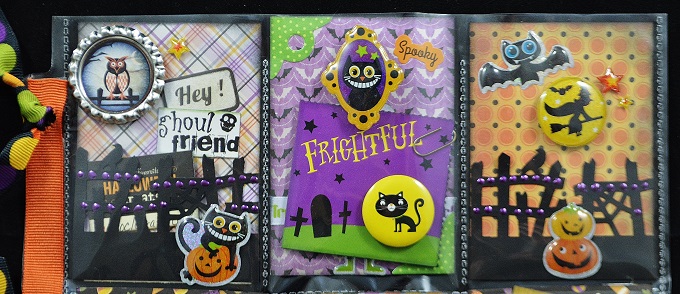
When we exchanged last month we had a cute animals theme going so I definitely wanted to include animals on my Halloween pocket letter for her. Owls are the main focus with a black cat, bats and birds. Orange, black and white, with a touch of yellow is the color scheme and there are no goodies on the front which might lead her to think she's been tricked. All she has to do though is turn it over and jackpot, treats everywhere. :) Also I included several ribbons and an Idea-ology Halloween token that she can use for future projects on the spine. 

Check it out...
The back is fully decorated so when she removes all of her treats it will still look great.

 A little close up of her treats-tea, fragment tags, button, stickers, ephemera, stamped Halloween images for her to color and use, bottle caps, clear stamps, owl and skull erasers, ribbon and twine and lastly charm die cuts. Since her pl is traveling a long way I put her sweet treats in a bag and included a trick or treat label. 


My third and final Halloween pocket letter went to my pal in Indiana. We were part of a Halloween Group swap and truthfully I wasn't sure what she'd like so I kept it classy with a touch of elegance. Sound weird? Guess it does but hopefully the Authentique Glowing paper collection helped me pull it off. 

Glare is a bit of a factor here too so I've included close ups of a few pockets.

The middle pocket functions as my quote pocket. I stamped a Waltzingmouse greeting that says Halloween WISHES in Staz On Metallic Silver ink and added filigree corner stickers. Ribbon tied into a bow adds a pop of color. You can see the left pocket a little better below.

This is the pocket that greets my pal and lets her know I have included a note for her. You can see the MS fence border punch a little better in this photo and here I used silver liquid pearls. To make sure the web stands out I ran a silver Wink of Stella brush pen over it. This is a good time to address the spine of my letter which I always try to dress up. In this case I added washi tape, brads and the middle punch hole has a button attached which my pal can use for future pockets or keep for herself. Hey ghoulfriend is a Taylored Expressions stamp and I also stamped a pumpkin patch on the bottom with a Verve pumpkin stamp. The wood laser cut arrow is by Studio Calico and I altered it with black paint and a silver gel pen. An alpha set by Studio G was used to stamp NOTE as well as what each individual pocket holds (like the photo below). 

I'll get back to the spine in a minute but before I do I thought I'd mention that this pocket letter contains goodies on the front as well as the back. In this one I tucked in a Halloween charm die cut set by My Favorite Things for her. There's a witch's hat, cauldron, tombstone, pumpkin, dog bone, ghost, spiderweb and crescent moon included.

This pocket (bottom row-middle) has an acetate pumpkin which I added to the front of the pocket letter. I tucked in die cut tags and stamped images for her to use. On the pocket itself I stamped Tags and Images which gets lost by the big mouth pumpkin lol. 

If you jump back to the middle row-middle pocket you'll see a punched MS spiderweb where I hid some bottle cap images for my pal. If she dares to enter the web {insert evil laugh} to retrieve her goodies. Now if it were up to my daughter she'd pass as she hates spiders. If you want to see her lose it just "trick" her with a spider however I guarantee her reaction won't be a "treat" lol. ;)

Here's the back of her pocket letter (keep in mind I split the goodies up front and back).

I couldn't shake the glare today but I hope you can see that the back is as pretty as the front. Two of the pockets on the front have ribbon and twine stamped on them and I tucked the goodies in the back. Did the same for the metal bottle caps. The other pockets hold a packet of tea, a note for her and some stickers.

The last touch was to make this tag for her using stamps by Tim Holtz (greeting) and the trio of stacked pumpkins by Northwoods Stamps. I added spiced marmalade, squeezed lemonade and black soot to create my background and washi tape. Several ribbons and an Idea-ology Halloween token, which she can use, finish it. You can see the button (middle punch hole) I included and when I remember I also like to stamp the date I mail out the pocket. She also received a bag of chocolate treats as well.


I'm off to clean up the mess I made in my craft room so I can start work on my next pocket letter. It's for a fashion swap and there's a twist to this one. Can't wait to share it and see what you think. Wish me luck! 

Have a super day, wherever you are. 
Lisa xx 


Monday, October 19, 2015

Candy Corn Shaker


It's October which means Halloween is just around the corner. To make your cards extra special this year try making a fun shaker card from The Cutting Cafe. I used the Candy Corn Shaker Set to create this cute card for my daughter. 

Each section was filled with glass beads the color of candy corn.

For decoration I added a gingham bow with a sentiment from the set and a candy corn button which I found at the local dollar store. My daughter can pop the button off and add it her collection. Tim's distress inks-spiced marmalade and squeezed lemonade-provide some color. 

Easy peasy!

Have fun creating your shaker cards and if you need some instruction be sure to watch Regina's Watch Me Work Wednesday video here. Also, if you'd like to enter to win 3 FREE sets from The Cutting Cafe simply leave a comment on the design team post on the 21st. 

Have a great week, wherever you are!
Lisa xx

Friday, October 16, 2015

Mixed Media Girl with Dog


Hello and Welcome!

Most folks in the mixed media world know Andrea Gomoll but in case you aren't familiar with her, she's a mixed media artist from Germany. I love her whimsical creations and when she offered  a whimsical animals class at the beginning of October I immediately signed up. Another bonus was that part of the proceeds would go to help animals in shelters and I'm all for that. The project I'm sharing today is my first of the class yet it's actually from the second lesson. This dog was so cute I just had to jump ahead. ;) Hopefully the barrel around his neck identifies him as a St. Bernard. I definitely need more practice but this will have to suffice for now. ;)

This class-Whimsical Watercolors: Pawfect Furry Friends-is an online mixed media class. Click the link to learn more and if you'd like to test out Andrea's teaching style she offers free classes as well. I think you'll enjoy her fun personality!

Here are a few close ups.


The only time I've ever been around a St. Bernard was in high school. A friend of mine had one and he was truly a gentle giant. So is this guy!

A whimsical girl needs whimsical hair so I gave her a custom color which I call razzleberry pink. ;) I blended Quinacridone Magenta with white acrylic paint and once it was dry I added more color with pink madder lake and middle purple pink Faber-Castell Pitt brush pens. A white Signo gel pen adds  some highlights and using a technique from the class more white was added as well. I just wish I could pull this color off in real life lol. 

The butterfly on her shoulder is not part of the class creation, however I love butterflies so I added one. I used a stamp by Finnabair and colored it with spiced marmalade distress ink. Orange peel Stickles give it some pizzazz as well as a black gel pen.

I added texture to my mountains using stencils, modeling paste and permanent black ink. Also a small piece of washi tape which has 789 on it by Tim Holtz.

Using an uppercase alpha set by Hero Arts and a lowercase set by Recollections I spelled out my quote.  You can see more of the washi tape in the background along with Tim's arrow stencil. 

I love this sweet duo and can't wait to make more projects from this fun class.


Thanks for looking today, have a wonderful weekend everyone.
Lisa xx


Wednesday, October 14, 2015

Vintage Pocket Letter


I'm popping in to share a vintage pocket letter I created for a Pocket Letter Pal in Memphis, TN. The primary focus was vintage with some shabby chic and retro touches. Our color scheme was black, cream with pale pink and a touch of aqua. I think I nailed the theme because my pal absolutely loved it which totally thrilled me.

I have a few close ups for you as well as a peek at the goodies I stuffed in the back of the pockets.

My pal, Susan, loves all things Parisian so I included a laser cut wood Eiffel Tower. It's decorated with pearls and she can leave it on the pocket or use it for crafting. The rose pin (far left pocket) is from Pink Paislee's Sweetness collection. I included a Bo Bunny mini envelope with a note for my pal and some additional ephemera.

The second row is an ode to all things retro and I used ephemera from Pink Paislee's Vogue collection. The Prima paper clip says "dear" and again she can use it or leave it on her pocket letter.
I always dress up the left side of my pl's and this one has washi tape, a vintage button (shown) and a Girls Paperie metal charm that says "take the time to laugh" plus some pretty ribbon.

The lovely lady is a Pink Paislee Vogue chip and I placed it on a dictionary book page which I zipped up with Martha Stewart's doily border punch. A Prima bling center was placed on the pleated Stampin' Up ribbon and the sewing machine ephemera is from Pink Paislee as well. The vintage bling brads are by The Paper Studio and all of the soft pink blossoms are flower stickers by Jolee. 

A personal fav of mine is the Parisian themed pocket.
I layered two Prima papers then added a photo strip by Echo Park, a rose sticker, elegant lace trim and a handmade stamp I created with ephemera from Echo Park and a EK Success postage border stamp. 

Also, I like to add a personal touch about my pals so I included a Girls Paperie "S" alpha tile since my pals name is Susan. I had some leftover bling from a Prima flourish which I added to the pink blossom and I fashioned a pearl necklace as well to add to the PP Vogue chip lady. Pocket letters are stored in 3-ring binders so she'll be able to use all of the goodies on the left for crafting or creating more letters. :)


For the back I tucked in goodies which I thought she would enjoy.

Pink blossoms which I used on the front, satin blossoms by Melissa Frances, Tim Holtz clips and pins, stickers, ephemera, tags and washi tape, plus a selection of lace and per the PLP guidelines a packet of tea. The bottom middle pocket holds a letter about me for my pal which is also a PLP recommendation.


This one wasn't for a group swap like most of mine are, actually she contacted me about doing a personal swap and I'm so glad we did. I'll be sharing all of my October incoming pocket letters at the end of the month and next week I'll have 3 outgoing Halloween themed pl's to share with you here on my blog. 

Before I go I also want to thank everyone who wished my daughter here and on FB a happy birthday. We celebrated all weekend long and you can catch up by clicking my Instagram icon. We had a blast!

Have a wonderful day, wherever you are. 
See you Friday with a mixed media art journal page.
Lisa xx

Friday, October 9, 2015

Wish BIG


Happy 21st Birthday Sara!!!


Our baby girl is turning 21 today and we have a day full of celebrating ahead so this will be a quick post. She'll be whisked away for a morning spa appointment then off to Nashville to have lunch and meet up with one of her favorite authors, Rebecca Wells. She actually met her yesterday on campus and had two of her books signed. Today she'll be giving future writers some tips on how to become a best selling author which is what our daughter aspires to be. Later she'll be meeting up with family and friends at the Green Dragon and we'll all enjoy dinner, cake, presents and some merriment. The Green Dragon is a really cool place for all middle earth lovers like us. We're serious die hard fans of Tolkien's Lord of the Rings and it's like stepping into his world when you walk in the door. What is truly heartwarming for this mom and dad is that she wants us to be included in everything and we're not too old for her to be seen with us. lol It does a parent's heart good to have a kid like that. :)

A few details about her birthday card, I was in a mad rush all week getting things prepared for the party celebration and had to whip up a card before we left yesterday. When I need instant inspiration I go to Pinterest, don't we all?!? :) I based my card on one that is pinned to my Cards board and added some touches of my own. 

Okay, I have to run and prepare the last sweet treat for the party and get ready to dash out the door. Have a great weekend everyone, wherever you are.
Lisa xx
Related Posts Plugin for WordPress, Blogger...