***Photo Heavy Post***
Good Morning or afternoon....evening wherever you may be.
I have a super crafty post to share today that was inspired by the talented Suse Fish. I follow her You Tube channel and also on Instagram and I adore the way she scraps...anything. She incorporates recycled packaging, bags, scrap papers of all kinds...literally pretty much anything goes. I love to save packaging and have for several years to I thought it would be fun to stop hoarding it and start putting it to good use. I also am adapting another crafter's style into this project and that's Adele Toomey (aka Inkie Quill) from Australia. I also follow her on You Tube and I'm one of her patreons on Patreon. I love her easy style of "sticking and plunking" things down so you don't overthink the process. It appeals to me because I'm totally guilty of doing that and it tends to creatively shut me down. So no more overthinking for me I'm just going for it and frankly I love the results. Thanks Suse and Adele! xoxo
Here are my daily projects so far which I'm keeping in this planner binder that I found at a thrift shop.
It was a real bargain and it's perfect. ;)
I made an introduction tag for my binder and I journaled on the back what my intentions are for this challenge. Basically Suse inspired us to create something using her principles of Scrap Therapy for the current #the100dayproject and also hashtag her #100daysofscraptherapy so she could enjoy our makes. It is really using my scrap stash up which makes room for new crafty products so it's a win-win. Yay!
{Day 1}
I doubled a glassine page a friend gifted me and created an inside pocket. On the front I decorated it with puffy stickers and ephemera from recent Citrus Twist kits. Later I'll include bits and bobs she's shared with me over the years and seal it up as a keepsake, things I don't want to use because I want them in my forever stash. After my recent craftroom makeover I am much more selective as to what stays and what goes. If I don't plan to use it then it must go - donate, actually use on a project or preserve it like I plan to do with my cherished treasures for Katrin.
{Day 2}
I altered Pink Paislee packaging from an older collection, Vintage Vogue. The split screen photo shows the front on the left and back on the right. That day I was off to our monthly Ladies Devotion and Lunch at my church. We have such fun and my dear friend, Lucy, gave a wonderful and touching devotion that day. If you don't have any gal pals then I encourage you to go get some. They make life go round!
{Day 3}
A mixed media background using modeling paste and stencils gives a quick backdrop for this photo. My daughter was around 6 or 7 when this was taken and she wore that pink hat everywhere. She also carried lipstick and a New Testament Bible with her everywhere.
Sweet memories!
{Day 4}
More upcycled packing and this time it's a Jenni Bowlin package that held vintage buttons. Sorry for the glare but I'm not editing these photos because they'll be in groups and simply need to save time. The paper on the front of the library card kraft bag is from my dear friend in Germany. She wrote a note on the back and I saved it, in fact you'll eventually see more of that paper. I love the Paige Evans - Turn the Page paper clip that says "Let Your Light Shine" so I had to use it. This is the front side and below is the back.
I attached a glassine bag and popped in a photo of my favorite church in downtown Corinth, MS. It was in a brochure that was in my hair salon and I cut out the zip code from the brochure as well. The mixed media heart was a free download from Minerva Levinston several years ago. The doily sticker is an oldie from Amy Tangerine and love that I'm using up my sticker and chipboard stash with this project. ;)
{Day 5}
I used Maggie Holmes packaging for the base of this mini layout, layered lots of papers and tissue and spelled out Laguna Beach and Disneyland with Citrus Twist puffy alphas. I love the size of their alphas! Washi tape at the top, a yellow doily and ephemera complete this one. You can see the other projects peeking out from behind and I just love the way this binder is shaping up. It is so much fun to flip through the pages, remember the good times and know that it's mine. :)
{Day 6}
**I know this one says 8 but it's 6, just got ahead of myself lol**
This one is simply a 6x6 piece of paper that I started building on. I used scraps and more Citrus Twist ephemera from recent kits to embellish. The black foam hearts were on a nearly used Thickers sheet and I cut out the ampersand from a Paige Evans 6x6 paper and I can't remember what collection it is, so sorry. The doily peeking out is a Cambridge doily that I got for free, actually a bartender was kind enough to leave several for me once he learned I like to use them in craft projects. We were enjoying afternoon tea which was a great experience that I'd like to repeat again soon. Loved those little sammies! :) It records some great places we've been and would love to visit again.
{Day 7}
Suse Fish not only started Scrap Therapy which I adore she also does Faith Scrapping on You Tube. I love watching her videos and seeing her process while she shares her personal thoughts on Scriptures and passages in the Bible. One of her Instagram posts inspired me to create a rectangle vellum pocket to hold a prayer to God. Basically it's just me talking to God in written form and thanking Him for all of my blessings, thanking Him for loving me and carving out a moment in time for me to learn, know and accept His Son, Jesus Christ, into my heart as my Savior.
{Day 8}
It's so hard to believe it's been nearly a year since our baby graduated from college. Honestly, where did the time go? This paper {not sure where it is from?} was in a kit and I loved it immediately. However I needed to tone it down for this mini layout so I diluted white gesso with water so it would give a translucent look. I used Amy Tangerine stickers to build layers. It's not the best photo quality because we were in a week of rainy, gloomy days everyday and I needed to move on. Note: In real life it's beautiful. :)
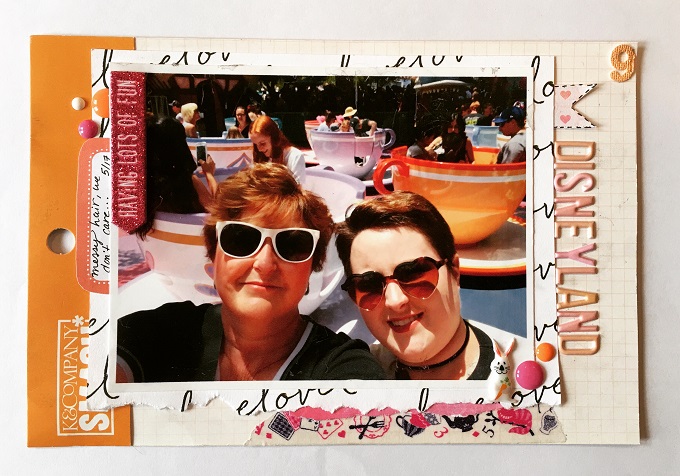
{Day 9}
Last year for my daughter's college graduation we took her on a 3 week vacation to California. To say we had a blast is an understatement. Love this kid and we're so proud of her! More product packaging and the alpha's are puffy stickers from the April Citrus Twist kit. The label on the left side says "messy hair, we don't care" and we didn't lol.
{Day 10}
Yes, coffee is my life....no proper day starts without it.
{Day 11}
I mentioned my friend from Germany, Katrin, writes notes to include in our happy mail swaps and she always finds the prettiest papers. I love them all but this one in particular because I love pansies. Pretty is spelled out in fabric thickers by American Crafts and the PAPER alphas are from Paige Evans newest collection - Turn the Paige by Pink Paislee. BTW the set also includes a dark blue set of alphas as well and the packaging will definitely be used. ;)
{Day 12}
Pink Paislee packaging is so pretty and I love the text on this one so had to use it. The photo was taken in Sonoma, California while we were visiting wine country last May. I loved our time there and the people and weather couldn't have been better. I pray they are getting back on their feet after the wildfires last summer. More thicker alpha's by Paige Evans on this one. Can you tell I like them?
{Day 13}
I have a flamingo loving friend and somehow...someway....he has made me love flamingos. His wife has allowed him to decorate their home with them and I have to say he's done a fabulous job. They put a smile on my face because they will forever remind me of them. For my tag I did some mixed media and played with paint, ink, stencils and stamps. I added a pop of black with the polka dot tissue and the embroidered flamingo was a gift from a crafty friend and I love it! xx
{Day 14}
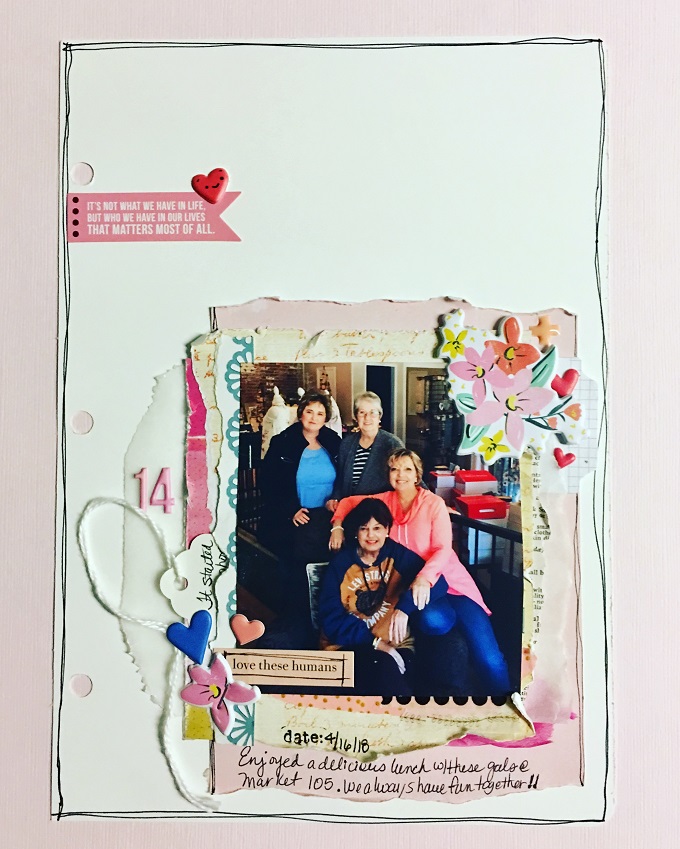
This was yesterday's share on Instagram so this is where I'm stopping as I have other things calling my name. I adore these ladies and last month we had lunch at a fabulous new restaurant in downtown Booneville, Mississippi called Market 105. It was sweet serendipity that they also had a boutique as well and I bought costume pearl earrings and a bracelet for all of us. Just a sweet reminder of our fun day and a thank you to them for the love they show me every day through their prayers and thoughtfulness. Friends are a true blessing in life and when they become family....well it just doesn't get better than that! All of the puffy stickers are Citrus Twist. I'm a monthly subscriber to their kits {they offer several} and I highly recommend them. Two thumbs up!!
You can keep up with my daily #100daysofscraptherapy posts on Instagram at @lisalea64. I also joined #the100dayproject since I was already creating anyway. ;) It's not too late to join in and just start where you are and use what you already have in your crafty stash or what is lying around that just looks pretty. Literally.....ANYthing goes so cut loose and have fun!
Take care,
Lisa xx