Showing posts with label washi tape. Show all posts

Friday, October 13, 2017

The Night Before Christmas Flip Book

{I wanted the front cover to look like a package would}


ABC Christmas Challenge

U - Unlimited as in Anything Christmas Goes 

V - Vibrant

Hello everyone and welcome!
Well I'm a little late with my DT post but things are busy in my corner of the world on many levels. We have entered the holiday season here with fall upon us now (decorating today) and right behind it Christmas. Throw in a few baby showers (lots of little ones making their arrivals very soon) and homemade gifts for those occasions plus regular life stuff and it's been a bit crazy. There's more going on but I won't bore you with that. ;)

So today I am finally sharing a flip book that I made to swap with a friend next month. It will travel all the way to India and I've used one of my favorite Christmas paper collections by Graphic 45. It is so fun to flip the pages and find little treasures and notes.! So without further ado let's get started.

 The Merry Christmas page is not what you actually see when you open the book, actually the right page will be the reindeer page (below) but either way it works. That's the great thing about flip books, right! The left pocket is red vellum and I am gifting her some ephemera, small gift bags, and die cuts. There's also a striped paper clip which she can add some jingle bells to and pass it on to another friend. The right page spells out Merry Christmas with red glitter thicker alpha's by American Crafts. The die cuts on the pocket and right page are from Pebbles and it's from one of their new Christmas collections this year.

Love the double sided papers in the Night Before Christmas collection by G45.


A gold glitter reindeer die cut is my Rudolph for this page and I cut out some words from a cut apart sheet. If you click on the photo (any photo actually) it will enlarge it and you can read the tiny word sticker sentiment better. 

This is the other side of the Rudolph page and there's a journal card which I am using as a pocket. I went over the leaves and green Wink of Stella brush and used a clear one for the berries. In my opinion, these brushes are the best way to add a glitter look without the mess of glitter. If I want more sparkle I simply apply more color.

When the book is partially opened this is what she'll see. The large envelope is chock full of G45 ephemera from the collection I used and I think that will make her happy. It folds down to reveal the pockets page below.

Bottom Flap
 This is the other side of the envelope page and I created another vellum pocket which I stuffed with pockets from the G45 collection. A die cut sentiment was added to the outside with a gold paperclip and I fussy cut a border from the cut apart sheet.

Top Flap
I used a clear vellum piece of paper to create this makeshift pocket where I stuffed tags (which I made for a previous DT post). She can use them or pass them on if she prefers. You probably can't tell but I went over this fussy cut image with a clear Wink of Stella brush pen and I love the shimmer it adds.

Fully Opened
You can see how I have added the pages with washi and I would advise that you first put some double stick tape down and then lay the washi on top of it. Washi tapes come with differing "tackiness" which means some hold up better than others. To be safe it is always good idea to add the tape or a glue that will dry clear to enforce the washi tape. Just a tip!

Center Page
Under the vellum sheet I created a page of stickers - puffy and dimensional - for her to use in her crafting. I know she loves woodland animals so these will put a smile on her face. :) The puffy stickers are from a new 2017 Pebbles collection and the dimensional stickers are by Recollections which you'll find at Michael's.

 This is the back of the flip book and it features a journal card from the cut apart sheet. Two gold snowflake stickers and washi is all I added. The button holds my twine in place which I used to close the flip book and I added some green washi to tone down all of the red on this page.
 

Thanks for looking!


Two lucky challenge winners will receive prizes in a random drawing and the winners will be announced on November 1st when the winner's post goes live at 7am BST. 

A prize from Carol


Build a Bloom Stamp Set from Craftwork Cards and Handmade Paper Tags and Ribbon


Challenge Sponsor


Good Luck!!!


I do hope you'll play along with us as there's still plenty of time!
Be sure to visit the main challenge blog for more inspiration by my incredible teamies and to see what the other participants linked up.

Have a wonderful day, wherever you are!
Lisa xx


Wednesday, September 13, 2017

Secret Sister Flipbook


Well it's a bit late in the day but I'm back with a flip book that I recently made for my secret sister. Every January the ladies in our church draw names and that person is our secret sister for the year. Usually once a month we leave a surprise gift for them and it has been a lot of fun to give and receive. Obviously this person loves flamingos and you'll see them throughout this book. The sticker on the cover was gifted to me by my sweet friend, Katrin, as well as other stickers in this book. 

Now a confession...this is for the husband of a dear friend who jokingly commented one day he wished he had a secret sister. He's battled cancer since 2011 and for the first time since his initial diagnosis he received the report in August that his cancer is gone. The doctors are bewildered but we are giving all the credit to God for healing him. I was thinking afterwards about making him something special that would reflect how we all feel about him. This flip book really touched him and he's now our honorary secret sister. :)  


Let's check it out...

I placed journal cards over the photos and they flip up with a private message to him. 

More wonderful stickers from Katrin on this page and a journal card from American Crafts.

I cut this journal card from a sheet of 6x6 sheet of paper and rounded the bottom corners with a corner chomper.

The right page flips open to reveal a tri-fold spread below. 

I created the paper for this tri-fold spread using mixed media paper, stencils, modeling paste, ink sprays and Sharpie water-based pens. I love the way it turned out and the colors were perfect. 

This journal card reveals another message and a photo underneath of dear friends.

I loved using this clear acetate with mini flamingos to create overlays. The dotted pink paper flips down to reveal another message and then it flips again to the right revealing the page below.   

The gold flamingo was another gift from Katrin. :)  

The tri-fold page flips up and down to reveal this page and the two below.

I found this image online and added 3D stickers and spelled out our message with Tim's chit chat stickers.

I added a clear sticker over the watercolor heart journal card along with a paper sticker.

The back cover is decorated with various stickers.

I altered this white bag with some washi tape and added a little note held in place with a flamingo paper clip. Flamingos all the way for our secret sister. ;)


Thanks for the visit today. Hope you are having a great day, wherever you are!

Lisa xx


Monday, September 11, 2017

California Beaches Flipbook


Happy Monday everyone! Hope your week is off to a great start. :) 
Today I am sharing a flipbook that I made for my German friend, Katrin, who loves the beach. Last May my family and I spent a few weeks in California and I decided to collect sand for her from the various beaches we visited to create this keepsake book. 

I used a travel themed collection by The Paper House and journal cards were used as tip-ins and spots to journal on. Most of the sand packets were created using a We R Memory Keepers Fuse Tool and I'm kinda on the fence about this product. It did not seal like I hoped it would but I'm going to give it another chance and hopefully my second try will work out better. Washi tape, stickers and a few other items were added but basically I kept it relatively simple. I created side and top loading pockets to include photos of the beaches where the sand came from. 

Here's how the inside looks...
{click on any photo to enlarge}

Santa Barbara
   
Santa Monica
-love that this paper had a lifeguard shack on it like the one in my photo-

Laguna Beach
-absolutely idyllic-

Malibu

Glass Beach at Ft. Bragg
-a magical place where the Pacific is powerful and deposits beautiful glass on the beach hence the name-

I added glass fragments to the page along with the sand.

San Simeon 
-we toured the Hearst Castle which overlooks the beaches here-

-in April and May the female seals are molting and the beaches are covered for miles with seals-

Back Cover

Like the traveler's notebook concept I used an elastic string to keep the book together and simply slipped each page in when it was finished. 


It was fun to make and she loved the idea behind it which made me happy. I'll be back on Wednesday with another flip book and I can't wait to share it with you.

Thanks,
Lisa xx


Tuesday, August 8, 2017

UK Travel Themed Album


***Photo Heavy Post***

Good Morning...or afternoon...or evening wherever you are! I shared some sneak peeks of this album on Instagram and now the full reveal is here on my blog. Recently I traveled to California for a long vacation and found coming home to so many photos overwhelming. I wished that I would have made an album so I could just print photos, do some journaling and record our keepsakes from the trip and file everything away neatly and without it taking me a year. ;) That's when it hit me! I could make one for my dear friend, Katrin, who was set to travel to the United Kingdom in July with her husband. I could begin working on it before the trip and finish it shortly after they left, mail it and presto she'd have an album to come home to where she could do exactly what I should have done. 

I'm happy to say they had a wonderful UK adventure and we "virtually" opened it together when she returned. It touched me how much it meant to her. Every now and then we come across special people who bless our life and become our friends and she is one of those people for me. I am blessed by her friendship beyond measure!

 So let's go right into the album, shall we. I'll start with the charms I added to the spine and go in order from there.


I added some of Tim's travel charms, a cross (because they always visit churches), a key with a heart, compass and a small bottlecap with a crown. The trim which holds the 2-ring metal binder is also by Tim.

This is the inside front cover and I die cut bunting with a Spellbinders pennant die, added some alpha's and teeny brads. The Union Jack washi has been in my stash forever and I was so happy to be able to use it. I sent some to Katrin before they left so she could also use it in her traveler's notebook. The chipboard piece at the bottom is a leftover from a sticker pack that I think (?) is by K and Co. and the metal arrow is by Tim Holtz as well as the star paper (Correspondence collection).

I used stickers from the travel themed collection that I purchased at Michael's, a Pink Paislee cork heart, MAMBI chalkboard sticker, wood veneer plane and alpha's by Dear Lizzy for American Crafts.

The back of the divider page is a perfect spot for adding a waterfall style album for larger photos or items they want to record from their trip. I added some of the cities and places visited with Tim's chit chat sticker alpha's and if I missed any I know she has some in her crafty stash. :)

I found this small calendar and recorded the dates they were traveling on it. On the pocket above I created Scotland's flag - the Cross of St. Andrew - and embossed the upper right pocket.

I stamped on both left pockets, tucked in some labels and used a journal card from the collection.

I stamped #selfie on the upper right pocket and tucked in a chipboard word - Holiday - which I painted yellow. That pocket (if you look closely) has been embossed.

A journal card and another for use as a photo mat which came from the travel collection.


Washi tape and a wood veneer frame tucked into the upper right pocket are the simple embellishments on this page. Visiting Scotland was a first for them so I know they'll want to record a lot of pictures. They traveled with their sweet bear, Bo, on this trip and as it turns out he loves cherries so had to include a paper with cherries on it for him. ;)
*traveling with a bear, yeah I know how that sounds, to learn more about Bo and his great big adventures check him out on Instagram at bocrewwanders*

Love the paper by Glitz on the upper left pocket, it has hexagons on it which Katrin loves. The butterfly on the upper right pocket was stamped on there and I added some washi to it.

This page is really about sharing photos, the washi holds in some treats for her you'll see below. On the blue striped paper I stamped flowers from one of Tim's stamps in weathered wood (I believe) distress ink.

I love the flowers on the top left pocket because I know they'll remind Katrin of the beautiful wildflowers in Scotland. I tucked in some cork and wood veneer embellishments in the lower right pocket for her to use where she wants to.

This concludes the first part and now onto to the second stop of their UK adventure, Ireland.

The second part of their journey began in Ireland and when I think of Ireland 2 colors come to mind - green and yellow. I always see fields of green grass with yellow flowers so those colors are heavily featured in this section. This deep pocket will be great for storing large photos or whatever happies they want to keep in it. I shared 3 green doilies with her which she can use or save for another project.

This is a G45 paper and I loved the colors in it, a side pocket was added and fun ephemera from a 6x6 paper collection that I can't recall right now. I'll look it up and edit it this post some time today.

The upper two are really photo mats and the lower left is a great place to journal. To the pocket on the lower right I added some of Tim's washi and one of his flashcards.

Katrin loves animals and especially little deer so this Maggie Holmes image had to grace her album. The upper right pocket already had the text on it and I added some stamped butterflies and a label. The other two (upper left and lower right) are front loading pockets to store photos. Since it was their first time there I knew she was likely to take a lot of pictures. ;)

I stamped soft images on the two left pockets - flowers and a compass - added some washi and chit chat stickers and did a bit of doodling with a gel pen.

Sometimes it is good to record those special meals in special places so your memories can instantly bring you back to that place and time again. 

Another place to record larger photos, I made it a half-sheet and she can add a photo mat or journaling to the back of it (see below).


I love Heidi Swapp's photo protectors and for this album I turned them on their side and placed in a waterfall style. The cardstock label above each photo can record the when and where it was taken. This washi had to make an appearance as I love it and the colors are perfect. :)


The upper left pocket can be used to slip a photo underneath or a piece of ephemera from their trip while the lower right pocket will hold tickets or more photos. The label can record what she decides to store in it.

I put a belly band on the upper left pocket and spelled out "dublin" on the lower pocket. On the upper right pocket I used a SMASH journal sheet so she can record some of their favorite things.

The papers on the right are busy but they go with the theme so maybe she can use them as photo mats or create a pocket with a calmer paper. ;) The journal card (upper left) will let her record special memories from their time in Ireland.

That concludes the second part of their journey, next they traveled to merry 'ole England.

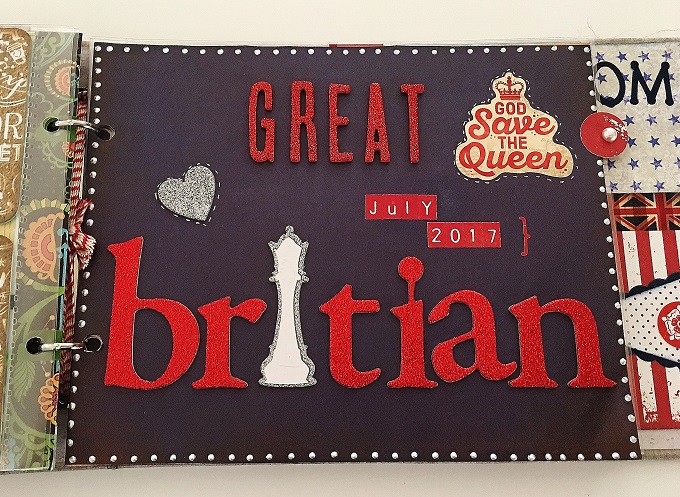
The divider for the last leg of their journey, Britian. I greatly admire Queen Elizabeth so I was tickled to use this sticker from the collection. Honestly I can't imagine the world without her in it, she has served with immense grace throughout her life.

The back of the Britian divider has more photo pockets by Heidi Swapp.

Stonehenge was on the travel agenda and fortunately for me there was a paper in the travel collection with photos on it. I also found a ticket that had London Country Buses on it (upper left) which was perfect. 

Sorry for the glare in this photo but I used a journal card (bottom left) and stamped an image of the British flag (bottom right) and simply added a sticker from the collection.

The London Calling was a journal card from the travel paper pack and I cut the other 3 from papers in Tim's Correspondence collection. I stamped images on each of those and the washi was added to secure what I tucked in the pocket below.

A wood veneer crown was tucked in the bottom left pocket and secured with washi so it wouldn't fall out during transit. A belly band was added to the bottom right pocket and more of my Union Jack washi tape makes an appearance. A die cut image with a tea pot was added and I slipped in some labels for her to use. In the upper right pocket you can see where I stenciled stars in chipped sapphire distress ink with Tim's stars stencil.

I tucked a wood veneer arrow in the bottom left pocket and stenciled some clock cogs with Tim's stencil on the bottom right card. Above it you see more of my Union Jack washi tape.

Maps of London and stickers from the travel themed paper pack can be seen here and below.

On the bottom right card I stamped a crown in faded jeans distress ink. The phone booth (upper right) is a sticker.

Love the journal card (bottom right) from the travel paper pack. :)

Inside Back Cover
It has a deep pocket where maps, brochures, large photos, etc. can be stored. Another British doily makes an appearance and I incorporated stickers from the travel themed paper pack I used throughout the album.


Thanks for visiting today and I hope this may provide someone with inspiration. Please overlook any grammar or spelling errors as I am flying today and wanted to get this up before noon. ;) I will be back soon with a belated design team project for ABC Christmas Challenge.

Have an awesome day,
Lisa xx

Related Posts Plugin for WordPress, Blogger...