Showing posts with label Graphic 45. Show all posts

Thursday, August 30, 2018

Happy Mail Tracker

Front Cover

Hello and Welcome Back!

As promised I am back with a project I made for a friend in India. We swapped 5 decorated tags and I used the beautiful collection - A Ladies Diary - by Graphic 45 to decorate her tags and to create this Happy Mail Tracker for her. She swaps with a lot of pals and thought this could be useful for her to keep up with what is going out and what is coming in. The cover and inserts are designer papers but the main body of the book is a file by The Cutting Cafe. I design for TCC and when Regina shared this new file with us I knew I had to create some for friends of mine. Unfortunately, I mailed two before I realized that I had forgotten to snap photos of them. Ugh! At least I remembered this time lol. We'll call it ex-cancer brain okay?1? LOL

Here is a link to the PDF file that is offered at The Cutting Cafe. All you have to do is print and trim to size. Easy peasy!! 


I used a Cinch machine to bind my book but you could use any style binding you choose. I also decided to chomp the corners with a We R Memory Keepers Corner Punch - Scallop. All of the edges were inked (dp's only) with Gathered Twigs distress ink by Tim Holtz. The alpha's on the cover are from the sticker sheet from G45's Secret Garden collection. 

Here's what the rest of the book looks like.


If you like to swap happy mail then check out the links above to get this file. They make great gifts for your pen/swap pals and Christmas is not too far off in the distant future. ;)

Thanks for stopping by! I'll be back with more scheduled posts next week with design team projects for ABC Christmas Challenge on the 5th and The Cutting Cafe on the 7th. 
See you then!

Crafty Hugs, 
Lisa xx


Tuesday, August 28, 2018

5 Tag Swap with Pen Pal

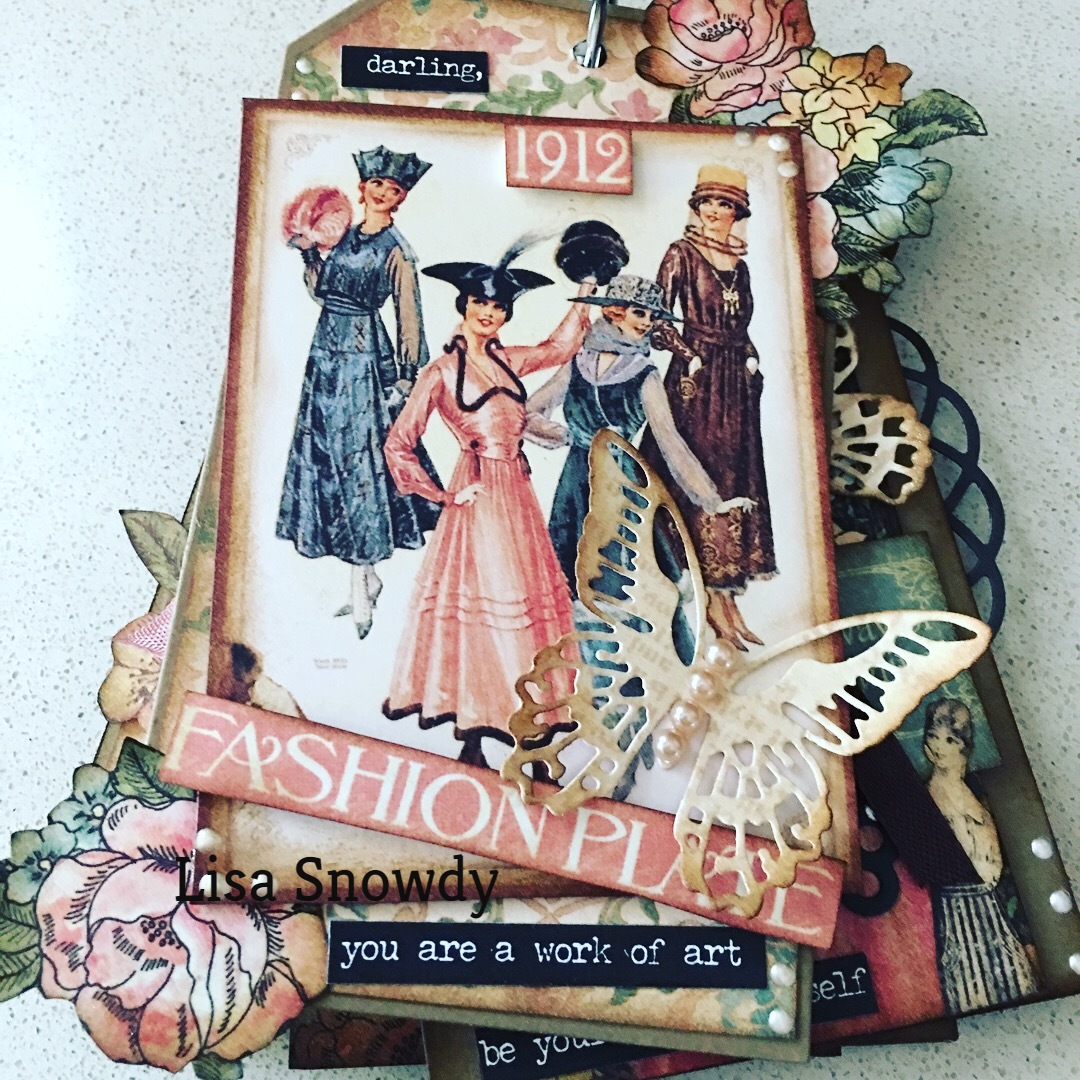
5 Tag Swap featuring Graphic 45's A Ladies Diary


Hello and welcome back! 
This is a scheduled post and today I'm sharing a Tag Swap I made for a dear friend in India. We originally met through Pocket Letter Pals and although I left PLP's we have remained friends. Earlier in the year she was battling cancer and in July I was diagnosed with cancer also. I'm happy to report that she is doing very well and has recovered. I am beginning my journey and on the 17th of this month I had surgery to remove the cancer and received a chemo treatment during surgery to kill any remaining cells. I have a rare cancer, Peritoneal Carcinomatosis, and just grateful that I was a candidate for the specialized surgery they now offer to patients. My family and I are praying that when I go for my first PET scan in November it comes back NED (no evidence of disease). It seems cancer touches so many people all over the world and it tends to bond you to each other in a very special way. That is why I wanted these tags to reflect beauty with a vintage touch (which she loves) and I couldn't resist adding encouraging notes using Tim's word stickers. 


Close up of the first tag, the sentiment is a cup apart from one of the designer papers. I die cut Tim's beautiful butterflies using another dp and inked the edges with Gathered Twigs distress ink. Liquid pearls were added to each tag and flat back pearls to the butterflies.

Fussy cut images really make these tags pop. I die cut a doily by Taylored Expressions and cut it in half and added to each side of this tag. 

Another die cut doily but this one is from My Favorite Things and I love the vintage feel of it.

The papers and cut aparts in this collection are so pretty. I added foam tape to some of the elements to add some dimension to each tag.
 
The flowers are a great feature and I fussy cut several types to add to these tags. The stamps were inked and two were popped up on foam tape. Every tag has a kraft base and all edges were inked with Gathered Twigs distress ink. I love the warmth this color adds. A O-ring was used to hold the tags together and I added various ribbon/trim to it as a finishing touch.


Thanks for stopping by today! I hope these tags inspired you to create some of your own and swap with a friend or gift someone. I would appreciate your prayers for my continued recovery. It will be a long one but I knew that going into it and fully believe that I have more to do here and God is not finished with me yet.  I'll be back on Thursday (also a scheduled post) with a companion gift that I sent my friend as a happy. ;) 

Until then take care and I'll see you then!
Crafty Hugs,
Lisa xx
Wednesday, July 4, 2018

N for Name, O for 'On Skates etc' at ABC Christmas Challenge

Ice Skate Card

Christmas in July is what I was thinking when I created this design team card for the ABC Christmas Challenge. With the record hot temps here in the U.S. I'm definitely dreaming of a white Christmas. :) I'll stop and confess right now that I'm no ice skater but I wish I was. Ice skating is a beautiful sport and I love to watch it!

I used a SVG file by Daniela Moscone available at Silhouette Design Store called Ice Skate Card. 


The inside sentiment and image are by Verve Stamps which sadly closed their doors the end of June. I used stickers by Simple Stories on the opposite page.


For the front of my card I used a merry mix of embellishments and ephemera. The seasons greetings stamp is from G45's Night Before Christmas 3 stamp set and I backed it with a 1" punched circle from black cardstock. Years ago Pink Paislee offered a collection called  City Sidewalks and I still have some of the papers and ephemera in my stash. The bell ephemera is from that collection as are the fishtail banners. I ran some red/white twine through the tag and secured it with Tim's tiny attacher. The rosette is a dimensional sticker from Recollections and the glitter red heart was punched using a Fiskar's heart punch. I also used a circle sticker from G45's A Place in Time sticker sheet on the right side of the cluster and foam tape to give some of the elements dimension.


White and black gel pens add highlights and faux stitching. I added a chipboard 'Believe' by Echo Park to the blade, tinsel by Tim Holtz to the base of the ice skate and flat back pearls where the laces pull through and that completes this card.

I used the fold card and layering pieces from the SVG file to create my card. My Silhouette Cameo made this an easy task to do. Check out the Silhouette Design Store to see what is currently on sale and if memory serves me correctly I believe they have a big Christmas sale during July. If I learn when I'll pop in and edit this post and add a direct link. ;) You can also visit my dear friend's online store, The Cutting Cafe, as Regina offers several Christmas themed files and each one comes with various electronic cutter SVG files as well as a PDF version in case you don't own an electronic cutter.   

Sponsor

Prize is a $25 gift certificate to our lucky winner.

also

Helen is our hostess this month and she is offering this stamp set from Lily of the Valley as a prize. 


You have from today, July 4th, until the end of the month to play along and as long as your project is Christmas themed you can enter as often as you like. The DT will be by to visit your inspiring creations soon and we all wish you the best of luck.


Crafty Hugs,
Lisa xx 

Monday, May 14, 2018

Graphic 45 Fashionista Flip Book

{Front Cover}

Good morning, afternoon or evening wherever you may be! 
I hope every mom in the US had a wonderful Mother's Day with loved ones yesterday. This was the first one in years that I haven't been traveling so it was nice to be home and enjoy down time with my family.

Today's share is a flip book I made for a pen pal in India that loves all things vintage. She also loves Graphic 45 papers so the Fashionista collection was a perfect choice.

Pages 1 and 2

Page 1 
The envelope holds tags for my friend and I decorated the page with Dazzles stickers, fussy cut images from the paper collection and spelled out Diva and Fashionista with Citrus Twist puffy alphas.

I mirrored the image on the inside of the flap and spelled 'tags' with Tim's small chit chat stickers. The tiny word sticker is from The Reset Girl.

Page 2 
More fussy cut images, a gold shopping bag holds a swap tag and I added more Dazzles and tiny word stickers. I tucked vintage papers and a library card in the pocket.

Pages 3 and 4 
Both have pockets and I gifted her a vintage sewing pattern and various doilies.

I love this paper!

I used a Heidi Swapp sticker and the scissors were a transparent sticker by American Crafts (I believe). I fussy cut the lady in blue and the saying as well.

Pages 5 and 6
The lace trim on the left was actually plastic and it was gifted to me by a pen pal. I fussy cut images from the paper collection, added washi tape, Dazzles stickers and some gems.

There are some beautiful images in the Fashionista collection by G45. This one was a favorite of mine and I knew I wanted to use it for Aparna's flip book.

For the final page I added a library pocket and gifted her several journal card size cut outs from the paper collection. 

In addition I gave her goody bags chock full of crafty supplies to create with. She was very happy with everything and that made my day. Aparna has been a long term pen pal of mine and currently she's going through a difficult time. If inclined please lift up a prayer for her, I know she would appreciate it. 

Thanks for the visit today!
Lisa xx


Friday, February 9, 2018

Graphic 45's Time to Flourish Perpetual Calendar

{click on any photo to make it larger}


Hello and Happy Friday! I'm thrilled it's the weekend because I am in the process of remodeling my craft room. Yay!!! My hubby and I will be splashing paint on the walls and hopefully in the next two weeks my new flooring will be installed and I can begin to put the room back together. I'll be sure to take photos along the way and I'll post the before and after here as well as on Instagram. 

For now I have a project to share that was so much fun to create. It was a gift for my sister and BIL. In January of 2016 I made a perpetual calendar that I created for myself using inspiration in this post by Annette Green. My sister loved it but she never got around to making one so I decided to use the scraps I had leftover from G45's Time to Flourish collection and gift them with one for Christmas. The photo above shows the calendar as it is displayed and the extra calendar month cards are stored neatly inside the decorative box which I also made and I'll share more on that in a minute. Guess I should note that Annette used Time to Flourish for her project and that my sister is a fellow paper crafter. ;)


For the decoration of the box I used images from G45's Botanicabella collection - butterflies, flowers which were die cut and postage stamps as Annette did. I added some additional fussy cut images on the back right of the box and applied Ranger's Glossy Accents to each of the butterflies for some shine. The hardware hinges were die cut using a Sizzix Alterations die by Tim Holtz and the metal key lock is by The Paper Studio I believe. Gem centers were added to the tattered florals, also a die by Tim Holtz, and metal label pulls hold the month cards in place. The stands were made from cardstock and you can see how to construct those in Annette' tutorial (link below).

I had to use paper and images that were larger than my original calendar for the month cards but it worked out. I simply chose the same image and if something did not fit then I altered it. All of the edges on this project were inked with gathered twigs distress ink by Ranger. If I am completely honest it pained me to cut into this beautiful paper and on the small month cards I did lose a lot of the design. However, I have resolved to use what I have and not hoard it because it really is doing no one any good at all to do that. My craft room becomes cluttered and I cheat someone out of something they will enjoy. I can't tell you how many times already they have thanked me for their calendar. So my advice is to start cutting that paper up and use it. :)


The biggest change you can see is on the large month cards (larger images) but I followed Annette's layout as closely as possible to keep the design similar to hers.


{the pansy flower stamp is from G45's Children's Hour-March}


I was happy that I could use what I had left of my Time to Flourish paper to create another perpetual calendar. Even though there are slight changes they honestly don't stand out because I followed Annette's design so closely. It's just another interpretation forced out of necessity. :) This is a beautiful paper collection and if you're looking to create a calendar project I highly recommend it! 

I'll quickly note that I did not use the G45 box that Annette used in her You Tube tutorial and that you will need to note a dimension change that she updated in the description box. I found the G45 box is too tight of a fit to remove the monthly cards easily and for my sister's box I made one using a cutting file from The Cutting Cafe - Book Box Set 2. I had the option of increasing the size working with a SVG and it allows for easier access to the stored cards. I also printed the 2018 calendars from The Cutting Cafe's 2018 Calendar Printable Set. You can easily trim the months using your paper trimmer and round the corners, if you prefer, like I did.  


Thanks for your visit today and I hope you gain some inspiration here as I did from G45's Annette Green. When I originally shared my calendar Annette was sweet to comment and thank me for sharing her tutorial. I believe in giving credit where credit is due so please click her link and visit her original post and YT tutorial. If you visit her blog you'll also see that she has continued to offer her own yearly mini calendars for free download and they are here.

Take care and have a great weekend,
Lisa xx


Friday, October 13, 2017

The Night Before Christmas Flip Book

{I wanted the front cover to look like a package would}


ABC Christmas Challenge

U - Unlimited as in Anything Christmas Goes 

V - Vibrant

Hello everyone and welcome!
Well I'm a little late with my DT post but things are busy in my corner of the world on many levels. We have entered the holiday season here with fall upon us now (decorating today) and right behind it Christmas. Throw in a few baby showers (lots of little ones making their arrivals very soon) and homemade gifts for those occasions plus regular life stuff and it's been a bit crazy. There's more going on but I won't bore you with that. ;)

So today I am finally sharing a flip book that I made to swap with a friend next month. It will travel all the way to India and I've used one of my favorite Christmas paper collections by Graphic 45. It is so fun to flip the pages and find little treasures and notes.! So without further ado let's get started.

 The Merry Christmas page is not what you actually see when you open the book, actually the right page will be the reindeer page (below) but either way it works. That's the great thing about flip books, right! The left pocket is red vellum and I am gifting her some ephemera, small gift bags, and die cuts. There's also a striped paper clip which she can add some jingle bells to and pass it on to another friend. The right page spells out Merry Christmas with red glitter thicker alpha's by American Crafts. The die cuts on the pocket and right page are from Pebbles and it's from one of their new Christmas collections this year.

Love the double sided papers in the Night Before Christmas collection by G45.


A gold glitter reindeer die cut is my Rudolph for this page and I cut out some words from a cut apart sheet. If you click on the photo (any photo actually) it will enlarge it and you can read the tiny word sticker sentiment better. 

This is the other side of the Rudolph page and there's a journal card which I am using as a pocket. I went over the leaves and green Wink of Stella brush and used a clear one for the berries. In my opinion, these brushes are the best way to add a glitter look without the mess of glitter. If I want more sparkle I simply apply more color.

When the book is partially opened this is what she'll see. The large envelope is chock full of G45 ephemera from the collection I used and I think that will make her happy. It folds down to reveal the pockets page below.

Bottom Flap
 This is the other side of the envelope page and I created another vellum pocket which I stuffed with pockets from the G45 collection. A die cut sentiment was added to the outside with a gold paperclip and I fussy cut a border from the cut apart sheet.

Top Flap
I used a clear vellum piece of paper to create this makeshift pocket where I stuffed tags (which I made for a previous DT post). She can use them or pass them on if she prefers. You probably can't tell but I went over this fussy cut image with a clear Wink of Stella brush pen and I love the shimmer it adds.

Fully Opened
You can see how I have added the pages with washi and I would advise that you first put some double stick tape down and then lay the washi on top of it. Washi tapes come with differing "tackiness" which means some hold up better than others. To be safe it is always good idea to add the tape or a glue that will dry clear to enforce the washi tape. Just a tip!

Center Page
Under the vellum sheet I created a page of stickers - puffy and dimensional - for her to use in her crafting. I know she loves woodland animals so these will put a smile on her face. :) The puffy stickers are from a new 2017 Pebbles collection and the dimensional stickers are by Recollections which you'll find at Michael's.

 This is the back of the flip book and it features a journal card from the cut apart sheet. Two gold snowflake stickers and washi is all I added. The button holds my twine in place which I used to close the flip book and I added some green washi to tone down all of the red on this page.
 

Thanks for looking!


Two lucky challenge winners will receive prizes in a random drawing and the winners will be announced on November 1st when the winner's post goes live at 7am BST. 

A prize from Carol


Build a Bloom Stamp Set from Craftwork Cards and Handmade Paper Tags and Ribbon


Challenge Sponsor


Good Luck!!!


I do hope you'll play along with us as there's still plenty of time!
Be sure to visit the main challenge blog for more inspiration by my incredible teamies and to see what the other participants linked up.

Have a wonderful day, wherever you are!
Lisa xx


Related Posts Plugin for WordPress, Blogger...