Tuesday, July 31, 2012

All About the Ribbon


Welcome! Focus on the Ribbon is our new challenge at Top Tip Tuesday and Samantha is our hostess this fortnight. She has a special tutorial for you by Ribbon Carousel and if you haven't seen it yet be sure to drop by the blog and check it out, it's wonderful. My tip for this challenge is-make your own ruffled ribbon using a needle, thread and a running stitch. It's simple to do and allows you to turn any ribbon into a ruffled one. It's sew easy!


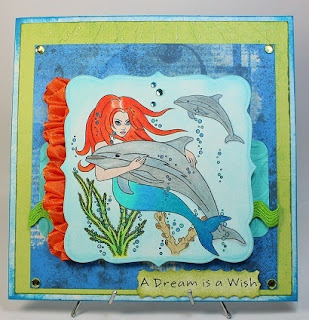
Teri, of Delicious Doodles, provided our team with digital images to work with and I chose this beautiful mermaid  and she's Swimming with Dolphins. A friend of mine has a dream to swim with dolphins someday and I made this card to remind her to just go for it. I colored my image with Prismacolor pencils and used a Finesse blender pen on my mermaid's hair & body. A trio of rhinestones mimics the water bubbles while Tumbled Glass distress ink sets my image in an underwater scene. Our challenge has us focusing on the ribbon and my handmade ruffled ribbon adds some drama and a pop of color while the ric rac has a wavy motion to it. Many thanks to Teri for providing the design team with amazing images to work with! For more inspiration check out the beautiful cards my teamies created at Top Tip Tuesday using more of Teri's delightful images.


For sketch inspiration I played along with Jen's Deconstructed Sketch No. 62 which is guaranteed to get your mojo going.Here's another tip for newbies to stamping, I wanted to separate my sentiment and use the upper line on the front of my card and the lower line on the inside. To keep from getting ink on the line I wasn't stamping I placed a piece of scotch tape to mask (cover) it. I inked my stamp, then carefully removed the tape and stamped my sentiment. I  got a clean image both times with this little trick. Hope this helps someone! Here's the second line on the inside of my card.


Focus on the Ribbon Challenge


Sponsors

The Lovely Emma from Sew Sweet is offering 1 lucky entrant
a £10.00 voucher to spend at her yummi shop.
Sew Sweet stocks a huge selection of wool felt, buttons, ribbon, divine twine,
handmade personalised gifts, findings and more.


Hi ya folks!
Thank you so much for your interest in Delicious Doodles images,
Teri xx


ribboncarousel.com/ carries a large selection of ribbon,twine and accessories. The only problem with ribbon has been storage...until now! More than two years, 3 design changes, 3 raw material changes and 4 manufacturers later.....we present to you, the ultimate in ribbon storage systems, the patent-pending Ribbon Carousels! We call it the Ribbon Carousel© because it looks like a carousel AND it spins around like a carousel! The 4 post Ribbon Carousel holds full spools of all different size ribbon, including the large spools from Stampin' Up, May Arts, A Muse, etc. The 8 post Ribbon Carousel is perfect for up to 16 full spools of the popular Baker's Twine, or 40 of our custom-made Maple Spools. Our Ribbon Carousels, Ribbon Club Kits and various ribbons and accessories are sold to ribbon enthusiasts around the world.
Join us at the RibbonCarousel.com Blog, our weekly Challenge Blog or on our FB page for inspiration, tutorials, specials, news and fun!


I do have a bit of sad news to share, three members of our design team are stepping down to pursue other interests. It's with sadness that we bid Janette, Tammy & Katrina farewell but we certainly hope they will stop by often and play along sometimes. Ladies, thank you for the inspiration you've provided and we wish you all the best! Now for a bit of good news, Lisa M. has become a new co-coordinator here at TTT to help Carol & Samantha keep things running smoothly behind the scenes. Yay! 

I'm entering my card in the Make It Monday #100 Challenge, One Stop Craft Challenge #93 Just Good Friends  {dolphins are a mermaid's BFF}, 52 Card Pickup-Week 30, Papertake Weekly Challenge-Make Your Own {made my own ruffled ribbon}, ABC Challenge-T for two {2 ribbons}, Paper Pretties Challenge #50-Seeing Double  {3 dp's}, Southern Girls Challenge #49-Angels & Fantasy, and DYSU Challenge #82-For a Friend. For the Paper Pretties challenge I used a green dp which I embossed with a Sizzix folder, the dark blue dp by Bo Bunny, and my card base is actually a dp by DCWV which you can see below. As for the Southern Girls Challenge my mermaid is my fantasy element and I made this card for a friend {DYSU} as I stated earlier. 


Thanks for stopping by and sharing part of your day with me. Have a wonderful week wherever you are!
Hugs,
Lisa

Digital stamp image: Swimming with Dolphins (Delicious Doodles), sentiment-Pure Innocence Naptime (MFT), handmade by yours truly (studio G)
Ink: Memento Tuxedo Black, Bahama Blue & Bamboo Leaves, Tumbled Glass & Peeled Paint Distress Inks (T!m Holtz/Ranger)
Paper: Block Party dp (Bo Bunny), green-textured (PS), card base dp-The Old World Stack (DCWV), Choice Snow White (TE), aqua cs (Bazzill Basics Paper)
Accessories: Spellbinders Labels Fifteen; Prismacolor colored pencils; Finesse blending pen; orange ribbon& wavy scissors (Hobby Lobby); green ric rac (PS); Divine Swirl & Rays-Texture Fades embossing folders (Sizzix); island lagoon & aqua rhinestones (Kaisercraft); lime gems (studio G); Scallop 3 Dot border punch (MS); bubble stickers (Frances Meyer)

Thursday, July 26, 2012

Hope Today

Designed by Lisa S. for Nicecrane Designs

knocks your socks off! Hello all, I haven't meant to be away so long but I'm back to share a card and some exciting news. Recently I was asked by Ignacio of Nicecrane Designs to design for him and I jumped at the opportunity. He is a graphic designer who has an online store offering digital images & sheets, backgrounds, collage sheets and more. In case you are not into coloring Nicecrane Designs also offers pre-colored images and sheets. I have found a bonus to using digital products is cost and storage. Simply download, save to your computer and enjoy endless creativity!


Designed by Lisa S. for Nicecrane Designs

For my first card I chose a vintage image from Nicecrane's Kiddie Land II DSL Digital Stamp Sheet. This little guy seems to be having some trouble with his sock and I love the expression on his face, it's priceless. I colored him with Copic markers, fussy cut him out and popped him up on foam tape to add dimension. As I was choosing a sentiment I came across this one and it gave me a giggle! I should note that I used the current sketch from Unscripted Sketches #168 challenge for sketch inspiration. The ABC challenge required us to use "two of something" and my two elements are dies, the banner flag was used for my sentiment and a wonky rectangle provides a nice backdrop for my colored image. Both were distressed with antique linen ink so they would stand out more.

I'm also entering this card in the following challenges:

Thanks for stopping by today and I hope everyone will drop by Nicecrane Designs to view all of the wonderful products there. It's a papercrafters digital haven!


A big welcome to my newest blog followers and a huge thank you to everyone who's left a comment for me. You guys are the best and I am so grateful for you!!!
Hugs,
Lisa xx

Stamps: Kiddie Land II digital sheet (Nicecrane Designs); All About You (Verve)
Ink: Memento Tuxedo Black, Antique Linen Distress Ink (T!m Holtz/Ranger)
Paper: Sidewalks (October Afternoon), cs
Accessories: Spellbinders Wonky Rectangles & Nested Lacey Pennants; Copic Markers; button (Buttons Galore & More); button twine-natural (WMS); pleated ribbon (Hobby Lobby)


Friday, July 20, 2012

The Giving Tree


Hello and welcome, so happy you dropped by! I have another mixed media piece for you today and this one is close to my heart. I was visiting my friend's blog, You Made Me Ink, the other day and she made four cards that tugged at my heart strings. The images are from Nicecrane Designs and I immediately fell in love with them. The owner, Ignacio, offered me a free image and I happily obliged. Thank you so much Ignacio for your generosity!!! I chose this little boy because he reminded me of a very special boy, my boy. He's grown now and in the Army but he'll always be my little boy. I have precious memories of us reading his favorite book,  The Giving Tree, by Shel Silverstein. When he was 5 we bought him the book and I ran across it recently while cleaning. It stirred something in me and when I saw this image I knew what I wanted to do. I wanted to create something to capture that moment in time. This is how I did it...


The tree in the book was an apple tree so my tree is as well. I used a kaleidoscope circle stencil to create my sun with texture magic and rub ons, stamps, acrylic paint, & Faber Castell markers were used to create my background. I colored this sweet image with Copic markers and fussy cut it out. The tree was made from a Studio Calico paper pad I received in a kit from Scarlet Lime. Christy Tomlinson is the artist/owner and she does a video featuring the new kit every month. She made a tree but nothing stirred me so I put it up thinking what am I going to do with this. It's funny how things will come back to you in an instant because when I saw this image from Nicecrane I remembered the video and the book. So here it is and I plan to hang it where I can see it and remember.

If you haven't delved into the world of mixed media I encourage you to. You can create so much with so little, you do not have to buy a lot of expensive products to create with. Acrylic paints are inexpensive and can be found (in U. S.) at every Wal-Mart and most are under a dollar for a 2 oz. bottle. No fancy brushes are needed & Plaid's Mod Podge is probably the most expensive thing you need to buy. Hope you'll give it a try sometime. I created a wall hanging a few posts ago and did a tutorial. You can see my step-by-step process there (click on Tutorials tab) and I'll be creating more soon. Any questions just email and I'll be happy to share what I've learned. Good luck and happy crafting!

I'm linking this up at the Old Back Porch & Make It Monday #98 challenge where anything goes. I'm in a hurry to get out the door so if I find more challenges to enter I'll link up later in the day.
Edit: I'm back and I'm also going to play along with the Stampin' Royalty #133 Anything Goes, Divas by Design Challenge #44-Anything Goes, and The Paper Shelter Challenge #73-Anything GoesCrazy Amigo Challenge-Free Theme. So happy to find some new and exciting challenges!  

Thanks again to Ignacio at Nicecrane Designs for the free image, the inspiration I always receive from Lisa M. and to all of you for your support and encouragement. I do hope you'll click on the Nicecrane Designs link to view all of Ignacio's wonderful images and collage sheets. You will not be disappointed, promise. Also, pay Lisa M. a visit and leave her a sweet comment, she loves for folks to visit. As for me, your comments always brighten my day!!!
Hugs,
Lisa

Tuesday, July 17, 2012

All About Circles


This fortnight at Top Tip Tuesday Tammy Louise is our hostess and she'd like you to create a project using circles. You can submit up to 3 projects and 3 tips, if you leave a tip remember to put (TIP) beside your name when you link up and please turn off word verification so we can leave a comment for you. My teammates have amazing inspiration to share with you on the Top Tip Tuesday blog  and we're also celebrating a special some one's birthday. ;) Happy Birthday Samantha!!! I hope you have a very happy day that's filled with family, friends and lots of laughter. Be sure to stop by her blog and leave a sweet birthday wish, she'd love it!  You'll also want to check out Tammy's amazing tutorial over at TTT!

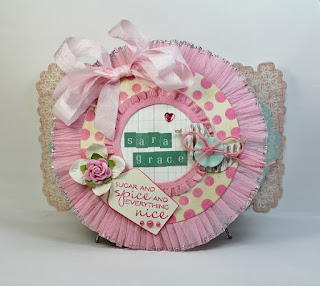
For this challenge I've created a keepsake mini album for my DD featuring my Top Tip which is to save the paper coasters your waiter/waitress gives you next time you dine out. They are useful in crafting and here they've made an excellent base for my "mini" album. Each coaster received a coat of white gesso which gave me a  neutral base to start from. Here's another tip for you, I discovered that the largest circle in the Spellbinders Std. Circles Lg. was the exact diameter of my round coasters which made me happy. :) Here are before and after photos...

various coasters from restaurants

one coat of gesso

For my front cover I used a kaleidoscope accent stencil by Deco Art featuring circles that I got in a mixed media kit a while back. I used bright pink ink then toned the color down with antique linen distress ink. Die #3 from the same Spellbinders die set cut out a round window and I placed a dp behind it and spelled out my daughter's name in alpha's. I trimmed it with ruffled pink ribbon and it adds a feminine touch. A corrugated chipboard bird was painted with white acrylic paint and I added a button & burlap bow. A tag is the perfect spot for my stamped sentiment and tiny hot pink pearls were added for color. Paper flowers, a rhinestone heart and silk ribbon are sweet touches but my fave thing on the cover is the crepe paper ruffle trim. I {heart} this element and can't wait to use more of it on future projects. I cut two long strips and accordion folded it along the perimeter of my circle and used X-Press It tape to keep it where I wanted it. To make it stand out more I used silver stickles which added the perfect finishing touch. Here's a close up of the front and inside cover.


Top Tip Tuesday - All About Circles


Sponsors

Redonkulous Designs - 16,000 Redonkulous Reward Points to
 spend on any mix of Digital Stamps, Papers, and Clip Art. 


Fred She Said - $20 Voucher!
Please Join...

Ooh La La Creations is offering you any 1 of their CD's!

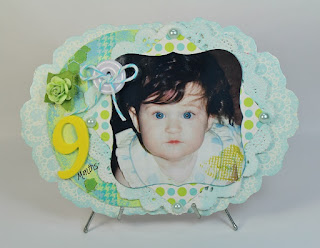
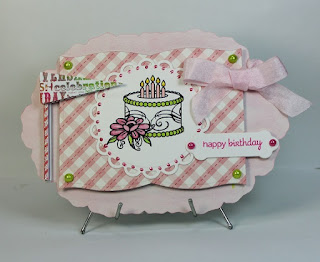
Here are photos of my individual pages...


dp's-5th Avenue by Melissa Frances


dp-Sugar Chic by Heidi Swapp

dp-Amy Tangerine's Sketchbook for American Crafts

dp's-Annalee by Prima


dp-Spotted Owl Soup by Jillibean


dp-Little Girl Collection by Echo Park

dp-This & That by Echo Park
(designed by Lori Whitlock)

dp-Be Mine by Echo Park

Phew! Thanks for hanging in there with me today for a super long post. I hope my project will inspire you to create your own coaster "mini" album. ;) This would great to record photos of your children, pet(s), inspirational quotes/Scriptures or your favorite things. You can personalize it to suit your taste and if you decide to make one I'd love it if you dropped me a link to your album so I can take a peek.

I'm linking this project up with Make It Monday Challenge #98, Tuesday Alchemy-Whose Got a Button? challenge and the Old Back Porch-Week 28.

Have fun crafting today & remember to save those coasters! :)
Hugs,
Lisa xx

Note: Verve stamps were used exclusively on these pages and my dies are from Spellbinders and Verve. If you have a question about a product send me an email and I'll be happy to pass the deets along. Please put "Circles" in subject line. Thanks!

Friday, July 13, 2012

TE Calendar Challenge-July


Hello and welcome! I'm dropping by today with my July calendar for the Taylored Expressions Monthly Calendar Challenge. I used TE's Fourth of July Wreath Petite Stamp Set which is full of patriotic images. To participate Taylor asks that you use a TE calendar product and any stamps of your choice. I'm using the 2012 6x6 TE Calendar download which I printed on choice snow white paper. This is an ongoing challenge so you can link up anytime during the year. There's a prize for those participating in 10 out of 12 months and you can click here to learn more.


 I am also linking this up to the weekly Make It Monday #97 linky party and Tuesday Alchemy Challenge #22 where they want you to share the lighter side of life. For most Americans July 4th is a day off from work and cause to relax and celebrate. Whether it's swimming, going to a BBQ, or eating watermelon and watching fireworks it is definitely a day to kick back and enjoy the lighter side of life. The last challenge I'm entering is Crafty Creations Challenges #178-Free-for-All where anything goes this week.


A big hello to my newest followers and a great big thank you to those who have left me a sweet comment. You guys are the best!
Hugs,
Lisa xx

Ink: Memento Ladybug, Paris Dusk & Tuxedo Black
Paper: Stars dp (PS), Choice Snow White (TE), red cs (Bazzill Basics)
Accessories: Seasonal Wreath Die (TE); Copic Markers; red metallic ribbon (American Crafts); Xmas Stickles (Ranger)

Monday, July 9, 2012

The Daisy That Became a Chrysanthemum


Hello everyone, I'm dropping by with a birthday card I made for a friend. The CR84FN58 Color Challenge colors of yellow, red and neutral were perfect for this occasion. Red and yellow are my main colors and I brought in cream and a smidgen of brown with the polka dot ribbon. I played with three different versions of this card and settled on this one at 3:45 am this morning. {Sue, I had to get up and just make the card lol} I did a lot of paper cutting, die cutting and border punching but I'm happy with the finished product and I hope my friend will be too. The flower is handmade using MFT's Die-namics Upsy-Daisy and a Paper Flower Video Tutorial by Tracy MacDonald that I viewed on her blog, I Wanna Build a Memory. When you click the link to her blog the tutorial page will pop up and it is the first one on the list, I highly recommend it. I didn't have the same punches she used so I improvised and used this daisy die which ended up looking like a chrysanthemum. Who knew, a two-for-one die. ;) My sentiment is from Waltzingmouse Stamps Compact Sentiments and I was inspired to play along with the weekly WMS Sketch Challenge #105 by Teresa Kline. The last challenge I am entering this card in is the Paper Play Challenge-Happy Birthday which is a *new to me* challenge. Here's my card...


Thanks for dropping by today and a very warm welcome to my new followers, so happy to have you! A big thank you to everyone who leaves me sweet and encouraging comments. You have blessed me more than you know!
Hugs,
Lisa xx


Supplies:
Ink: Saddle Brown (Staz On), Memento Ladybug
Paper: yellow plaid dp-The Thrift Shop & red dp-Schoolhouse (October Afternoon), cs (Bazzill Basics Paper)
Accessories: Spellbinders Labels Eighteen; EK Success Dotted Wave border punch; red, yellow & chocolate pearls (Kaisercraft); Buttercup Liquid Pearls, mini mister & dauber (Ranger); brown polka dot ribbon (TE); 3D Foam Dots (Therm O Web)

Wednesday, July 4, 2012

Baking, Doilies, & Poppies

Bakin' Beauties inspiration at OCC

If you are looking for my Top Tip Tuesday Design Team post click here.

Wow, what a combination. I'm playing along with  Our Creative Corner's Bakin' Beauties Challenge where Kristin challenged us to make a creation based on these delish looking treats and the catch was to use something you would use in baking in your creations. How fun is that! As it turns out, a lot of fun!!! The next challenge I'm playing along with, City Crafter Challenge 116-Hello Doily, asked that you use a doily but NOT a paper, crochet or die-cut doily. Rather, they wanted to see stamps, doily embossing, or doily patterned paper on your project. The third challenge, Moxie Fab World-Tuesday Trigger, features this beautiful china plate with gorgeous poppies and the color combo is my trigger.

Moxie Fab World -Tuesday Trigger
Image Credit: http://wunderschoen-gemacht.blogspot.com/2012/05/poppies.html


So, how did I combine the three...


and a close up of my sparkly heart...


I'll start with the OCC challenge first because you have to explain your ingredient(s) so here goes. I used Sparking Sugar Cherry Pink crystals and they provide color {poppies} & texture. To adhere them to my die-cut heart cardboard I used a combo of meringue powder, sugar & water which is used a lot in baking to crystallize flowers for cakes or cupcakes. The meringue powder is a great substitute for egg whites and I placed a thin layer of medium gel mat to the cardboard heart. A cake palette knife helped me spread the mixture and I sealed it with Plaid Mod Podge which I applied with a nylon brush. Happy to say it worked like a charm but I was a sticky mess afterwards. :) In case it isn't obvious the inspiration I drew from OCC photo is-heart shape cookies, icing colors & sprinkles. I applied rub on doilies (yes I know, not on the list but they are not on the NO list so maybe I can squeak by, hope so) and burnished them with a bone folder. The colors are from the Moxie Fab Trigger as I previously stated and I hope I achieved the requirements for all three challenges. One thing is for sure, I completely and totally enjoyed making this project. To me, that is what crafting is all about. If you'd like to know how I made this project just click the tutorial tab at the top and view the pictures. :)

I am also entering my mixed media wall hanging in two *new to me* challenges, The Crafty Bloggers Network: Monday Challenge #1 Anything Goes & Tuesday Alchemy: Challenge #21 Anything Goes.

Have a super day & Happy 4th of July to those celebrating in the USA! We would not have the freedom we do without the sacrifice of those who have fought and died for this country. We continue to experience freedom because of the men and women in our Armed Forces and I join my husband in thanking you for your service and selfless sacrifice. May God bless you and the United States of America!!!
Hugs,
Lisa xx


Supplies:
Ink: Shabby Shutters Distress Ink (T!m Holtz/Ranger)
Accessories: salvaged cardboard; Pro Art gesso; Apple Barrel & Folk Art acrylic paints; acrylic paint dabber-watermelon, (Adirondack/Ranger); Mister Huey's Pretty Pink & Read Red Color Mists (Studio Calico); Christy Tomlinson She Art rub ons (Pink Paislee); Timeless Doilies rub ons (Kaisercraft); motifs-transferts stylises rub ons (BG); Spellbinders Cl. Heart & Cl. Scalloped Heart; doily lace edger (MS); leaf green ribbon (Ribbon Boutique); Mod Podge-Matte (Plaid); India Tree Sparkling Sugar-Cherry Pink; Wilton Meringue Powder; sugar, water, Ateco cake palette knife; ScraPerfect Best Glue Ever; eyelets & original Crop-A-Dile (We R Memory Keepers)

Tuesday, July 3, 2012

Still Crazy about U


A little announcement before I begin....I am one of two new DT members at Top Tip Tuesday! WooHoo!!! I was thrilled to receive an invitation to join the uber talented Design Team at TTT and today officially marks my debut. Thanks again to Carol and Samantha for the invite and the warm welcome by the team. I {heart} you all! Wanna know who the other new DT member is? Jennifer Scull of Just Coffee Please...& Stamps, & Ribbons, & Paper so please check her blog out, you'll be glad you did. On a sad note, Leanne {the founder of TTT} is leaving to pursue other interests and we wish her the very best. Carol & Samantha are the new co-owners and coordinators of TTT so we are all in good hands. :)

1 For the Men-Masculine
 is the theme for our current challenge at TOP TIP TUESDAY and this is my tag featuring my Top Tip-use dies as masks to create depth on your project. I loved making this tag with mix & match fave stamps for my husband. I placed three Spellbinders Sprightly Sprocket dies on my tag and sprayed Adirondack Color Wash-Espresso over everything. Carefully, I lifted the dies and wiped clean. The images that were left created depth to my background and I went over the areas with distress ink to add some *cream* to my tag. I played along with the One Stop Craft Challenge 189-Coffee & Cream where the colors are determined by your favorite flavor of coffee. Cappuccino, espresso, latte, or flavored joe-it's all good! I grew up with my dad drinking black coffee so the black ink is a nod to his fave. :) I'm also linking up with the Make It Monday # 96 linky party.

We certainly hope you can join us this time and show us your take on 1 For the Men-Masculine !


Sponsors are:
Prize: $20 Gift Voucher 


Prize: 2 Digi Images

Thanks so much for visiting and a big welcome to my newest followers! Please visit the Top Tip Tuesday site for more information and for some amazing inspiration from the design team.
Have a terrific week everyone!
Hugs,
Lisa xx

Supplies:
Ink: Old Paper & Frayed Burlap Distress Ink (T!m Holtz/Ranger), Memento Tuxedo Black
Paper: White Lg. Tag & kraft cs(PS); Choice Buttercream (TE)
Accessories: Spellbinders Donna Salazar Sprightly Sprockets dies, Labels Four & Nested Pennants; Wavy Hearts Die Set (Verve); Adirondack Color Wash-Espresso (Ranger); Loops Heart border punch (MS); buttons (Buttons Galore and More); burlap (Canvas Corp.); mocha twill (Maya Road); cream button twine (WMS); black glaze pen (Sakura)   


Sunday, July 1, 2012

Have a SMASHing Good Day!


I'm so glad you dropped by today! Recently I ordered a few SMASH books because I love the concept behind them. It's a fun, quick way to preserve all the bits and pieces you've collected through the years such as concert & movie tickets, park passes, programs, etc.. Haven't heard of smashing? Check out K & Co./EK Success's site to learn more and watch their video. SMASH books also make a great visual journal to record all your fave things!


To personalize my cover I gathered some of my favorite products and customized it to suit my taste. This is the wedding book which will record "our beginning" as a married couple through present day. I'll be sharing some pages with you soon and more SMASH covers. :)

I'm entering this in a *new to me* challenge Crafty Creations Challenge: Embellish It # 176. We were asked to use at least three different embellishments on our card/project. Lace, paper roses, pearls, and brads were all suggestions and I also added wood die-cuts and alphabet tiles to my cover.


Hope you are enjoying your weekend,
Lisa xx
Supplies:
Spellbinders Twisted Metal Tags & Dies & Flower Creations, pink paper roses (Recollections); aqua flowers (Got Flowers/Prima); wood die-cut butterfly (Studio Calico); chunky pink glitter (Doodlebug); Karlee Chipboard Alphabet & Paper Girl Sticker Market-the two of us (Girls Paperie); clear sticker (Flea Mkt.-Colorbok); aqua flowers (Got Flowers-Prima); aqua lace (Maya Road); Expressions Wood Shop-Timber, Alphabet Black rub ons, Vintage Vogue Spool Buttons & Ephemera (Pink Paislee); Bliss & Pink Pearls (Kaisercraft); Flamingo Liquid Pearls (Ranger); Swirling Lace border punch (MS)
Related Posts Plugin for WordPress, Blogger...