

{Scrapbook Layout}
Congrats to our Featured Entry and Winning Commenter of last week's linky party!
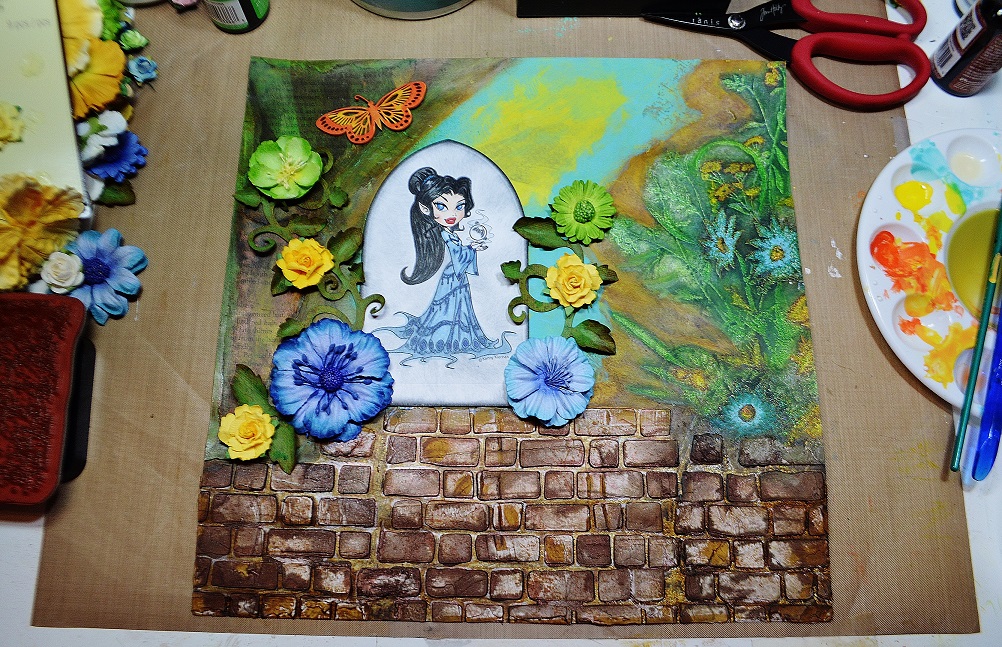
It's time for a new linky party to open at Make It Monday and our sponsor this week is the talented Kenny K. So what is the first for me? A scrapped digital image layout. I really had no idea where I was going with this image until I used SB's Arched Window One die to frame her. A light bulb went off and I set out to create a view from her window. My LO definitely evolved over the three days I worked on it. Last week was a bit rough and this project helped provide some creative therapy for me.
So who's the pretty lady in the frame? She's Kenny K's Elf Queen digital image and I absolutely love her! I colored her with Copic markers and added some detail to her hair with Faber-Castell Pitt Pens.
Here are a few ;) photos of the process and it does include another first for me...

I altered a MME glittered paper by sanding the
dp. It removed the glitter and left a faint
shimmer. I'm kind of liking this idea. :)

Then I used a silver Adirondack dabber to cover
the brown bg and polka dots. A water bottle was used
to soften some of the areas.

To build my castle wall I used a stencil - MPD
Brick Wall and modeling paste. Here's how I did
it-lay your stencil down and use an old
credit/gift card to apply the paste over the stencil.
I kept moving my stencil and repeating until I
was happy with my wall. Sorry the photo is so
dark, hopefully you can see the dimension
that modeling paste adds. Using a blow dryer
set to low I dried it then sprayed with various
ink sprays. For detail and shading I used
FC Pitt Pens in brown, dark
sepia and black shades.

To tone the silver down on the top part
of my LO I used a thin coat of white gesso
and brushed it on. I started applying
acrylic paint to create my background
and a script roller stamp came in handy
to add some detail.
Note: I used the metallic silver to create
depth under my brick wall and add a bit of shine.
The flowers on the right side were brought to life
with FC Pitt Pens. I kept adding layers
of color until I was happy with the look.
At this point my brick wall and background are
finished and I can move on to the embellishments.
Oops, almost forgot to show you how I made
the window frame.

I used my SB die as a template and drew around
the outer edge and roughly sketched the inside, fussy cut
it out and using my brick wall stencil again I sprayed
over it with Cappuccino Perfect Pearls on white cs.
I cut the bricks out individually and placed them
at interval spaces on my frame. The mortar
(modeling paste) was applied with a brush and
colored with FC Pitt Pens.

I used another SB die-On the Vine
Borderabilities (for my flowers to grow on)
which I sprayed with water to manipulate
the leaves. It was distressed with Vintage
Photo Distress Ink and a Unity stamp.
When looking to add texture with a stamp
choose one with no particular pattern
so you can use it all over. I randomly stamped
the paper flowers, background, brick wall,
and butterflies with it.

The next step was to use various sprays-shown are
Dylusions Cut Grass, Melted Chocolate and Perfect
Pearls Cappuccino-to give my vine an aged look. If the
color is too dark use water to dilute it in a mister.
Note: I always spray first on a scrap piece of paper to check
the true color of the ink before spraying it on my project.

The pretty Dusty Attic chipboard butterfly was
altered with Twinkling H20's as well as the wood
flourishes and leaves. I gave each a thin coat of gesso
first so they'd absorb the color better. Love the sparkle
of H2O's!

A pretty gemstone butterfly by Recollections.

I altered the lace with gesso and
Adirondack Butterscotch ink spray
then added a row of pearl trim.
The miniature roses were in my stash already
and to get that beautiful blue shade I used H2O's
again. The remaining paper flowers are
by Recollections.
I plan to frame this and keep it in my craft room. These are my happy colors-blue, yellow, green-and it will provide a bright spot for me and a reminder that beauty is every where.
Joining along with the following challenges:
(used a chipboard butterfly, lower right)
(I distressed my image, On the Vine die, flowers, washi tape, brick wall/window, etc.)
(used elf digital image)
(see photos above for detail on how I created my own background)
Edited: I do not have a POTW this week, my MIL passed away on Friday and my teamies were gracious to help me out with my commenting. I'll be back in a few days and will catch up with everyone then.
SPONSOR

Thank you Kenny K for supplying digi's for the DT to create with!
For prize info please check the challenge blog HERE.
For more inspiration drop by my teamie's blogs and check out their amazing creations.
(Their links are on my right sidebar)
Hugs,
Lisa

25 comments:
Lisa..Lisa..Lisa...this is just stunning...gorgeous colours and textures and love the flowers and beautiful image..just a delightful scene and I loved the step by step tutorial..that brick wall is amazing..love it.
luv CHRISSYxx
WOW WOW WOW,WHAT AN AMAZING CREATION ,SO MANY STUNNING DETAILS AND I REALLY ENJOYED THE PICS HOW YOU CREATED THE FAB SCENE..
have a great week
tracey x
Wow. Fantastic piece Lisa! I'm drooling over this wonderful texture. Fab fab fab! xxx
Gorgeous work Lisa, so much detail. Fab image and just love that lace!!!
Hope you are all coping at the moment.
Hugs,
Sandy
Oh My Word, Lisa! How awesome is this!!! And I love the step by step tut... you are a star!
hugs, Asha - Sunny Summer Crafts
WOW!!!!! So much work, what a masterpiece. It is just gorgeous. Thank you for the step by step, there is so much to look at. This is just beautiful.
Have a lovely week
Rachael :-)
Wow! Wow! Wowwwwww!!
My jaw is on the floor !!
You are so talented in many diff styles!! This is outstanding !!
Really really great textures & design elements !!
Looks so real !!
Nicole’s Craft Nook
Nicole’s March Digi BLOG Candy
So sorry to hear about your mother in law. :(
Sending hugs! Xo
WOOW! I LOVE the tutorial on the faux brick wall! I'm SOOO trying that! And the scenery you created for your image is simply magical! It all works so well. I love it!
xoxo
Rocio
Sorry to hear about your MIL...
This is a piece of art, Lisa! What a complete transformation of the DP! What a fantastic brick wall! I've been looking at this for quite some time as I'm trying to take in all the details and inspiration!
A fairytale garden, Lisa!
Thinking of you and your family...
Alison xx
Hope that you and yours are holding up ok there , Lisa .Am thinking of you .
I appreciate all the work that has gone into creating this awesome , amazing scene. It is beautiful and your photos a great addition .Very interesting post .
hugs Shirley-Anne
Wow - so much work has gone into this. The texture and details are amazing! Thanks for sharing this with us at Sentimental Sundays! x
wow!!! stunning! you have put so much work and hours into this! love the bright colours, and that modelling paste wall is amazingly done! a beautiful hidden garden! thank you for joining our Make your own background paper challenge at Sentimental Sundays !
Mirella DK
DT Sentimental Sundays (Cute and Crafty Cards by Mirella)
Everyone needs some Creative Therapy sometimes! Some more than others LOL! This is just gorgeous! So much detail, love the brick wall, the vibrant colors and the lace! A labor of love :) Thanks for playing in our neighborhood at 613 Avenue Create!
Hugs,
Kathi
Co-Owner
Lisa
Your project sent me to the enchanted dreamland. Such a vivid creation and the amount of time skills and effort you have put in this work of art is clearly visible.
Hugs
Vinita
P.S. I saw your card on MIM.
wow...you created this very good! thank you for showing this how you made it.
stunning!!
thank you for joining at lacy sunshine challenge.
wow this is a great creation. Thanks for sharing with us at Kenny K Krafty Krew xx Stacey S xxx
Great project, looks like you really enjoyed it too! Thank you for joining the Sentimental Sundays Challenge, hope to see you again very soon.
Victoria DT
So very pretty Lisa! Love the textured brick wall background and all the sweet butterflies fluttering about! The flowers are beautiful too!
LOVE the scene you created, Lisa and how you showed all of the steps! Truly a STUNNING work of art!
I'm so sorry to hear your sad news. My condolences to your family.
You put a tremendous amount of work into the project and it is truly amazing Lisa. The brick wall--good grief! And I am truly in awe of how you used the pens for the flowers. Fabulous effect. This NEEDS to be framed. Hugs!
This is a very stunning project. You really put alot of time and detail into this. It will look great hanging on a wall. Thank You for joining us over at The Robyn's Fetish Challenge blog. Good Luck
Michelle (DT)
Gorgeous, so much work! Thank you for sharing over at Lacy Sunshine, Kerry DT x
OMG.....gorgeous!!!!! I fell in love at the very first photo....INCREDIBLE job L1 :D
hugs,
L2
fabulous project - thanks so much for sharing with us at Craft my life - very good luck x
Post a Comment