Tuesday, May 10, 2016

Disney Mini Album, Part 2

{click to enlarge any photo}

Hello and Welcome!

It's a rainy day here in west Tennessee (again) and it's putting a damper on my crafty projects. Among everything else going on these days I'm planning a Dad-chelor party for my son and DIL in July. It's a baby shower for dads and I think it's a great idea. Wish those were around when we were having our children because my hubby totally missed out. Since my DIL is from South Carolina and my son is from Tennessee they decided to have "Dad" and Mom" baby showers. Her shower will be more traditional while our son is having a large scale game day culminating with a poker game where everyone buys in with a box of diapers. My how times have changed! We'll go from 3pm until so we're planning the usual cake, punch, light finger foods then we'll morph into a full blown Taco Bar with all of the fixings plus 7-Layer Taco Dip. It's going to be a blast and I'll keep you posted on all of my crafty projects for the shower. Let's just say my Silhouette Cameo will be working overtime lol.

As promised I'm back today with pages one and two of my Disney Mini Album that I created for my daughter. She's one of the biggest Disney fans ever so she was absolutely thrilled when I gave it to her this past weekend. Because there are SO many pictures I decided to break up my posts into 4 different segments. Yesterday I shared how I created my front and back covers, the spine and the binding method I used. This would probably have been easier if I was set up already to do a video but somehow that hasn't happened. Maybe I'm trying subconsciously to spare all of you my Tennessee twang. ;) 

Here we go...

This photo shows the inside front cover with the first page on the right. Now the pages are actually a series of two-fold or tri-fold pages with flaps. By adding flaps you create additional spaces for photo mats, journaling, pockets for storing mementos like maps, programs, etc.. It's how you build your pages and it's easy to do. It's rare that I sit down and take the time to sort things out in my head but I did for this album...mainly because this will be the first of several mini's for me this year. I have quite a few to make for my daughter yet, plus I'm making one for my 30th anniversary trip that my hubby and I are taking in June because this month is too busy. Then I'm making a baby book for my DIL as a keepsake to record our grandson's first year. You lose countless hours on Pinterest and You Tube looking stuff up so I decided to create my own templates.   

Here's a closer look at the first page.
There's a large hidden pocket on the left side of the page where you see the photo mat sticking out. 

Then on the right side there's a smaller pocket where you see the paper sticking out. It's actually quite deep and long so it will fit a 4 x 6 photo mat easily. Mickey is a sticker while the hand is part of a SVG file set I purchased here. I layered white cs on top of black cs and used my Silhouette Cameo to cut each one out. 

The Mickey tie belongs to another SVG file I purchased here. I placed a magnet in the tie and also on the paper base to it snaps shut and holds whatever she wants to put under it in place. On the far left side I ran a strip of Disney washi tape with the character's names on it. I spelled out her name with Disney alpha stickers and added them to the tie to personalize her album.

The tie flips open and I added a white piece of cs which I distressed with Black Soot Distress Ink for a journaling spot. The magnet is under that piece of paper and the other magnet is hidden behind the black strip separating my two papers. I'll include a link to a You Tube video by Anna Rostad that gives great info on adding magnets to your projects and where you can order them at the end of my post today. This page is actually the top page and it's wider than the others, the other two serve as a base and side flap. Technically speaking this is the left flap page which folds on top of the others and is the first one you see in each set of pages. There's a back page as well but more on that in a minute.

When you open the previous page you see a large photo mat (left) and two photo mats which fold out. The Mickey head/ears is part of  SVG file and it's glued in place so she can slip a small photo or some memento under it. 


There's a large deep pocket for hiding stuff behind the black dp, another outer pocket that I border punched with EK Success Dotted Wave. The Mickey head (at the top) and on the white pocket are adhesive stickers along with the quote-It all started with a Mouse. The resin heart is an Ice Accent by Queen and Company.

There's a long pocket and I notched it with a 1" circle punch and added White Opal Liquid Pearls around the outline. Throughout this mini I either used a 1" or 1.5" circle punch to make for easier access.

When you flip the previous page over this is the back page. There's another pocket for storing hidden stuff or extra photos. A Mickey hand will also hold a photo or memento. I'm not showing it here but there's also a deep side pocket on the left as well.

You can see the start of the next page series on the right. You can also tell from this photo that the pages lie flat which is important when making your mini album. I went over that in yesterday's post but I'll say it again-you really need to work your hinges when creating your binding because it makes a difference.

Years ago my daughter picked out Disney papers from Hot Off the Press. While I love the images the paper quality is not what I like so when I use it I always have to mat it to a stronger paper. I did that throughout the album including photo mats, etc.. The photo mat dp is from a 6 x 6 paper pack and Mickey is a sticker. I'll include the papers I used at the end of every post starting today.

When you flip the page you see that this one is a tri-fold. On the left I added a side pocket punched again with EK Success Dotted Wave border punch. Another variation of the Mickey hand makes an appearance and it's included in the same SVG file as the other hand. There's a sticker at the bottom and I die cut two film strips which I'll go back and fill in photos then mat them to hold in place. A small polaroid frame is also tucked in there and both are from the Spellbinders Shapeabilities Snapshot Die Templates.

This booklet is magnetized and it open to the right to reveal two photo mats and a pocket to slip in a journal tag. 

It also folds out to the left to reveal two more photo mats.

The Mickey punch (EK Success) hides a magnet that connects with the other magnet which I placed behind the journaling pocket. It keeps the mini photo album in place so it doesn't open on its own. 

When you open the page there's a triple page spread with interactive stuff for her to enjoy.

The bottom pocket folds down and then the top one folds out to reveal two large photo mats on both sides (other side not shown) plus a large photo mat on the base paper.

 This pocket is for tucking in extra photos or mementos. The stickers are 3D which adds some nice dimension and the colors worked perfectly with my assortment of Disney papers.

This is what it looks like when it's folded up. The outer pocket has a punched border and more stickers. The Mickey silhouette is from this SVG file and hasn't been layered. Once I cut it out I liked the look of his silhouette so I left it as is. I may cut another one out in white cs and attach to the back so she can journal on it or let her journal with a white gel pen. It's her choice! :) I punched more Mickey heads in yellow cs using the same EK Success punch. The star stickers were part of the set and I like the pop they add.

This page actually folds in and this is the back side or inside flap if you prefer. I have a pocket with a yellow photo mat and a journal spot on the other side. On the outside of the pocket I added another SVG file cut out of Mickey's pants and it is magnetized so it will stay in place. Another heart Ice Accents by Queen and Co. makes an appearance. "Gosh!" is a sticker and so is "Mousin' Around" plus the Mickey head. A strip of coordinating paper was added to the photo mat tag and polka dot ribbon from my stash finishes it.


 I wanted to show you what it looks like before I add the final white layer which she'll journal on. You place your magnets between layers of paper, the magnets will find themselves so use Anna's tip (video link below) and it will help ensure they are always in the right place.

In the upper corner I added another flip style photo book.

It also has a magnet closure to keep it closed. 


Almost there, one more page...
You can see the back page on the left and you're getting a sneak peek at the next page series. The colors changed because this section will record photos of Disney's Tomorrowland in the Magic Kingdom and it's a colorful place. 

This page features Lori Whitlock's 3D Layered Mini Album Tabs cutting file from the Silhouette Design Store. BTW, if you hurry everything is 50% off  in the online store but today only. There are four tabs in the cutting file but I only used 3 due to space restrictions. I layered Disney papers on yellow cardstock (front and back) for large photo mats or to possibly do a collage. 

This is a cardstock Mickey head from Hot Off the Press and he has a magnet which matches up with one on the bottom page. It keeps the album closed and even though we've graduated to Tomorrowland Mickey is present everywhere. :)

I love Toy Story!!! I can't tell you how many times I watched it with my son when he was little. I watched it again with my daughter as she loved the movie as well and she has several of the characters as well. With my grandson about to make his appearance in September it has me thinking about all of the toys I saved from my kids childhood. I have my son's Buzz Lightyear, his spaceship, Woody, and Woody's hat which he used to wear all the time lol. I can still see him running around the house like a banshee. :)

Here are two You Tube videos on using magnets. 

(this one goes into details like binding, covers, flaps and magnets) 


Disney papers used:
Mickey and Friends 8 x 8 - HOTP
Finished in a Flash 12 x 12 - HOTP
Busy Scrapper's Solution Disney Papers 12 x 12 - HOTP
Disney 12 x 12 Page Kit - EK Success
Mickey Poses 12 x 12 sheet - Creative Keepsakes

I'm adding the final touches to my free template PDF for building pages and flaps. It will be available tomorrow (not sure what time) and then I'll share pages 3 and 4 on Thursday and finish with pages 5 and 6 on Friday. 

Thanks for looking today and for hanging in there!
Lisa xx


Monday, May 9, 2016

Disney Mini Album, Part 1


Hello and Welcome! 
I hope mothers everywhere celebrated a wonderful Mother's Day yesterday. We made it a weekend event in my family and had the best time visiting the Tennessee Renaissance Festival and touring the magnificent Castle Gwynn in Arrington, Tennessee on Saturday.  I was treated to lunch out on Sunday and afterwards the day was filled with gifts, flowers and good times. It was really a special day but the best part was being with all of my family. When my son was in the Army it was hard to get together due to where he and his wife were stationed but now that they're civilians and living full time in Nashville (close to where his sister lives thankfully) it was cause for celebration.

Okay, let's start...
The first step in making a mini album is to decide what size album you want. I wanted my mini album to be 8 x 8 so I cut a front and back cover with my Fiskars Deluxe Bypass Trimmer  out of black chipboard. If you don't have chipboard use box material from old cereal boxes or any food product that fits the size you need. The spine piece is obviously the height of the album, 8 inches, but the width is determined by the binding system you use. I used the Hidden Hinge Binding tutorial (link at end of post) which I really like. Once it's assembled you measure the width and then you have the measurement for your chipboard spine. I'll note here that in creating the binding you are free to change the 3rd score line in the series (see below) to accommodate for a wider gusset which is helpful if you are making interactive pages. They tend to be chunky and if you use a 1/4" gusset you'll have trouble with the pages lying flat and you don't want that. That's why I like a half inch gusset. The video will make sense of this. 

For the binding you need some sturdy cardstock, scoreboard with bone folder, double stick tape and a pair of scissors.

You'll want to miter the ends of the hinges (what your page will attach to) and the side flaps. I like to cut my side flaps 1.75" but that's optional. 

This photo shows the back of your hidden hinge, you'll measure the width of the hinges (not side flaps) to determine the width you need to cut your chipboard spine. Remember the height will be the same as your front and back covers. 

Flip your binding system over and add double stick tape. Several folks recommend reinforcing your binding with Tyvek envelopes. When it came time to make mine I didn't have any on hand so I used a postal priority mail envelope (uses the same type material) which I cut open. Peel the protective strips off the double stick tape and adhere to the envelope then cut around the outside edges. It works in a pinch and since I live two weeks from anywhere it was a life saver. Plus it really does reinforce your binding so you have no issues in the future. :)

BTW, you can find Tyvek envelopes at office supply stores or on Amazon. Grab your chipboard spine (which should be cut by now because you have your width measurement) and attach the hinges.

You need to add double stick tape to the outer edges of your front and back inside covers. You'll notice at the top I bring the tape so far then put a separate piece. It makes it easy to peel the protective cover off and attach the side flap. I do this at the top and bottom on both covers. Be sure to line up your spine piece with the covers and then attach your side flaps to the front and back cover. Note: I place the protective cover back over the tape until I'm ready to decorate the inside.

Hinge is lined up and attached now to add the side flaps.

Flaps are attached and now it's time to decorate the inside covers.

I added a comic dp which my daughter loves, black cardstock and another Disney dp for pockets for tucking stuff inside. The hands are attached at the side only so she can tuck something behind them if she wants. I love the hands and they are a SVG file that I found on Etsy. You may notice they look a lot like the Disney Cricut cartridge images but since I have a Silhouette Cameo and I don't want/need another cutting machine I started researching how/where I could get these. I'm happy to say that I found a great file which included these hands plus more images at SVGFILEDESIGNS for $2.50. Gotta love Etsy! :-)

You can see the double stick tape which I added to both sides of my hinges. I'm not going over a step by step of how to put the binding together bc you'll see the construction process when you watch the binding tutorial links included. You really need to work your binding after it's assembled, folding the score lines (one way then the other) several times. This aids in helping your pages lie flat in your album. You won't peel the tape off your hinges until all of your pages are finished and they're ready to add to your mini album. The mitered edges help the pages slip on easily and the end of the hinges don't show giving it a professional look.

I know several people add paper to the front covers, then crease between the spine and covers and wrap the outer covers. Well, what can happen is that if you do not use a quality weight paper then your corners can tear and that's no fun. I find this method works best for me and leaves me with a very flexible spine. Here's what I do to the front outer covers.

I cut a strip of black cardstock (same as I created my binding system with) to cover the spine and add side flaps to the front and back covers. I flipped it over and placed my bone folder in the crease between my spine and cover then gently pulled up each side while running my bone folder along the crease line. I did this to both sides and like I said I end up with a spine that has the necessary give without tearing the cardstock. No, you don't see any lines lol.

My front cover (right), spine and back cover (left). 

I wanted to round the edges of my covers so I used a We R Memory Keepers 1/2 " corner rounder. I added white and red cardstock to the black chipboard and a Disney dp which you also saw on the inside cover pockets. I picked up this Mickey postcard on my last visit to Walt Disney World and thought he'd look great on the cover. 

To the spine I added white cs and used a pack of  Disney adhesive stickers. You can see the back cover and again I layered white and red cs then a Disney autograph dp.


Here is a view showing her mini closed with all of the pages attached to the hinges. You can see that it's full but still closes nicely without the aid of a closure. Most likely I'll add one just for decorative purposes but I'm still on the fence about that. ;)


Here are links to binding tutorials on You Tube.  

Hidden Hinge Binding Tutorial by SuperHappyScrapper  
(one I used)


by Anne (xannero 1) of Anne's Paper Creations


If you like the idea of wrapping your covers then you might find this tutorial by Ginger Ropp of My Sister's Scrapper helpful. You'll also learn how to create easy waterfall pages as well. :-)


I'll be back tomorrow with the first two pages of my mini album plus I'm sharing tips and tricks as well as a free template (from me to you) to use for creating your own pages.

Thanks for the visit today!
Lisa xx
Friday, May 6, 2016

A Mini in a Mini


Today I'm sharing a mini album which I'll place inside a mini album. Regina, owner/designer of The Cutting Cafe, asked the DT to create projects featuring albums from The Cafe for the design post tomorrow. With my daughter graduating from college next year I had the idea to create several mini albums that remind her of the wonderful vacations we've enjoyed as a family. That way she'll have her own set of photos to enjoy and a few keepsakes from mom. :) 


This mini is going to be used as a trip diary to record her thoughts and it will tuck inside the inner pocket of the front cover. I love the fun shapes of the - Mixed Shapes Album Book - at The Cutting Cafe so that's the cutting file I used. To create a sturdy base I used Silhouette chipboard and cut dp's from various Disney papers to layer on top. Two holes were punched so I could run a strip of polka dot ribbon through them to tie in a bow and it serves as easy binding that can be easily untied for her to decorate and journal. 

The back pages are white cardstock and I may go back and add lines to imitate notebook paper. 


Here's her Disney Mini Album which I'll share in detail next week on my blog. I created my own templates for everything and I'm pretty proud of myself lol. After I double check all of my measurements I'll be adding a page on my blog where you can access the templates for free. Here are a few sneak peeks of her first, yes first, Disney Mini Album.

 
The front cover features a Mickey Mouse postcard I bought at Walt Disney World on our last trip there. This is a chunky album so there will probably be a closure mechanism which I haven't added yet.  

This photo shows the spine and back cover. I went rogue on the way I attached my covers to the spine and I'll share more in detail about that next week. I love that the spine has the necessary give it needs after adding the chunky pages. :)

You can see how thick it is and I still have one more set of tri-fold pages to add. :) 

~ ~ ~ ~ ~ ~ ~ ~ 

I love her mini so much I'm going to make one for myself so while I was cutting pages for her trip diary I made one for me as well. 

The binding is the same and I added a punched Mickey head to the first page like I did on hers. Only difference is a slight variation of the dp's I used. The Mixed Shapes Album Book is an awesome file and while it's cute as a mini you can also turn the pages and use them to create pockets. ;)


Okay, that's all for me today. I hope you'll check back next week when I share all of the pages, details and fun tips for my daughter's Disney Mini Album. Have a terrific weekend everyone and a very Happy Mother's Day to all of the moms out there. I'm off to spend the weekend with my kids and I can't wait. :-) 

Hugs,
Lisa


Monday, May 2, 2016

April Incoming Pocket Letters and a Bonus


Happy Monday everyone!

Hope your week is off to a great start, ours is rainy here and has been off and on the past 3 days. My hubby managed to continue work on the deck in between the rain while also building the fence sections in his workshop when the weather wasn't cooperating. We were due to have the holes dug for the support posts but not sure that's going to come off today or not. ;)

I'm back to share the incoming pocket letters I received from my pals at Pocket Letter Pals plus the pl I was surprised with from a dear friend of mine. I should note there are two pl's that aren't making their debut in this post because they haven't arrived yet. I sent two of my April pl's out early due to my crazy schedule so they wouldn't be late and their pl's should arrive some time this week. I'll share them with the incoming pl's I receive in May. Okay, first up is a pocket letter I received that was a private group swap  at Pocket Letter Pals and my partner was Yamil (also known as ydoom30) from Puerto Rico. She saw on my profile that I like Graphic 45 and sent this gorgeous Creator' Choice pl to me. Now I've been on the fence about this collection because I'm more of a mountain type girl than beach however this is one collection I have to have lol. Since I decided to take close ups of the fabulous images I'll be sharing close ups of all of the incoming pl's today. 

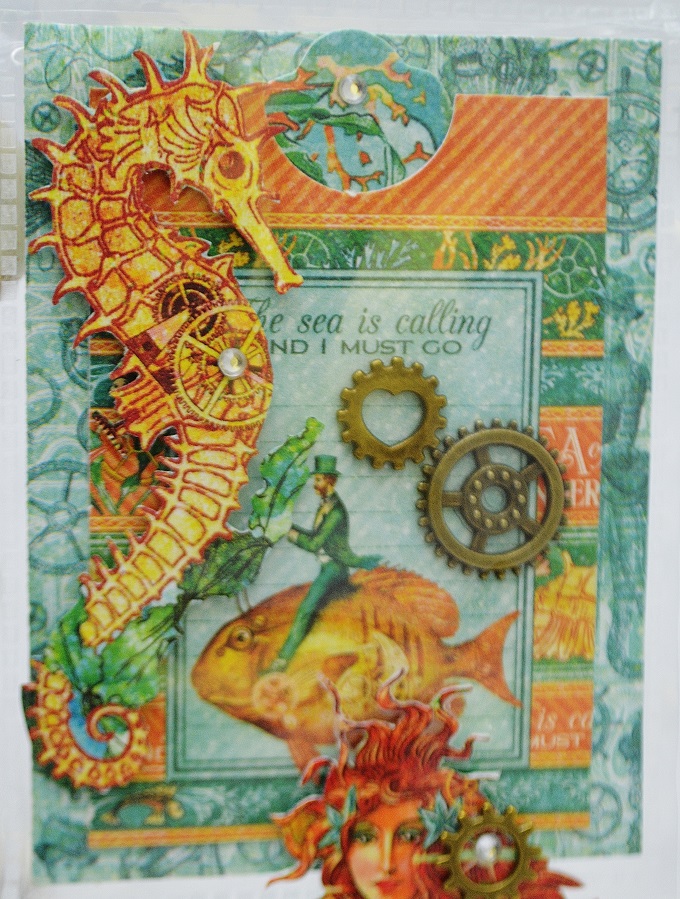
The colors are simply stunning and she added metal gears and cogs to several of the pockets to enhance the images and it adds a steampunk feel  which I happen to love as well. :) More on the spine goodies in a minute...

You can see more gears on each of the two images and it's the color of this mermaid's hair that made me decide I have to have this collection. My DIL has red hair and she loves the beach so guess what I'll be making her birthday card with this September. ;)

I adore seahorses...I mean after all it's the male that becomes pregnant instead of the female. How cool is that! Check out the guy riding the fish, there's so much detail to this paper line. It's amazing! I also adore the pocket, on the pocket, she created and the gears. Haven't seen the one with the heart in the middle before. :) 

Love her strategically placed gear and the details on the paper are fabulous. This is a must have collection!

Now here is something really cool....Yamil placed sand from a local beach in Puerto Rico in the glass bottle and attached it to the spine along with stamps and ephemera from the collection. What an awesome souvenir, thank you so much Yamil. The black flecks in the sand are awesome and I can't imagine what that beach looks like. :)
I {heart} your pl so much!!!

~ ~ ~ ~ ~ ~ ~ ~ 

Next up is a pl I received from my pal, Donna, in Indiana. It was a personal swap with us deciding on black and white with a pop of color. I love the trio of colors (black, white and khaki) she used on my pl and I actually have the same colors in my bedroom. :) 


I love each pocket Donna and to think you were worried about swapping. You nailed it lady!

I decided to do her close up as a collage so you can soak in the all of the details. The owls on the middle pocket are adorable and love the texture of the embossed paper. This is a fabulous pl Donna, thanks so much!

` ~ ~ ~ ~ ~ ~ ~ 

The third and final pl from a pal at PLP's is by Michelle (known as Mimi) from Rhode Island. Both of us like the vintage / shabby chic style so that's what we exchanged. 

Love the soft colors mixed with gray!


How sweet is this trio of vintage suitcases!

I am, my grandson is on the way. :)

This bloom is gorgeous and I can't wait to use it on a crafty project. 

Thanks Michelle for my wonderful shabby chic pocket letter. I love it and I'm looking forward to swapping again!

~ ~ ~ ~ ~ ~ ~ ~ 

Now for the BONUS pocket letter I received from a dear friend, Lisa Minckler. This lady is an extraordinary crafter and I've been fortunate to create along side her on several design teams. In fact, it was for a current design team project that she made this pl. It was such a treat to receive and I'm absolutely thrilled that I get to look at it everyday. :)

It celebrates Mother's Day which is literally around the corner (can you believe that?). Honestly I don't know where April went...or March...or February...she doesn't either lol. Did I mention this is her very first pocket letter...crazy talented isn't she!

She has combined two of my favorite things - silhouettes and mason jars - together. :) Lisa used several cutting files from The Cutting Cafe as well as clear cardstock from The Cutting Cafe Shop. She has links to those products in her blog post in case you're interested. 

To see more close ups of her fabulous pocket letter please visit her wonderful blog You Made Me Ink.  I love my pocket letter and crafty goodies L2! Thank You!!!


Okay, that's a wrap. I'll be back later in the week with a mini album inside a mini album. Be sure to check back on Friday and in the meantime I hope you have a great week. 
Hugs,
Lisa 


Related Posts Plugin for WordPress, Blogger...