Showing posts with label Disney Mini Album. Show all posts

Friday, May 20, 2016

Disney Mini Album, Part 5


Happy Friday everyone!!!

I'm back today with my last installment of the Disney 8 x 8 Mini Album that I created for my daughter. Every day last week I shared posts on how I created this mini plus a tutorial which included templates for you to use. You can see that post here (there's a link in it which takes you to a hidden page) and it's been updated to include a tutorial on page construction. I have photos of page 6 to share so let's get started.

I used black cardstock as the base for all of my pages. This is my tri-fold page but I didn't stop there. 


To the left and right pages I added small flaps.
~page 6 opened~

A close up of the large waterfall photo mats I created.

I didn't stop with the addition of side pages nor flaps...I went upward and outward and added 3 large accordion style photo mats...if you flip it down it reveals...

3 more photo mats

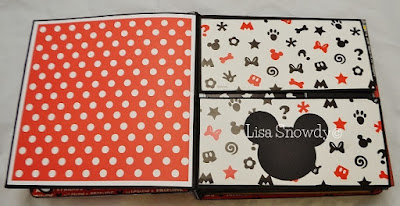
I wanted this page set to hold several photos. As you can see from this peek there are waterfall photo albums on both outer flaps plus large waterfalls on the side pages. There's a fold down flap with a pocket for storing tickets, etc.. I cut hands from a SVG file (link below) but this time I reversed the layers and used black on top, they'll hold a large photo in place. I layered Mickey and Minnie silhouette heads together and tucked it into the deep pocket. She can journal on one side and place a photo on the other side. 

-Right side pg and pocket flap-
These Disney elements - Mickey's pants, tie and head w/ears - are from SVG files that I purchased on Etsy here. I cut them with my Silhouette Cameo and layered the elements. There's a magnet in the tie that matches up with one on the base layer of the waterfall album that keeps everything in place. As you'll notice I kept everything on this page spread symmetrical.

-Left pocket flap-
Everything tucks neatly into the pocket.

The back side of my photo mat tag and cut outs.

Again I used magnets to close the waterfall album and I added 3D Disney stickers to each tie. This one features Mickey's head while the right side tie features his pants. The ties are in a different SVG file which you can find on Etsy here.

 
I created 3 large photo mats that graduate in size. On the 1/2" strips you can add another dp to cover which I plan to do as a finishing touch.

I love these Disney papers and to add some visual interest I used the We R Memory Keepers Stub corner punch on the bottom corners on the front side and the upper corners on the reverse side.

When you close the page you can see the back side of the right page, there's a deep pocket for storing maps, daily itinerary, etc. I used another cut out from the SVG file on the bottom and added a flip style album at the top.  


On the outer flap, on both sides, I created matching waterfall albums with 8 double sided photo mats. Another photo can be added to the base paper which has a 3.5" x 5" photo mat giving her a total of 17 photos per album.  

-opened-

To close my waterfall album I added a magnet to a double sided Mickey head (EK Success punch) and glued it to polka dot ribbon. The magnet pairs up with a hidden magnet under the first photo mat and I used Basic Grey's large magnets. They're strong and will keep the album closed. 

This photo shows the back page (on left) and the front side of page 6 on the right. Both feature more photo opportunities, a flip style album on the left with a deep pocket then on the right there are 3 photo mats for Tomorrowland pictures.


 That's a wrap for my Disney Mini Album, thanks for looking!

Have a great weekend everyone, wherever you are.
Hugs,
Lisa


Friday, May 13, 2016

Disney Mini Album, Part 4


Hello!

I'm back with the fourth installment of my Disney Mini Album. Each day I've been breaking my posts into sections where I share parts-binding/covers, interactive pages, tutorial and templates-of the mini I created for my Disney loving daughter. I received an email requesting that I show how I attached the pages to the flaps so there will be a photo tutorial with instructions for page 6 on my blog Monday. So today it's all about page 5, let's get started. :)

There's a pocket filled with Mickey SVG file cut outs that she can personally add where she wants. 

They can be used for photo mats or to journal on. The Walt Disney World is a cardstock title which she can add to any page/pocket. To the right of the pocket is a Disney Mickey 3D sticker.

At the top I added more stickers spelling out Mickey Mouse. Love the layered look of these alpha's!

There's a hidden pocket on the right side of the page.

The large photo mat does double duty, on this side you can slip a photo under Mickey's hand and tuck in maps, daily activity page, etc. inside the pocket. There's a row of washi tape along the left side and a border from the paper collection-Busy Scrapper's 12 x 12 by HOTP-at the bottom.

On the back side is a large photo mat.

When you flip the page this is the next page you see. I added a clear Minnie Mouse stick along with her name. The pocket was created from ephemera from the paper collection and another clear sticker-Certified Mickey-was added also.

It opens to a tri-fold spread with flip style photo albums, pockets, large photo mats and hidden journal spots.

This cute Mickey paper had to make an appearance and I used it to cover the outside of the matching flip style photo albums on each side. There's a row of washi tape at the bottom of each opposite page.

There's a magnet closure to ensure the album stays shut.

On the base page (center) there's a flip down photo mat which stays in place with a magnet. 

There's a spot for a large photo on it and it flips open to reveal more mats inside the pocket.

Stickers were added to embellish each side.

I used a MS corner punch on the four corners, need to straighten out the bottom left one again. :(

When you flip the page this is the back side of page 5. It has a large waterfall album, 4 x 6 on it. There's a free template available by clicking the link in this post here. Do you see the white tape strip? That's where page 6 goes and it will be live on my blog Monday with a complete step by step tutorial of how to assemble the pages and add interactive flaps/pockets. 

It has a magnetic closure and I addressed how I made the wrap to close it in yesterday's post. There's a smaller version in that post also along with a template for it as well. The Mickey button is a sticker.

It flips up and down and there are twelve 4 x 6 photo mats.


Okay, that's all for me today. I'll be back on Monday with my final page and until then I hope everyone enjoys a wonderful weekend full of sunshine.

Thanks for looking!
Lisa xx


Wednesday, May 11, 2016

Mini Album Page Templates for 8 x 8 Album


Hello again and welcome!

We are in the middle of my Disney Mini Album reveal and as promised I am sharing the templates I created to make interactive pages. It's not hard once you determine the size album you want and for this mini I decided to create it 8" x 8". In Part 1 the album covers, spine and binding were covered and you can find that post here. Part 2 covered interactive pages 1 and 2 and that post is here. I'll be sharing pages 3 and 4 tomorrow and will wrap with pages 5 and 6 on Friday. Once those posts go live I'll edit this post and include those links as well. Edit: Page 5 here and Page 6 here. Also, I have updated my tutorial with a photo tutorial showing how I assemble and build my pages.

If you have any questions you can email me at adventuresinpaperland@gmail.com but please be advised that currently I am extremely busy and I check my email 1 - 2 times a week so it may be a few days before I respond. It will help tremendously if you put Mini Album Page Templates in the subject line as well.  All I ask is that you refer others to this post where they can download their own copy. Please do not copy/share to use as your own tutorial. 
Thanks in advance for your cooperation! 

Click here to be taken to a hidden page to retrieve your templates, tips and I also included waterfall templates I used in making my mini album.

Enjoy!
Lisa xx

Tuesday, May 10, 2016

Disney Mini Album, Part 2

{click to enlarge any photo}

Hello and Welcome!

It's a rainy day here in west Tennessee (again) and it's putting a damper on my crafty projects. Among everything else going on these days I'm planning a Dad-chelor party for my son and DIL in July. It's a baby shower for dads and I think it's a great idea. Wish those were around when we were having our children because my hubby totally missed out. Since my DIL is from South Carolina and my son is from Tennessee they decided to have "Dad" and Mom" baby showers. Her shower will be more traditional while our son is having a large scale game day culminating with a poker game where everyone buys in with a box of diapers. My how times have changed! We'll go from 3pm until so we're planning the usual cake, punch, light finger foods then we'll morph into a full blown Taco Bar with all of the fixings plus 7-Layer Taco Dip. It's going to be a blast and I'll keep you posted on all of my crafty projects for the shower. Let's just say my Silhouette Cameo will be working overtime lol.

As promised I'm back today with pages one and two of my Disney Mini Album that I created for my daughter. She's one of the biggest Disney fans ever so she was absolutely thrilled when I gave it to her this past weekend. Because there are SO many pictures I decided to break up my posts into 4 different segments. Yesterday I shared how I created my front and back covers, the spine and the binding method I used. This would probably have been easier if I was set up already to do a video but somehow that hasn't happened. Maybe I'm trying subconsciously to spare all of you my Tennessee twang. ;) 

Here we go...

This photo shows the inside front cover with the first page on the right. Now the pages are actually a series of two-fold or tri-fold pages with flaps. By adding flaps you create additional spaces for photo mats, journaling, pockets for storing mementos like maps, programs, etc.. It's how you build your pages and it's easy to do. It's rare that I sit down and take the time to sort things out in my head but I did for this album...mainly because this will be the first of several mini's for me this year. I have quite a few to make for my daughter yet, plus I'm making one for my 30th anniversary trip that my hubby and I are taking in June because this month is too busy. Then I'm making a baby book for my DIL as a keepsake to record our grandson's first year. You lose countless hours on Pinterest and You Tube looking stuff up so I decided to create my own templates.   

Here's a closer look at the first page.
There's a large hidden pocket on the left side of the page where you see the photo mat sticking out. 

Then on the right side there's a smaller pocket where you see the paper sticking out. It's actually quite deep and long so it will fit a 4 x 6 photo mat easily. Mickey is a sticker while the hand is part of a SVG file set I purchased here. I layered white cs on top of black cs and used my Silhouette Cameo to cut each one out. 

The Mickey tie belongs to another SVG file I purchased here. I placed a magnet in the tie and also on the paper base to it snaps shut and holds whatever she wants to put under it in place. On the far left side I ran a strip of Disney washi tape with the character's names on it. I spelled out her name with Disney alpha stickers and added them to the tie to personalize her album.

The tie flips open and I added a white piece of cs which I distressed with Black Soot Distress Ink for a journaling spot. The magnet is under that piece of paper and the other magnet is hidden behind the black strip separating my two papers. I'll include a link to a You Tube video by Anna Rostad that gives great info on adding magnets to your projects and where you can order them at the end of my post today. This page is actually the top page and it's wider than the others, the other two serve as a base and side flap. Technically speaking this is the left flap page which folds on top of the others and is the first one you see in each set of pages. There's a back page as well but more on that in a minute.

When you open the previous page you see a large photo mat (left) and two photo mats which fold out. The Mickey head/ears is part of  SVG file and it's glued in place so she can slip a small photo or some memento under it. 


There's a large deep pocket for hiding stuff behind the black dp, another outer pocket that I border punched with EK Success Dotted Wave. The Mickey head (at the top) and on the white pocket are adhesive stickers along with the quote-It all started with a Mouse. The resin heart is an Ice Accent by Queen and Company.

There's a long pocket and I notched it with a 1" circle punch and added White Opal Liquid Pearls around the outline. Throughout this mini I either used a 1" or 1.5" circle punch to make for easier access.

When you flip the previous page over this is the back page. There's another pocket for storing hidden stuff or extra photos. A Mickey hand will also hold a photo or memento. I'm not showing it here but there's also a deep side pocket on the left as well.

You can see the start of the next page series on the right. You can also tell from this photo that the pages lie flat which is important when making your mini album. I went over that in yesterday's post but I'll say it again-you really need to work your hinges when creating your binding because it makes a difference.

Years ago my daughter picked out Disney papers from Hot Off the Press. While I love the images the paper quality is not what I like so when I use it I always have to mat it to a stronger paper. I did that throughout the album including photo mats, etc.. The photo mat dp is from a 6 x 6 paper pack and Mickey is a sticker. I'll include the papers I used at the end of every post starting today.

When you flip the page you see that this one is a tri-fold. On the left I added a side pocket punched again with EK Success Dotted Wave border punch. Another variation of the Mickey hand makes an appearance and it's included in the same SVG file as the other hand. There's a sticker at the bottom and I die cut two film strips which I'll go back and fill in photos then mat them to hold in place. A small polaroid frame is also tucked in there and both are from the Spellbinders Shapeabilities Snapshot Die Templates.

This booklet is magnetized and it open to the right to reveal two photo mats and a pocket to slip in a journal tag. 

It also folds out to the left to reveal two more photo mats.

The Mickey punch (EK Success) hides a magnet that connects with the other magnet which I placed behind the journaling pocket. It keeps the mini photo album in place so it doesn't open on its own. 

When you open the page there's a triple page spread with interactive stuff for her to enjoy.

The bottom pocket folds down and then the top one folds out to reveal two large photo mats on both sides (other side not shown) plus a large photo mat on the base paper.

 This pocket is for tucking in extra photos or mementos. The stickers are 3D which adds some nice dimension and the colors worked perfectly with my assortment of Disney papers.

This is what it looks like when it's folded up. The outer pocket has a punched border and more stickers. The Mickey silhouette is from this SVG file and hasn't been layered. Once I cut it out I liked the look of his silhouette so I left it as is. I may cut another one out in white cs and attach to the back so she can journal on it or let her journal with a white gel pen. It's her choice! :) I punched more Mickey heads in yellow cs using the same EK Success punch. The star stickers were part of the set and I like the pop they add.

This page actually folds in and this is the back side or inside flap if you prefer. I have a pocket with a yellow photo mat and a journal spot on the other side. On the outside of the pocket I added another SVG file cut out of Mickey's pants and it is magnetized so it will stay in place. Another heart Ice Accents by Queen and Co. makes an appearance. "Gosh!" is a sticker and so is "Mousin' Around" plus the Mickey head. A strip of coordinating paper was added to the photo mat tag and polka dot ribbon from my stash finishes it.


 I wanted to show you what it looks like before I add the final white layer which she'll journal on. You place your magnets between layers of paper, the magnets will find themselves so use Anna's tip (video link below) and it will help ensure they are always in the right place.

In the upper corner I added another flip style photo book.

It also has a magnet closure to keep it closed. 


Almost there, one more page...
You can see the back page on the left and you're getting a sneak peek at the next page series. The colors changed because this section will record photos of Disney's Tomorrowland in the Magic Kingdom and it's a colorful place. 

This page features Lori Whitlock's 3D Layered Mini Album Tabs cutting file from the Silhouette Design Store. BTW, if you hurry everything is 50% off  in the online store but today only. There are four tabs in the cutting file but I only used 3 due to space restrictions. I layered Disney papers on yellow cardstock (front and back) for large photo mats or to possibly do a collage. 

This is a cardstock Mickey head from Hot Off the Press and he has a magnet which matches up with one on the bottom page. It keeps the album closed and even though we've graduated to Tomorrowland Mickey is present everywhere. :)

I love Toy Story!!! I can't tell you how many times I watched it with my son when he was little. I watched it again with my daughter as she loved the movie as well and she has several of the characters as well. With my grandson about to make his appearance in September it has me thinking about all of the toys I saved from my kids childhood. I have my son's Buzz Lightyear, his spaceship, Woody, and Woody's hat which he used to wear all the time lol. I can still see him running around the house like a banshee. :)

Here are two You Tube videos on using magnets. 

(this one goes into details like binding, covers, flaps and magnets) 


Disney papers used:
Mickey and Friends 8 x 8 - HOTP
Finished in a Flash 12 x 12 - HOTP
Busy Scrapper's Solution Disney Papers 12 x 12 - HOTP
Disney 12 x 12 Page Kit - EK Success
Mickey Poses 12 x 12 sheet - Creative Keepsakes

I'm adding the final touches to my free template PDF for building pages and flaps. It will be available tomorrow (not sure what time) and then I'll share pages 3 and 4 on Thursday and finish with pages 5 and 6 on Friday. 

Thanks for looking today and for hanging in there!
Lisa xx


Related Posts Plugin for WordPress, Blogger...