Hello and Welcome!
I hope mothers everywhere celebrated a wonderful Mother's Day yesterday. We made it a weekend event in my family and had the best time visiting the Tennessee Renaissance Festival and touring the magnificent Castle Gwynn in Arrington, Tennessee on Saturday. I was treated to lunch out on Sunday and afterwards the day was filled with gifts, flowers and good times. It was really a special day but the best part was being with all of my family. When my son was in the Army it was hard to get together due to where he and his wife were stationed but now that they're civilians and living full time in Nashville (close to where his sister lives thankfully) it was cause for celebration.
Okay, let's start...
The first step in making a mini album is to decide what size album you want. I wanted my mini album to be 8 x 8 so I cut a front and back cover with my Fiskars Deluxe Bypass Trimmer out of black chipboard. If you don't have chipboard use box material from old cereal boxes or any food product that fits the size you need. The spine piece is obviously the height of the album, 8 inches, but the width is determined by the binding system you use. I used the Hidden Hinge Binding tutorial (link at end of post) which I really like. Once it's assembled you measure the width and then you have the measurement for your chipboard spine. I'll note here that in creating the binding you are free to change the 3rd score line in the series (see below) to accommodate for a wider gusset which is helpful if you are making interactive pages. They tend to be chunky and if you use a 1/4" gusset you'll have trouble with the pages lying flat and you don't want that. That's why I like a half inch gusset. The video will make sense of this.
For the binding you need some sturdy cardstock, scoreboard with bone folder, double stick tape and a pair of scissors.
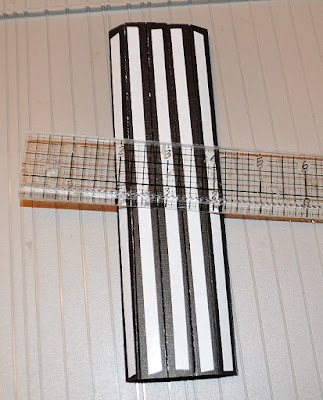
You'll want to miter the ends of the hinges (what your page will attach to) and the side flaps. I like to cut my side flaps 1.75" but that's optional.
This photo shows the back of your hidden hinge, you'll measure the width of the hinges (not side flaps) to determine the width you need to cut your chipboard spine. Remember the height will be the same as your front and back covers.
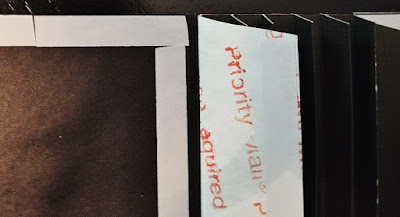
Flip your binding system over and add double stick tape. Several folks recommend reinforcing your binding with Tyvek envelopes. When it came time to make mine I didn't have any on hand so I used a postal priority mail envelope (uses the same type material) which I cut open. Peel the protective strips off the double stick tape and adhere to the envelope then cut around the outside edges. It works in a pinch and since I live two weeks from anywhere it was a life saver. Plus it really does reinforce your binding so you have no issues in the future. :)
BTW, you can find Tyvek envelopes at office supply stores or on Amazon. Grab your chipboard spine (which should be cut by now because you have your width measurement) and attach the hinges.
You need to add double stick tape to the outer edges of your front and back inside covers. You'll notice at the top I bring the tape so far then put a separate piece. It makes it easy to peel the protective cover off and attach the side flap. I do this at the top and bottom on both covers. Be sure to line up your spine piece with the covers and then attach your side flaps to the front and back cover. Note: I place the protective cover back over the tape until I'm ready to decorate the inside.
Hinge is lined up and attached now to add the side flaps.
Flaps are attached and now it's time to decorate the inside covers.
I added a comic dp which my daughter loves, black cardstock and another Disney dp for pockets for tucking stuff inside. The hands are attached at the side only so she can tuck something behind them if she wants. I love the hands and they are a SVG file that I found on Etsy. You may notice they look a lot like the Disney Cricut cartridge images but since I have a Silhouette Cameo and I don't want/need another cutting machine I started researching how/where I could get these. I'm happy to say that I found a great file which included these hands plus more images at SVGFILEDESIGNS for $2.50. Gotta love Etsy! :-)
You can see the double stick tape which I added to both sides of my hinges. I'm not going over a step by step of how to put the binding together bc you'll see the construction process when you watch the binding tutorial links included. You really need to work your binding after it's assembled, folding the score lines (one way then the other) several times. This aids in helping your pages lie flat in your album. You won't peel the tape off your hinges until all of your pages are finished and they're ready to add to your mini album. The mitered edges help the pages slip on easily and the end of the hinges don't show giving it a professional look.
I know several people add paper to the front covers, then crease between the spine and covers and wrap the outer covers. Well, what can happen is that if you do not use a quality weight paper then your corners can tear and that's no fun. I find this method works best for me and leaves me with a very flexible spine. Here's what I do to the front outer covers.
I cut a strip of black cardstock (same as I created my binding system with) to cover the spine and add side flaps to the front and back covers. I flipped it over and placed my bone folder in the crease between my spine and cover then gently pulled up each side while running my bone folder along the crease line. I did this to both sides and like I said I end up with a spine that has the necessary give without tearing the cardstock. No, you don't see any lines lol.
My front cover (right), spine and back cover (left).
I wanted to round the edges of my covers so I used a We R Memory Keepers 1/2 " corner rounder. I added white and red cardstock to the black chipboard and a Disney dp which you also saw on the inside cover pockets. I picked up this Mickey postcard on my last visit to Walt Disney World and thought he'd look great on the cover.
To the spine I added white cs and used a pack of Disney adhesive stickers. You can see the back cover and again I layered white and red cs then a Disney autograph dp.
Here is a view showing her mini closed with all of the pages attached to the hinges. You can see that it's full but still closes nicely without the aid of a closure. Most likely I'll add one just for decorative purposes but I'm still on the fence about that. ;)
Here are links to binding tutorials on You Tube.
Hidden Hinge Binding Tutorial by SuperHappyScrapper
(one I used)
Laura Denison's Stack the Deck Binding Tutorial
by Anne (xannero 1) of Anne's Paper Creations
If you like the idea of wrapping your covers then you might find this tutorial by Ginger Ropp of My Sister's Scrapper helpful. You'll also learn how to create easy waterfall pages as well. :-)
I'll be back tomorrow with the first two pages of my mini album plus I'm sharing tips and tricks as well as a free template (from me to you) to use for creating your own pages.
Thanks for the visit today!
Lisa xx


2 comments:
okay SAVING THIS PAGE.....thank you my friend...im currently working on the 2017 planner right now and this might just come in handy...
Absolutely adorable! TFS
Have a wonderful day,
Migdalia
Crafting With Creative M
Post a Comment